


The RX3 electrical system is both advanced and straightforward. This tutorial explains the system’s main components, their locations, their functions, and some suggestions in the unlikely event you’ll ever need to troubleshoot the system. I’ll throw in just a bit about some of the cool features we’ve included on the CSC RX3, too.
The CSC RX3 has an 18-pole, 300-watt stator that puts out plenty of power, which we specified when we defined our bike’s configuration with Zongshen. To put the 300-watts in perspective, the mighty KLR (a motorcycle I own and love, and a benchmark motorcycle in the adventure touring niche) only has a 187-watt stator. The reason this is important is that adventure riders frequently hang a lot of accessories on their bikes (heated vests, driving lights, heated grips, etc.), and on bikes with smaller electrical outputs, you can run the battery down while riding with all the accessories powered up. The RX3 needs 160 watts for normal operation, which means that you have another 140 watts for your accessories.
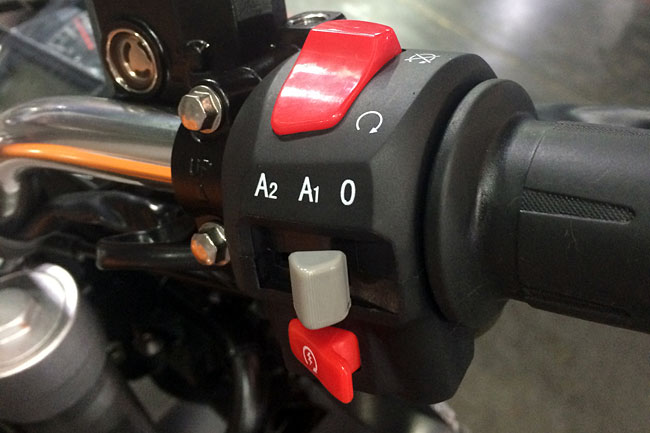
Two other cool features on the RX3 are the built-in accessory outlets already wired into the main harness, and the accessories switch located on the right handlebar. On the non-US bikes, that switch was used for the headlights and parking lights. In the US, the headlights have to be on all the time, so the switch isn’t necessary. Steve had a great idea, though, and Zongshen made it happen…we’re using that switch to control the accessories outlets.
 If the built-in accessories outlets are not enough for you, you can buy our dash-mounted accessories outlet kit, which provides USB and cigarette-lighter-type 12V ports.
We specified an RX3 main harness already wired to accept the dash-mounted accessories kit for the CSC RX3 (we thought you might not appreciate having to pull out your old harness, and then buy and install a new harness). We ate the cost increase for the dash-outlet-compatible harness (you’re getting that for free).
Alright, enough for the commercial. Let’s get on to the main attraction, and that’s the CSC RX3 electrical system and its components. Most of the electrical doo-dads on this bike are located under the seats. The horn, the lights, and the turn signals are pretty obvious, so we’re not going into any detail on those items. We’ll focus instead on the other items.
To get to the electrical components, remove the seats (the rear seat pops off with the ignition key when you insert and turn it in the key receptacle on the left side of the bike). The front seat requires removing two bolts on the back of the seat. You can also remove the body panels under the seat to get to the battery and some of the plugs a little better.
Once you have the seats off, you’ll notice that there’s a plastic cover under the rear seat secured by four bolts. Remove those and you’ll have access to most of the electrical system components.
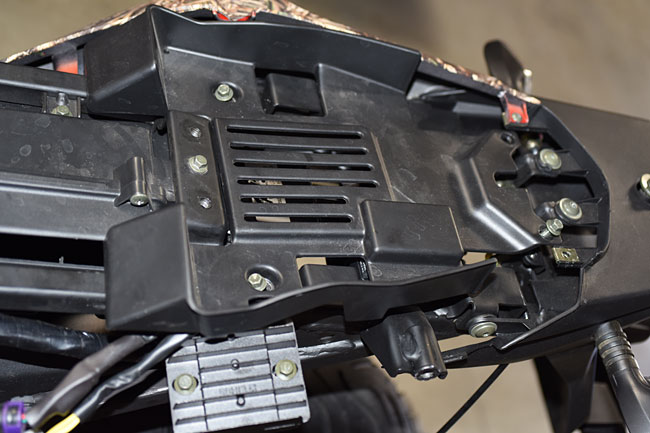
Here’s what it looks like…
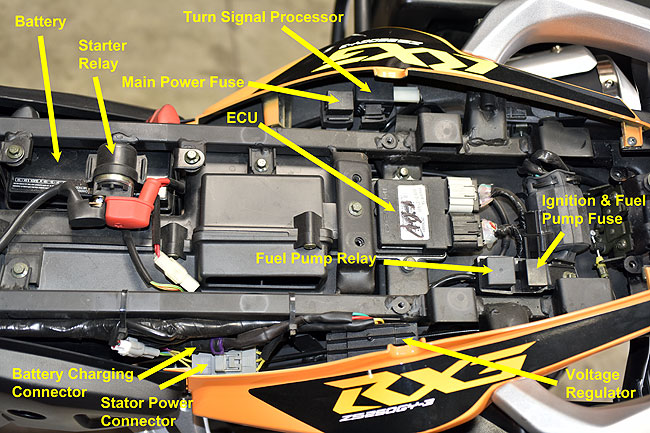
So, let’s talk about some of the system’s main components…
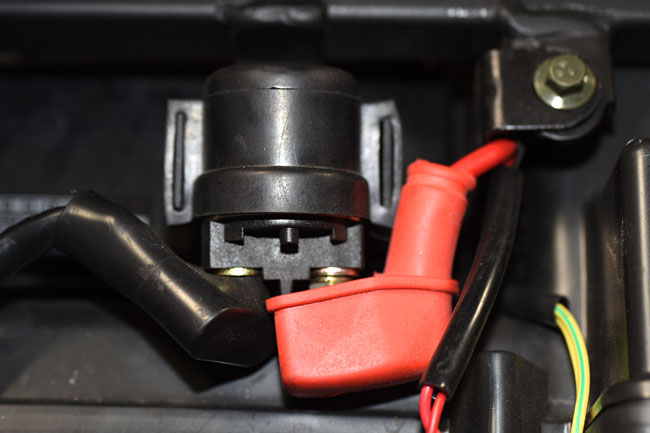
The battery is located under the seat on the right side of the motorcycle. It is accessible by removing the right body panel underneath the seat. It is not necessary to remove the seat to gain access to the battery. It will be easier to work around the battery, however, if you remove both seats.
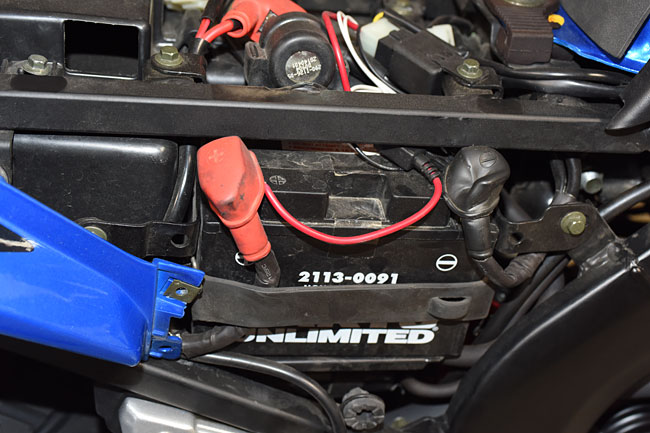
The red harness is the positive side of the motorcycle electrical circuit; the black terminal is the negative side of the motorcycle electrical circuit.
When installing a new battery, add acid to the cells. Prior to installing the caps, charge the battery with a battery charging device with a charging rate that does not exceed 2 amps. We recommend using a Battery Tender charging device for this initial charge, which is well below 2 amps. (We further recommend using the Battery Tender charging device to keep the motorcycle battery charged when the motorcycle is not in use for an extended period of time, as this will extend battery life. If you wish to purchase a Battery Tender, give us a call at 909 445 0900. I keep my bikes on a Battery Tender all the time.)
After the battery is fully charged, install it in the motorcycle. The battery should be oriented so that the positive terminal faces the rear of the motorcycle, and the negative terminal faces the front of the motorcycle. Connect the red cable to the positive terminal, and the black cable to the negative terminal. Secure the rubber retention strap around the battery, and you’re good to go.
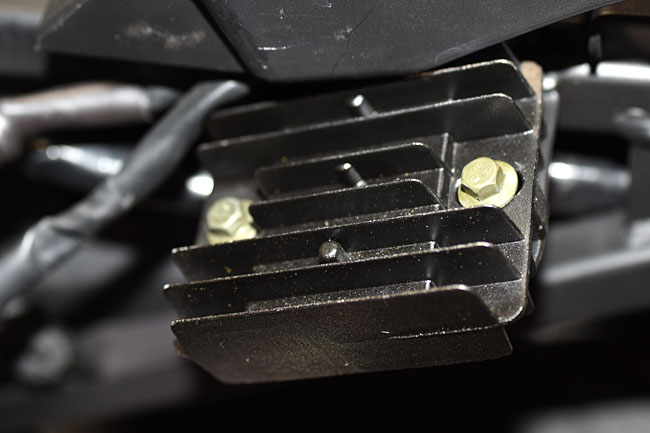
The voltage regulator is the key component for the motorcycle’s power supply. It is located under the rear motorcycle seat on the left outboard side of the frame…
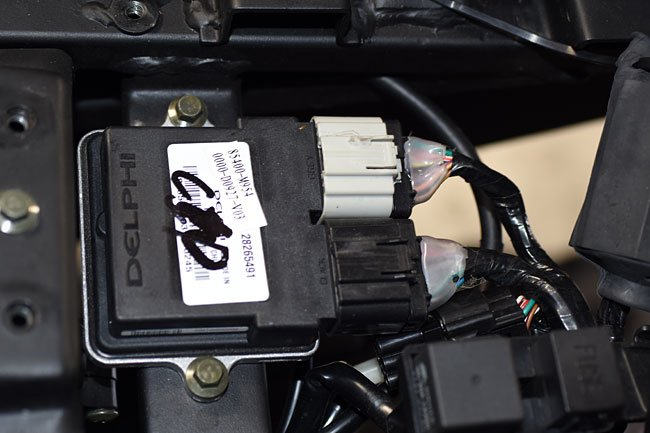
The ECU controls the fuel injection system and the engine’s electrical management. The ECU is located directly beneath the cover under the rear seat.
The starter relay is located under the rider’s seat to the left of the battery. If the motorcycle doesn’t start at all, I’d check here and I’d check the battery. If it cranks but has difficulty cranking, look for corrosion on either the battery terminals or the starter relay terminals.
This next electrical connector (the one with purple edges) is located under the rider’s seat outboard of the left side of the frame. This circuit provides energy from the voltage regulator to the battery. If this connector is not mated properly, the motorcycle will not charge the battery (don’t ask me how I know this). When you’re working on the air cleaner, you’ll most likely have to hold this connector out of the way to get the air filter out of the motorcycle. You need to be careful that you don’t pull too hard on the wires going into this connector such that the connector contacts separate inside the connector. If I ever found myself in a situation where the battery is good but it’s not charging, this would be the first place I’d look.
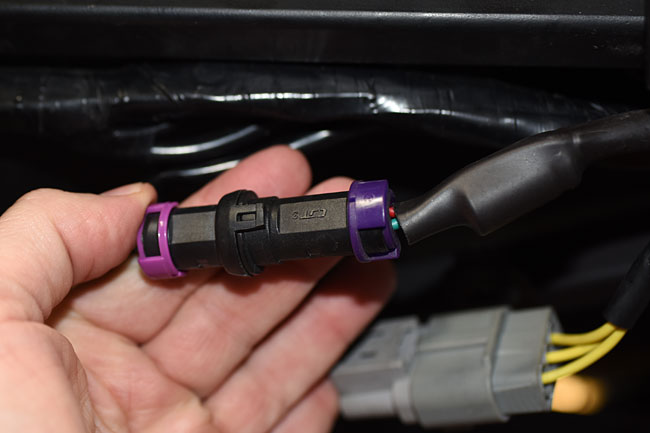
This electrical connector is the main electrical connector from the stator to the voltage regulator. It is located under the rider’s seat outboard of the left side of the frame. If this connector is not mated properly, the motorcycle will not charge the battery.
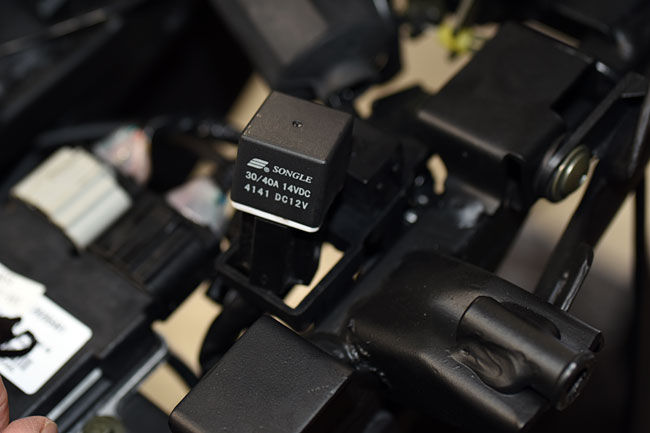
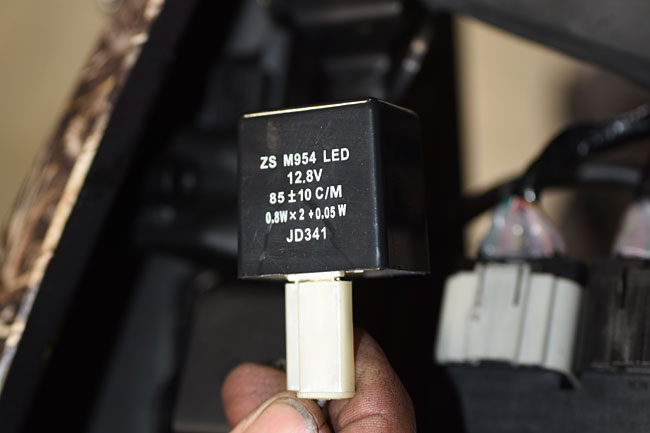
Here’s the relay that controls power to the fuel pump. It is located under the plastic cover under the passenger seat, inboard of the frame, in front of the 15A fuse box on the left side of the motorcycle. You can get a better feel for its location by examining the photo above that shows all of the components under the seats.
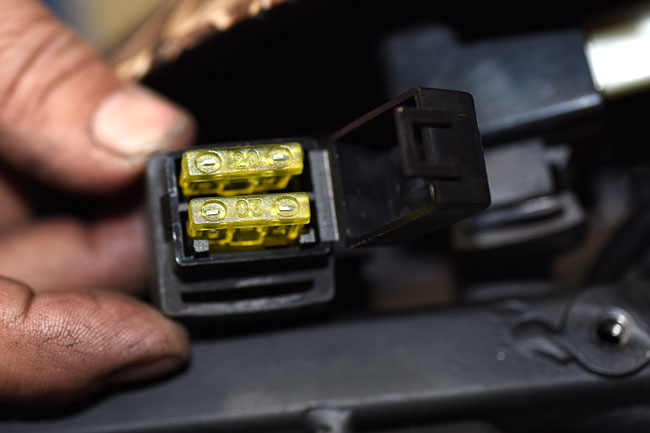
The motorcycle’s two 15A fuses are in a fuse box located under the plastic cover under the passenger seat, inboard of the frame, on the left side of the motorcycle. One fuse is a spare; the other is the fuse for the ignition and the fuel pump. This is pretty cool feature (having a spare fuse). I’ve had other bikes that did not have a spare fuse, and I’ve had instances where the fuse opened and left me high and dry. If you turn the bike on and don’t hear the fuel pump pressurizing the system, this is a good place to start looking. If the fuse is blown, find the source of whatever caused it to open before you plug in the spare fuse, or you’ll probably just blow the spare, too.
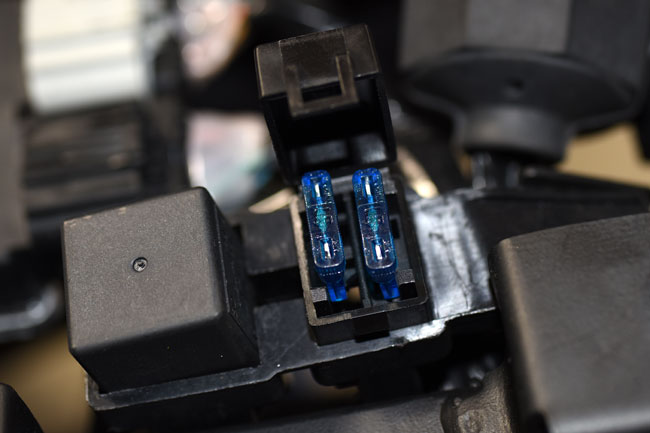
The motorcycle’s two 20A fuses are in a fuse box located under the plastic cover under the passenger seat, inboard of the frame, on the right side of the motorcycle. Same deal here, boys and girls: One fuse is a spare; the other is the fuse between the battery and the rest of the motorcycle. If this fuse is open, no power is provided to anything on the motorcycle. If your motorcycle is just flat dead, first check the kill switch on right handlebar first to make sure it’s in the run position (you have no idea how many phone calls we get from people telling us their bikes are dead, we ask them to check the kill switch, they disappear for a minute, and then they come back with an embarrassed “never mind…”). If the kill switch is in the run position and the battery is good, this fuse would be the next place I’d go.
This small processor controls the motorcycle’s turn signals. It is located under the plastic cover under the passenger seat, inboard of the frame, on the right side of the motorcycle behind the main fuse. If your flashers conk out, this would be a good place to start looking.
That’s it for now, folks. It’s a nice day out, I haven’t ridden our styling exercise SuperMoto yet, and Richard has it ready to go for me…
Time to do some shredding….
 RX1E Electric Motorcycle
 TT250 Enduro
 SG250 San Gabriel Cafe Racer