Brake Maintenance

Our brake maintenance tutorial covers the following topics:

  • Adjusting the brake pedal free play.
  • Inspecting and replacing the brake pads.
  • Replacing the brake fluid.
  • Bleeding the brakes.
  • Inspecting and replacing the brake disks.

The RX3 has hydraulic disk brakes on both the front and the rear wheel.

Adjusting the Rear Brake Pedal

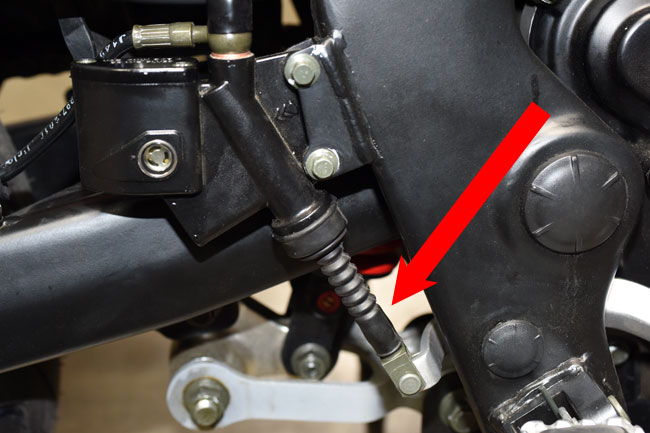
You should adjust the rear brake pedal to have 10 to 20 mm of free play.  The adjustment is made with a threaded adjustment shaft and locknut just below the rear brake master cylinder.   First, pull back the rubber grommet over the adjustment shaft.

brakes_0007-650

brakes_0005-650

Loosen the locknut, adjust the free play with the threaded adjustment shaft, and then tighten the locknut.

Inspecting and Replacing the Brake Pads

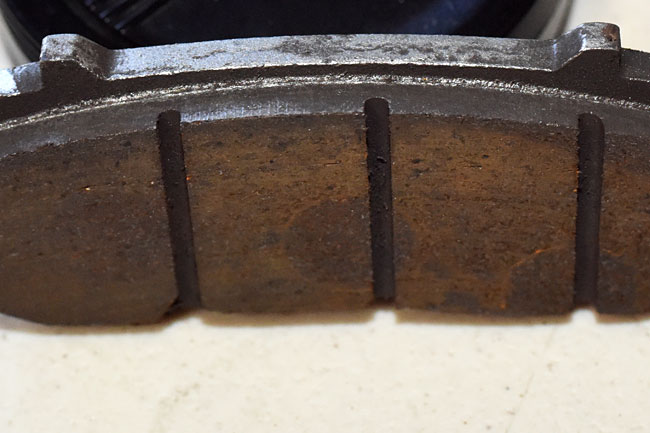
The front and rear disk brake utilize dual piston calipers.   You should replace the brake pads when either one has less than 1.5mm of pad thickness left, or if you the brake pads are worn such that the groove in the pad is no longer visible.   We stock the brake pads, so when you need a set, give us a call at 909 445 0900.

0-ServMan24Feb_0103-650

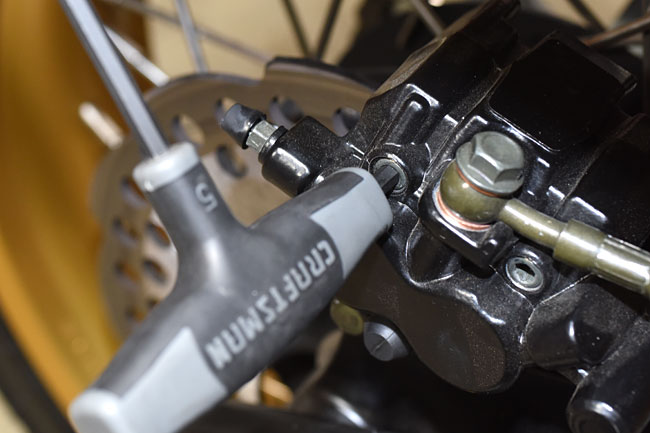
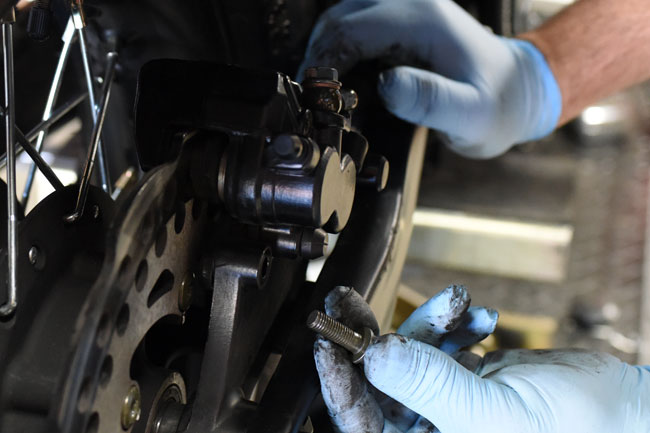
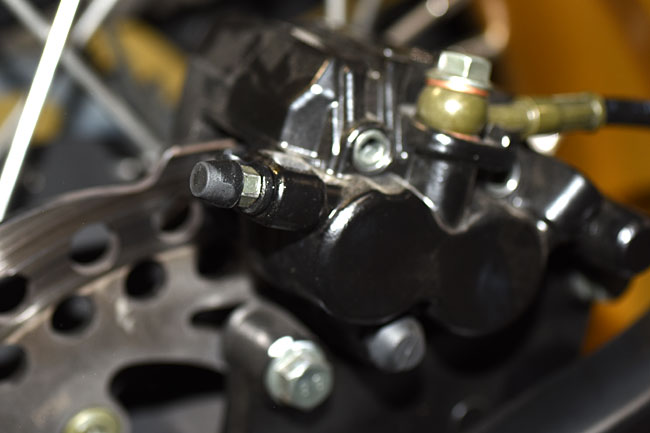
To remove the rear brake pads, loosen the rear brake caliper Allen bolts as shown in the photo below.

brakes_0010-650

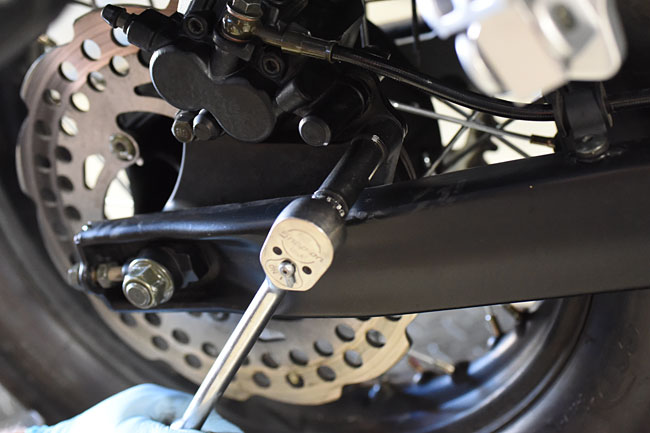
Remove the bolts securing the caliper to the swingarm.

ServMan24Feb_0072-650

One the rear caliper bolts are removed, slide the caliper rearward, lift if off of the disk rotor, and then remove the Allen bolts holding the brake pads in place.

ServMan24Feb_0076-650

ServMan24Feb_0079-650

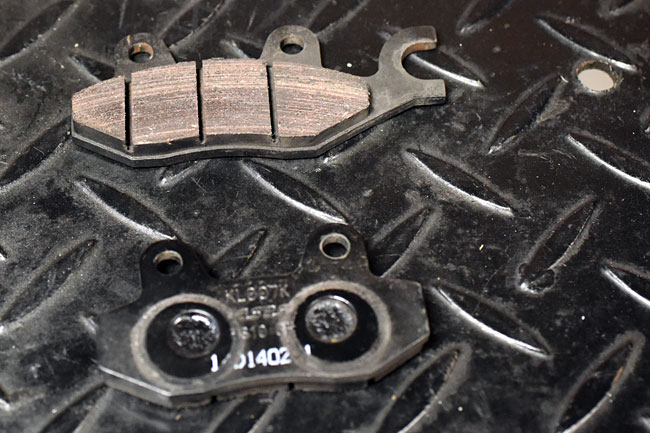
Once the caliper Allen bolts are removed, the pads will slide out.   Note that the pads are not identical; they must be installed in the correct orientation.  The pad with the large arm (shown at the top of the photo below) is opposite the pistons; the pad without the large arm is situated against the pistons.

ServMan24Feb_0082-650

Inspect the brake pads to determine if they are worn beyond their service limit (less than 1.5mm thick).  If the pads are worn such that the grooves are gone (visible as vertical slots in the photo above), the pads should be replaced.

Reinstall the Allen bolts in the caliper, position the caliper in its appropriate location, and install the caliper bolts to mount the caliper to the swingarm.  Tighten all fasteners.

Pump the rear brake pedal several times.   Operate the motorcycle to assure satisfactory rear brake performance.

The process for replacing the front brake pads is similar to that described above for the rear brake pads.    Loosen the front brake caliper Allen bolts, and then remove the front brake caliper mounting bolts.   Remove the caliper and then remove the Allen bolts from the caliper.   Inspect the front brake pads and replace if necessary.  Reinstall the Allen bolts, the front caliper, and the caliper bolts.  Tighten all fasteners.   Pump the front brake lever several times.   Operate the motorcycle to assure satisfactory front brake performance.

Replacing the Brake Fluid

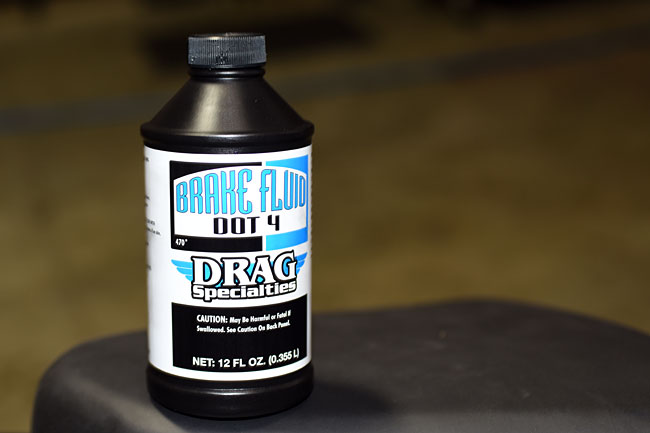
You should replace the brake fluid in the front and rear master cylinders every 2 years.   Use only DOT 4 brake fluid.  We recommend Drag Specialties brake fluid, and if you call us at 909 445 0900, we will ship a container to you.

Brakes20140227_0011-650

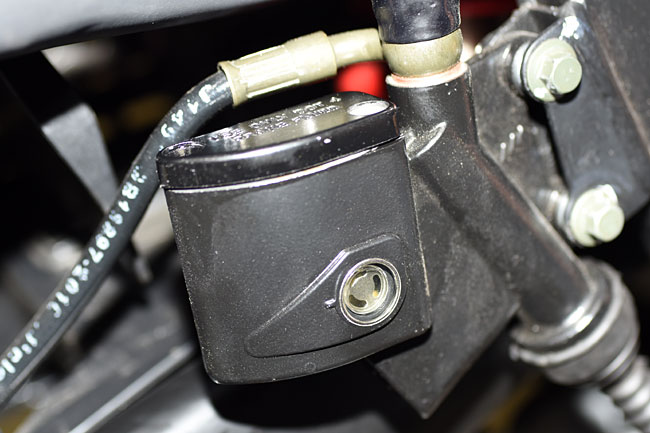
The procedure shown here is for the rear master cylinder; the front master cylinder is performed in a similar manner.

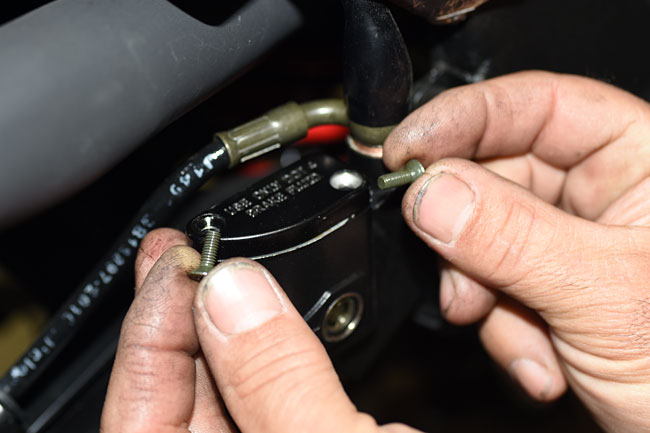
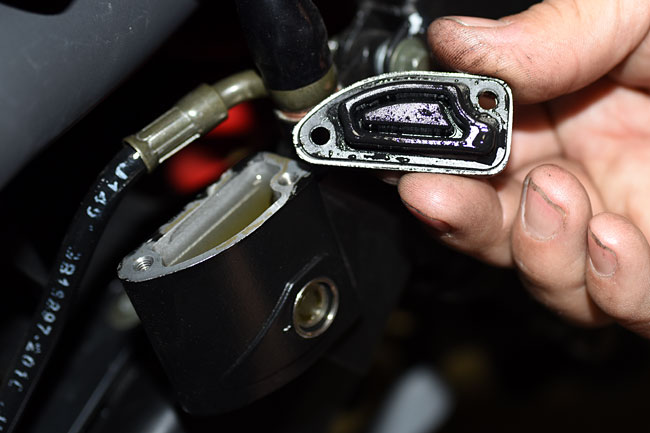
Open the master cylinder by unscrewing the two screws securing the master cylinder cover.   Remove the master cylinder cover and place it in an area where it will not become contaminated.

Brakes20140227_0002-650

Brakes20140227_0001-650

Brakes20140227_0003-650

Using a turkey baster or other suction device, remove as much of the brake fluid in the master cylinder as possible.   Exercise caution to prevent any brake fluid spillage.  If any spillage occurs, wipe up the spilled brake fluid immediately (it will damage painted or plastic surfaces).

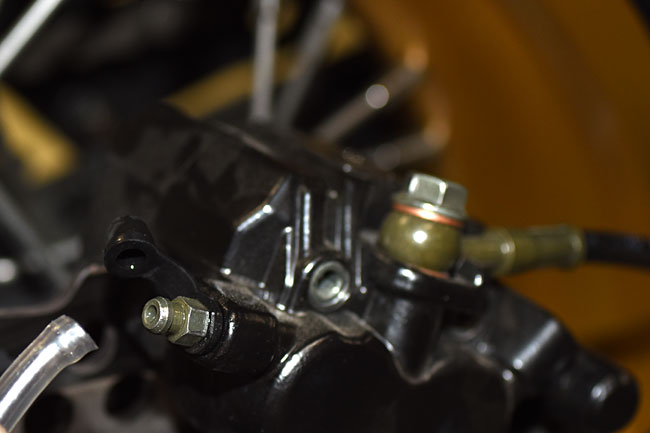
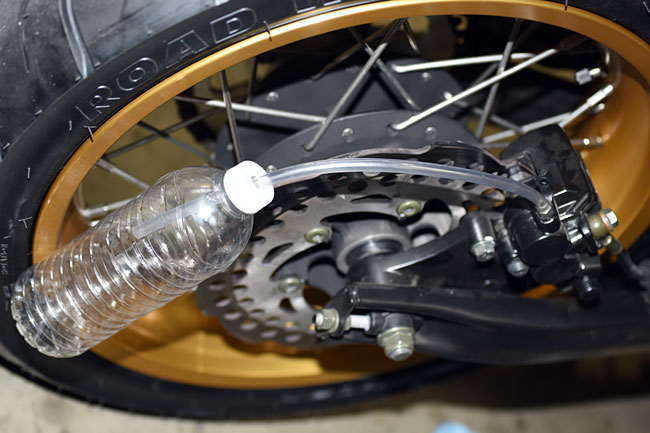
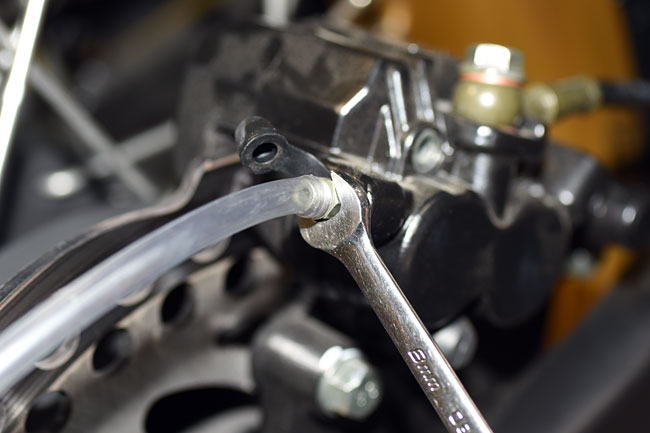
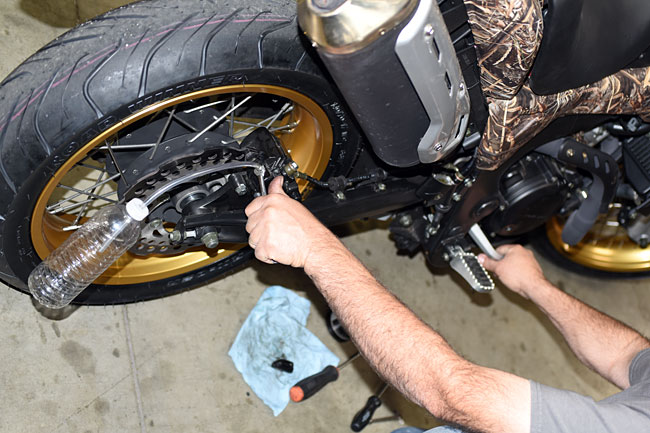
Remove the caliper bleed cap and attach a small diameter tube to the caliper bleed fitting.   Route the tube to a receptacle.

Brakes20140227_0012-650

Brakes20140227_0014-650

Brakes20140227_0005-650

Add fresh brake fluid to the master cylinder.

Open the caliper bleed fitting by unscrewing it slightly (turn it counterclockwise to do so) and depress the brake lever to pump brake fluid out through the caliper bleed fitting.   Prior to allowing the brake lever to return, close the caliper bleed fitting by turning it clockwise.

Brakes20140227_0006-650

Brakes20140227_0007-650

Repeat the process until fresh brake fluid exits the caliper.

Close the caliper bleed fitting and replace the caliper bleed fitting cap.

Add brake fluid to the master cylinder such that the upper level is within 1/8-inch of the top (do not overfill the master cylinder).

Replace the master cylinder cover and the screws securing it to the master cylinder.  Tighten the screws.

Pump the rear brake pedal several times.   Operate the motorcycle to assure satisfactory rear brake performance.

Bleeding the Brakes

If air gets into the brake lines, braking performance will be diminished.   You should bleed the brakes any time the brakes feel spongy or soft, or if the brake fluid drops below the level of the master cylinder view port.   Before you bleed the brakes, you should isolate and correct any leaks.  Again, use only DOT 4 brake fluid.

The procedure is similar to the procedure for replacing the brake fluid.  Open the master cylinder by unscrewing the two screws securing the master cylinder cover.   Remove the master cylinder cover and place it in an area where it will not become contaminated.  Remove the caliper bleed cap and attach a small diameter tube to the caliper bleed fitting.   Route the tube to a receptacle.    Open the caliper bleed fitting by unscrewing it slightly (turn it counterclockwise to do so) and depress the brake lever to pump brake fluid out through the caliper bleed fitting.   Prior to allowing the brake lever to return, close the caliper bleed fitting by turning it clockwise.  Add brake fluid to the master cylinder as necessary.  Repeat the process until the brake fluid exiting the caliper is free of air bubbles.   Close the caliper bleed fitting and replace the fitting cap.  Add brake fluid to the master cylinder such that the upper level is within 1/8-inch of the top (do not overfill the master cylinder).    Replace the master cylinder cover and the screws securing it to the master cylinder.

After completing the above, pump the rear brake pedal (if you are bleeding the rear brake) or operate the front brake lever (if you are bleeding the front brake) several times.   Operate the motorcycle to assure satisfactory brake performance.

Inspecting and Replacing the Brake Disks

You should replace any brake disk that is worn below service wear limits or if the disk is warped.    You can measure disk thickness and straightness without removing the wheel from the motorcycle.  You will, of course, need to remove the wheel if you replace the brake disk.

Use a caliper (i.e., a measuring device; not the brake caliper) to measure disk thickness.  If the disk is less than 2mm thick, replace the disk.

Use a dial indicator with the wheel off the ground to measure disk runout.   Spin the wheel and measure runout.   If the runout exceeds 0.3mm, replace the disk.   You only need to do this if the disk appears to be visibly warped (which is not likely) or if the brakes pulsate when applied.   It’s not likely you’ll ever experience this; in 50 years of riding motorcycles, I never have.

You will have to remove the wheel in order to replace the disk.  Refer to our maintenance tutorial on fixing a flat tire for instructions on how to remove the wheels.

DSC_0356_0012-650

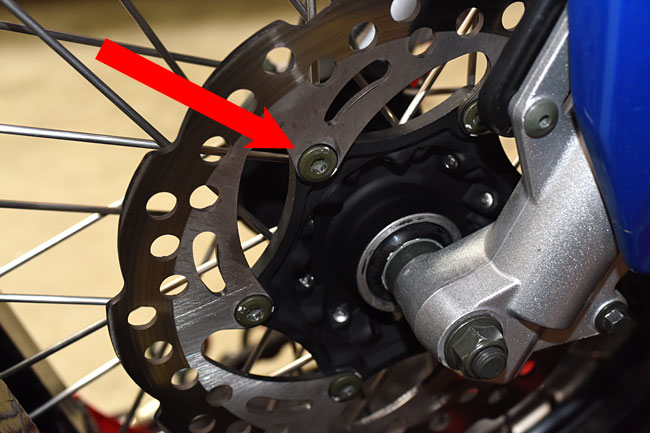
Each disk is secured with 6 Allen bolts.   Use blue Loctite when reinstalling the bolts that secure the brake disk.

And that’s about it, folks.   Time to get out and go for a ride!

_DSC0069-650

See you on the road!
 

Posted in CSC Motorcycles | Comments Off on Brake Maintenance

Clement Salvadori speaks…

BlueRX3GRR

Blue is my color, boys and girls.   I made that decision today.   Blue photographs well, and Clement Salvadori helped me decide.   Let me explain how this came about.

Clement Salvadori is one of the world’s great motojournalists.   I’ve been reading his work for years in different motorcycle magazines and books, so you can imagine how good it felt to learn that he had good things to say about the RX3 in this month’s issue of Rider magazine…

Now, about that CSC Cyclone….a quite presentable 250cc single-cylinder version of an adventure-touring motorcycle, with saddlebags, small fairing, skid plate, and the rest.  For a very reasonable $3495.

Is a 250 too small to go touring?  Not at all.   My first bike was a 250, which I rode one summer over much of Western Europe, including the Alps.

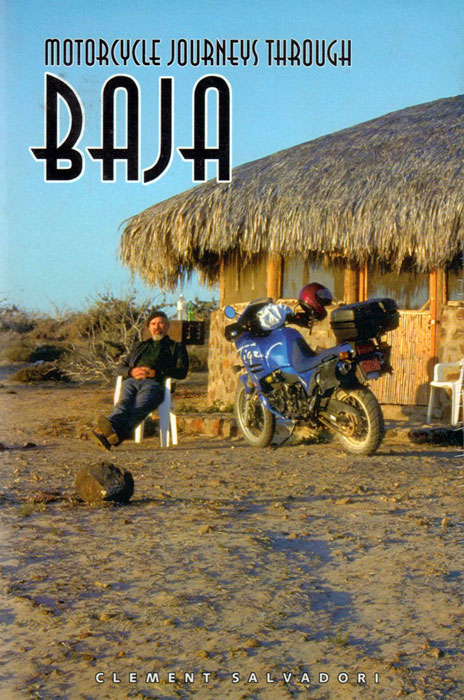
When I first started exploring Baja, one of the books I studied was Clement’s classic Motorcycle Journeys through Baja.   He knows more about Baja than I ever will, and I diligently read and reread what he had to say about this land of mystical  mountains and magnificent motorcycling.

Let me explain just a bit of the influence Clement’s writing has had on me.   See that blue Triumph Tiger on the cover of Clement’s book?

ClementSalvadoriBajaW&D

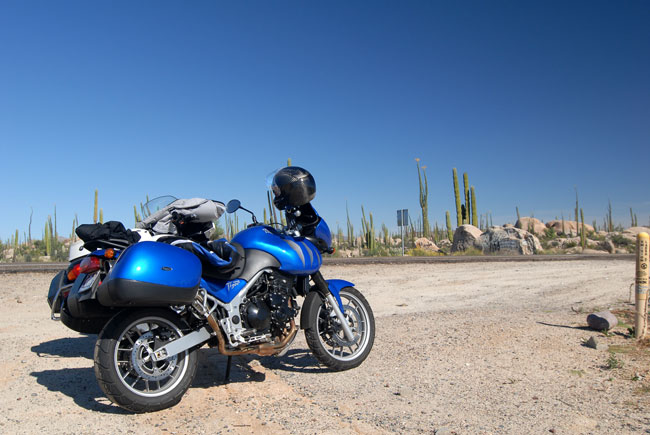
In the book above, Clement rode a first generation Triumph Tiger (the first generation of the modern Triumphs, that is), and that image of rolling through Baja on a blue Tiger stuck in my mind.

Blue became my color.   When I convinced myself I needed a Tiger, there was no question what color it would be…

I thought about my inbound RX3 again and what color I want.   What else could it be?   Mine will be blue, unless, of course, we run out of blue bikes in this shipment.  In that case, one of you folks will get it and I’ll take yellow…

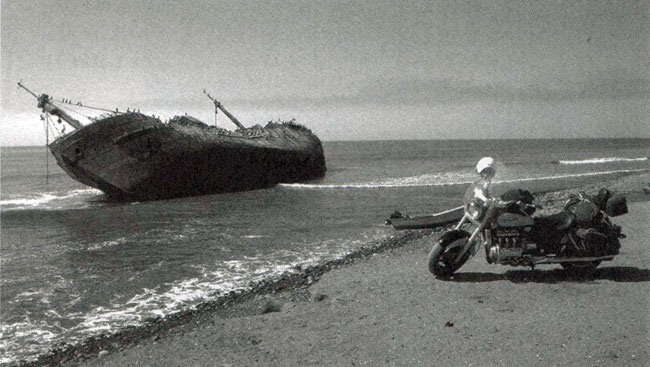
So, back to Motorcycle Journeys through Baja.   Mr. Salvadori’s book covers the entire Baja peninsula and many of its hidden wonders.   One of these is the Isla Del Carmen, a shipwreck off the Pacific coast of Baja’s San Jacinto.   Most folks never see it (San Jacinto is way off the beaten path…you can’t get to it without riding in the dirt).

Here’s a scan of Clement’s photo from the book…

Isla-Del-CarmenW&D

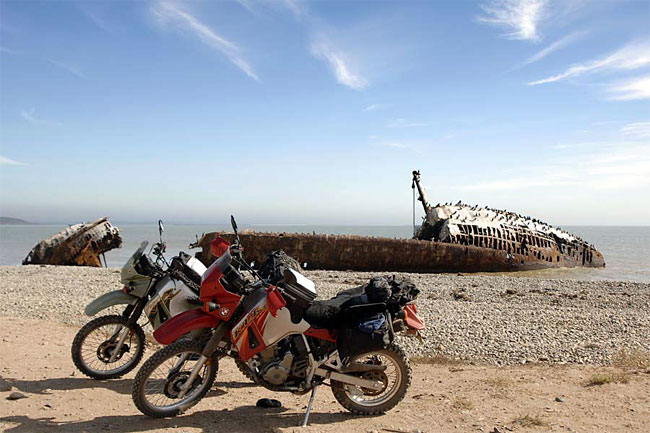
In 2009, my buddy Primo and I made the trek through the soft sand and dirt on our KLRs to get to San Jacinto (a place neither of us had ever been to before), and yes, I grabbed my own photo of the Isla Del Carmen with our bikes…

KLRIslaDelCarmen

That was a hell of a ride (you can read about it here).  The high points were that photo above and a mean old Mexican dog who thought I was his dinner (yeah, I got bit).   Ouch!

I had a nice conversation with Clement yesterday, and trust me on this, I’m going to get him on the RX3.   Watch the blog, folks, and you may just see a photo of Clement Salvadori on your favorite motorcycle in my favorite place for an adventure ride (and that would be, of course, Baja).

In the meantime, make sure you pick up a copy of this month’s Rider magazine.   You can read Clement’s “Road Tales” column (in which the RX3 figures prominently), and it just so happens there’s a nice article in the same issue about Baja.  If you really want to get the straight scoop on Baja, though, you should pick up a copy of Motorcycle Journeys through Baja.   It’s required reading for those of you coming along for the Inaugural Baja Run with us.   Even if you’re just thinking about joining us, Clement’s book is a “must read” bit of first class moto literature.   You can order your own copy here.

Oh, and one more plug…remember those photos I put on the blog a month or so ago from Bisbee, Arizona?    I took that trip for Motorcycle Classics magazine (I write many  of their “Destinations” pieces), and you can read my article about Bisbee right here.    Make sure you pick up your copy of Motorcycle Classics magazine this month, too!
 

Posted in CSC Motorcycles | Tagged , , , , , , , | Comments Off on Clement Salvadori speaks…

Clutch Maintenance

This maintenance tutorial addresses four areas:

  • Clutch cable lubrication.
  • Clutch cable replacement.
  • Clutch adjustment.
  • Clutch replacement.

I’ve been riding for more than 50 years.  I’ve only ever needed to replace a motorcycle clutch once, and I’ve never needed to replace a clutch cable.    Having said that, I always carry a spare clutch cable on my forays into the boonies (it’s just cheap insurance).   I’ve lubed plenty of clutch cables, and I’ve adjusted the clutch on virtually every motorcycle I’ve ever owned.   All of this is good stuff to know.

Clutch Cable Lubrication

Clutch cables are easy to lube.   All you need to do is to disconnect the cable at both ends (the clutch lever on the left handlebar, and the clutch input lever on the left side of the engine), and then get lubricant into the clutch cable sheath so that it lubricates the wire portion of the cable.

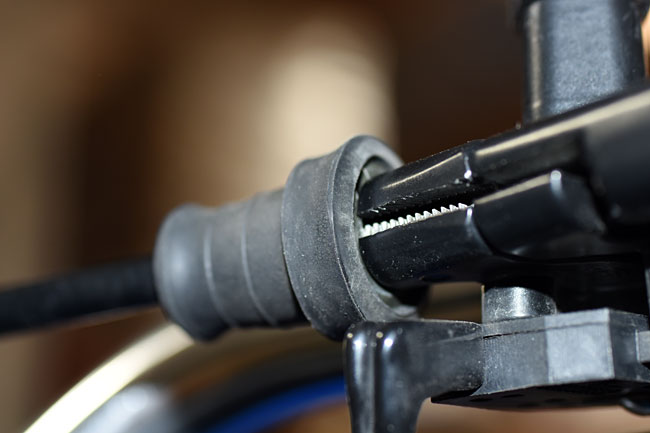
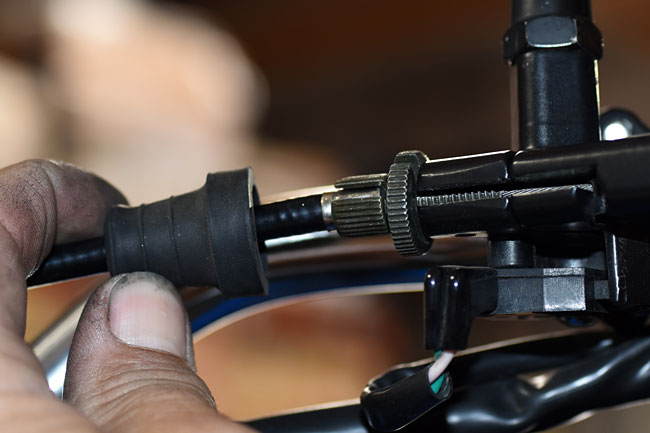
To disconnect the cable at the handlebar clutch lever, pull back the rubber grommet to expose the clutch lever knurled adjustment knob and knurled lock nut.

Clutch_0041-650

Clutch_0042-650

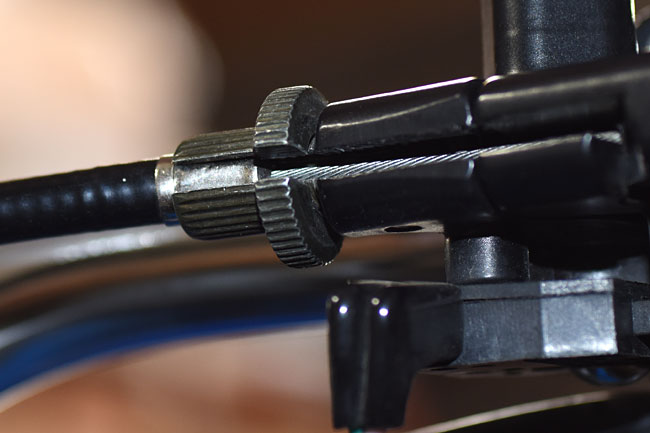
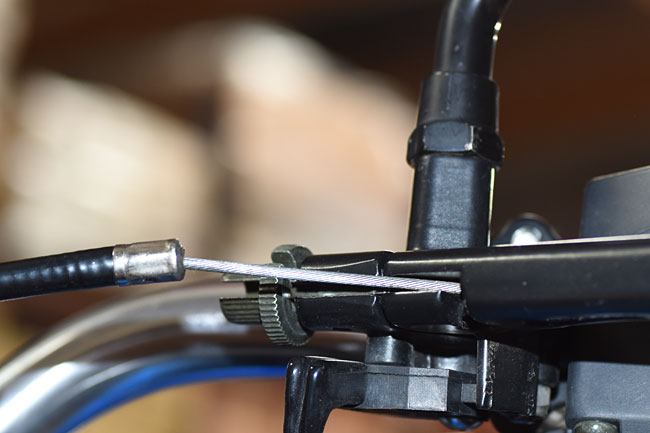
Loosen the knurled lock nut, and then fully screw in the knurled adjustment knob.   Align the slots in the knurled adjustment knob and the knurled lock nut, as you see in the photo below.

Clutch_0043-650

Find the other end of the clutch cable where it attaches to the clutch lever on the engine case.  It’s on the left side of the engine behind the cylinder and above the shift lever.

Clutch_0044-650

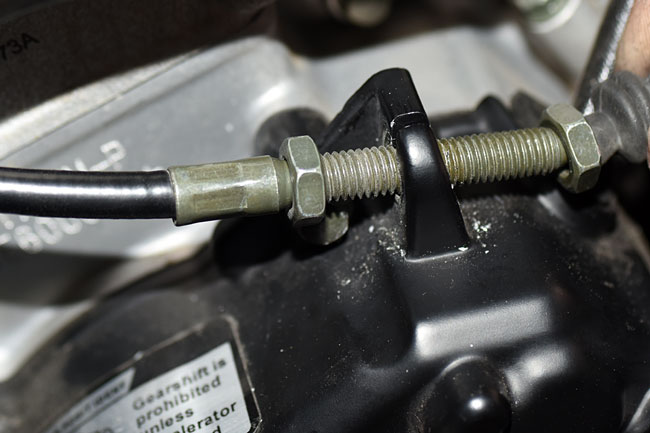
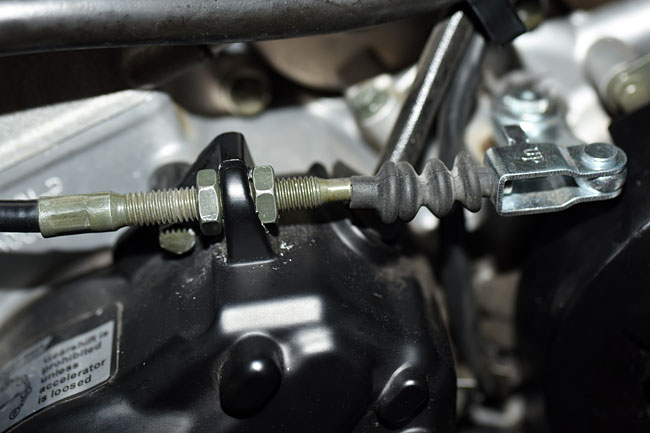
Loosen the lock nuts on the threaded adjustment mechanism and move it forward to gain more slack in the cable.

Clutch_0049-650

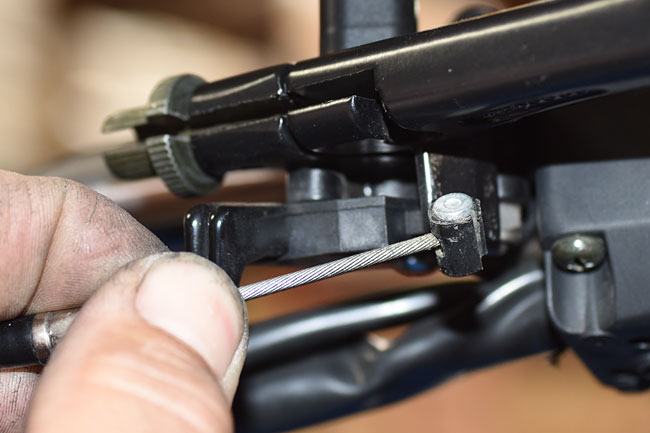
Once you have enough slack in the clutch cable, you can remove the cable sheath from the knurled adjustment knob at the handlebar end of the cable, and slide the clutch cable out.  This will allow pulling the cable forward and sliding the cable head out of the clutch lever.

Clutch_0050-650

Clutch_0051-650

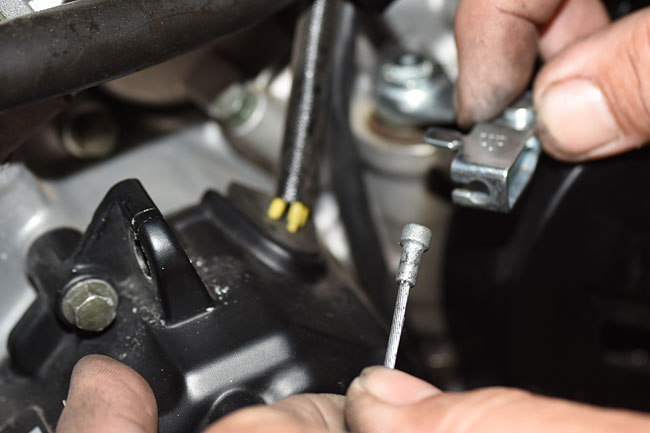
Similarly disconnect the clutch cable at the engine end, as shown in the photos below.

Clutch_0052-650

Clutch_0053-650

Clutch_0054-650

At this point, you have the cable disconnected at both ends, and you can manually slide the wire cable up and down in the cable sheath.   Inspect the wire cable at both ends.  If any of the cable’s wire strands are frayed or broken, it’s time for a new cable (we’ll cover that in the next section).

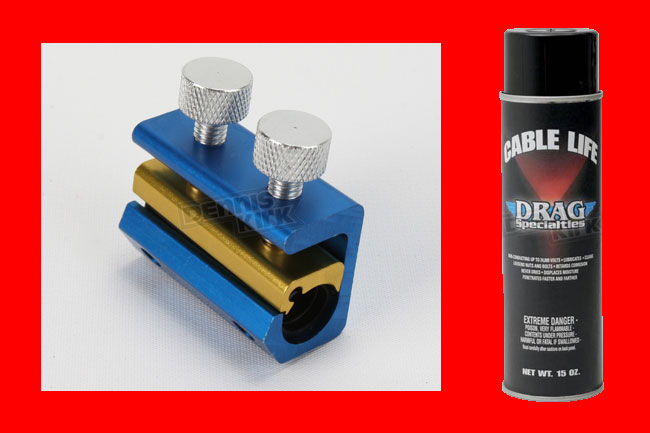
Assuming the cable is good and does not need to be replaced, point the clutch cable up at the handlebar end, and work the cable up and down in its sheath as you lubricate it.    We recommend Drag Specialties clutch cable lube.   You need a can of this (give us a call at 909 445 0900, and we’ll shoot a one out to you).  Getting the lube down into the cable sheath can take a little while doing it the way described above.  If you want to be a bit more efficient (and a lot less messy), use a mechanical attachment that directs the spray lube into the cable sheath.   The idea behind this tool is that it forms a seal around the end of the sheath and forces the lube into it.   We like the Dennis Kirk cable lubricator, and we also stock those.  Give us a call and we’ll send that to you, too.

Lubes

You’ll know you’ve lubed the cable adequately when you see the lubricant emerge from the cable sheath at the other end of the cable.   When you’re finished lubricating the clutch cable, reattach it at both ends and adjust the clutch so that you have 10mm to 20mm of free play at the clutch lever tip.  We’ll cover the clutch adjustment process in more detail a little further down in this tutorial.

Clutch Cable Replacement

This is a fairly straightforward operation.   If the clutch cable is frayed, if it feels snatchy or grabby even after you’ve lubricated it, or if it snaps, you need a new clutch cable.   As I mentioned above, I always carry a spare cable.    We stock the clutch cables, and my advice to everyone is buy a spare, tuck it away in your motorcycle’s luggage, and hope you’ll never need it.   It’s cheap insurance.

If you need to replace the clutch cable, disconnect it at both ends as described above.  Take a good look at how the cable is routed through the motorcycle before you remove it.   A trick I’ve seen other folks use is to tape the upper end of the new cable to the lower end of the old cable, and use the old cable to pull the new one into place when you remove the old cable.  Before doing that, though, I recommend that you lube the new cable first.  If it’s been in your saddlebag for a couple of years or more, it’s probably picked up some dust.

After you have the new cable in place, connect both ends and adjust the clutch.  We’ll explain how to do that in the next section.

Clutch Adjustment

There are two areas in which adjustments can be made to the clutch.  These are the lower end of the clutch cable (where it attaches to the lever on the engine case), and the upper end of the clutch cable (where it attaches to the lever).

We recommend setting up the lower end of the clutch cable adjusting mechanism so that it is about in the middle of its adjustment range, as shown in the photo below, such that all of the slack is removed from the clutch cable sheath.   That’s the primary function of the lower end of the clutch cable adjusting mechanism.

Clutch_0046-650

Once you’ve done that, adjust the knurled adjustment know at the handlebar clutch lever such that there is about 10mm to 20mm of free play at the end of the clutch lever.   When you’ve done that, lock the knurled adjustment knob in place with the knurled lock nut.   Pull the rubber grommet back over the adjustment mechanism, and you’re done.

Clutch Replacement

If you change your oil regularly and you use the right kind of oil, and if you don’t abuse your bike, your clutch will last a long time.   If you abuse your clutch by using it as a hill holder or by popping wheelies, it won’t last a long time.  If the clutch is grabby or if it slips, and you can’t fix it by changing the oil or by adjusting the clutch, you need a new clutch.

Installing a new clutch sounds ominous, but it’s really not that big a deal.   Let’s take a look.

The first step is to drain the engine oil.  You can see how to do this in our oil change maintenance tutorial.

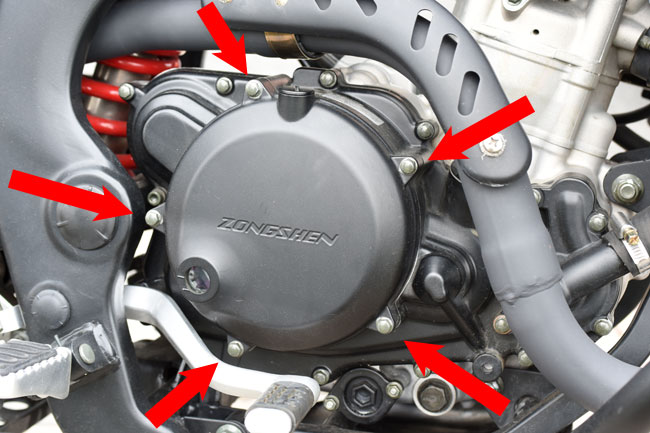
Remove the clutch cover by unbolting the five bolts securing it to the engine.

Clutch_0015-650

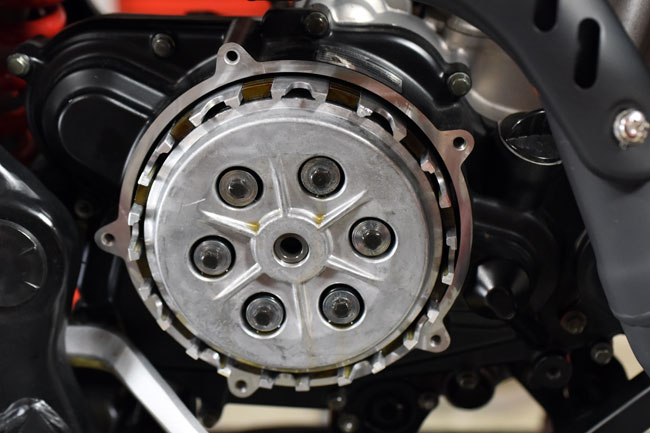
When you’ve removed the clutch cover, the clutch will look like this.

Clutch_0017-650

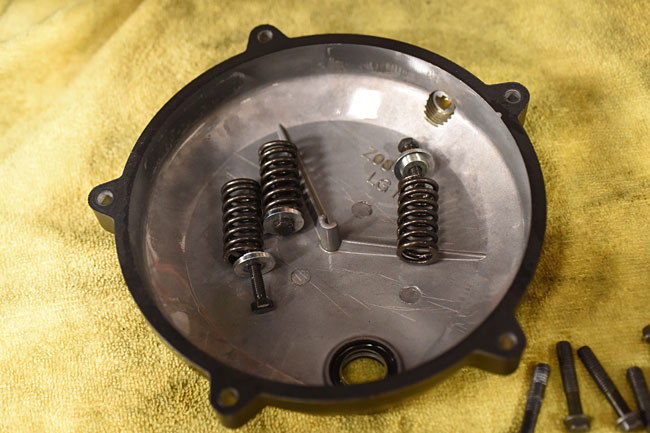
Set the clutch cover aside, inside face up.  You can use it as container for the parts we are going to remove next.

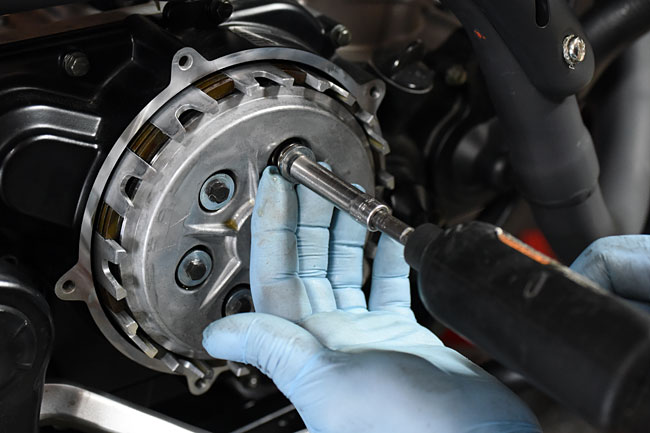
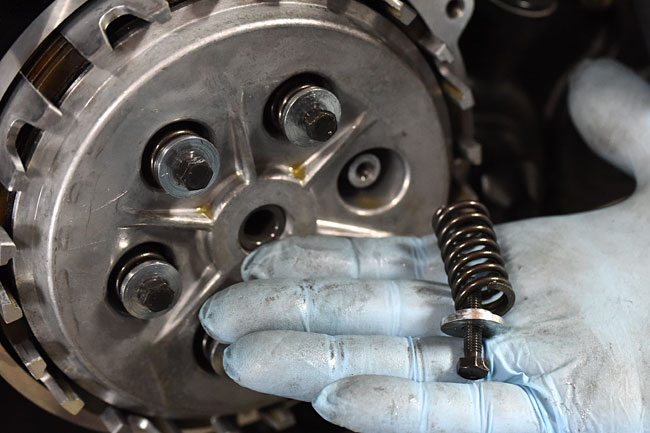
Remove the six clutch pressure plate bolts.   Each bolt has a large machined keeper and a spring.  Place these in the clutch cover.

Clutch_0018-650

Clutch_0021-650

Clutch_0024-650

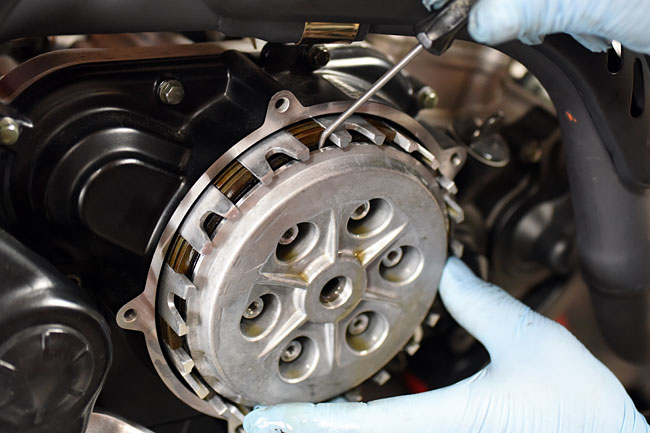
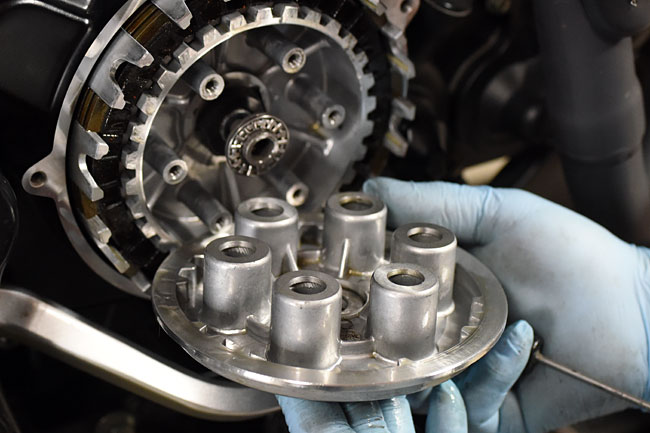
Remove the clutch pressure plate.  You may need to use a small pick to get behind it to coax it out.

Clutch_0025-650

Clutch_0026-650

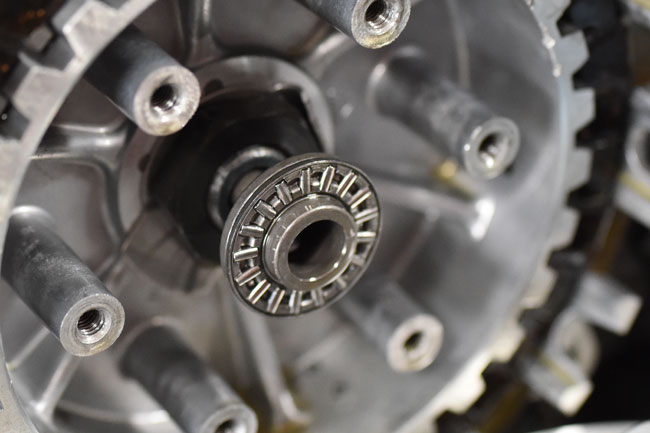
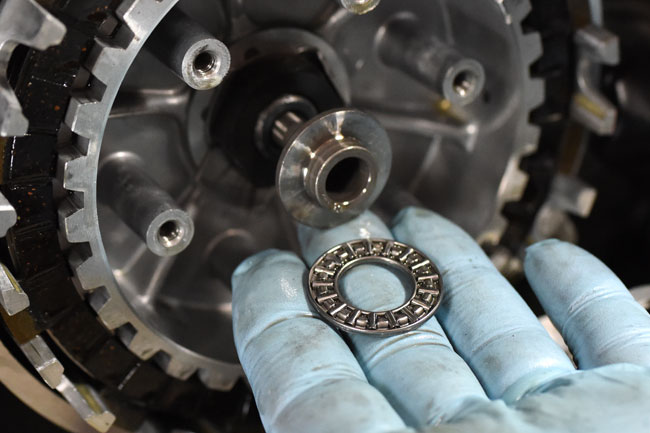
There’s a pusher behind the pressure plate that consists of a shaft, a roller bearing, and washer.  You can see it in the photo above, and here are additional photos that show these components.

Clutch_0027-650

Clutch_0028-650

Clutch_0029-650

Inspect the roller bearing and washer.   If either part is damaged, replace it.

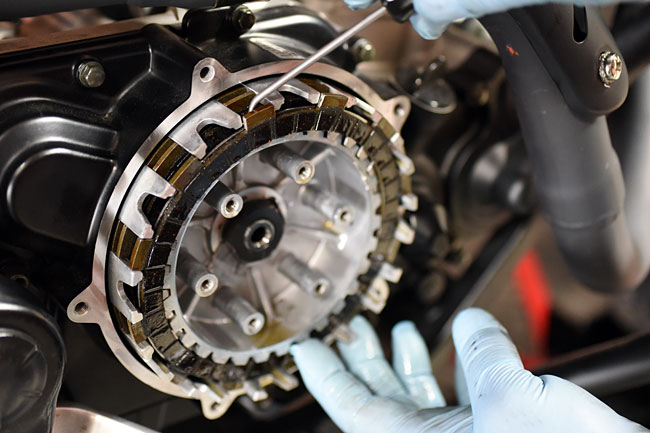
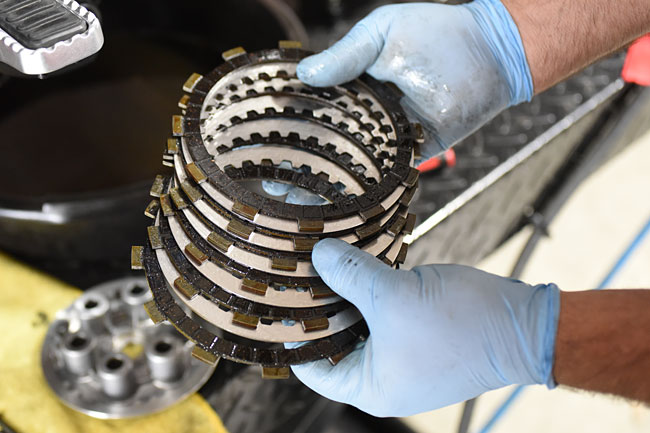
At this point, you can remove the clutch plates.   There are six friction plates and five steel plates.  It’s best to use a small pick (as shown below) to do this.

Clutch_0030-650

Clutch_0040-650

If the clutch was slipping due to the use of an unapproved oil (for example, an automotive oil with friction inhibitors), you may be able to wash the plates to remove any remnants of the unapproved oil that induced the slippage.   If I was doing this, though, I’d just replace the clutch plates.  The parts are not that expensive and I would not want to invest the labor only to find out that washing the plates didn’t work.

Replace the plates (we stock these parts), and then reinstall the pressure plate, the clutch springs, the keepers, the bolts, and the clutch cover.    Fill the engine to the correct level with an approved motorcycle oil.   Adjust the clutch as outlined above, and you are good to go.


Posted in Best Of, CSC Motorcycles | Comments Off on Clutch Maintenance

A bike that pays for itself…

We’ve posted six maintenance tutorials so far here on the blog, and a couple of folks have properly pointed out that it can be difficult to find a specific tutorial hunting around on the blog.   To make things a bit easier, we posted a maintenance tutorial index on the CSC website, and you can get to it here.  It shows all of our maintenance tutorials, it provides a quick link to each, and we’ll update it each time we post a new tutorial.

We’ll be adding several more maintenance tutorials in the next couple of weeks, but we had an interesting conversation in the plant today about how much our riders will save based on what we’ve posted so far.   The concept is intriguing, so we worked up a quick spreadsheet based on 2 years of estimated dealer labor costs and 12,000 miles on your bike during that time.   I realize this is a fairly subjective estimate, but the results are interesting…

LaborSavings

Wow, a quick back-of-the-envelope calc indicates that if you brought a bike to a dealer and had only the maintenance actions done that we’ve already empowered you to do through our online tutorials, it would cost about $3,500 in labor charges.  Yep, $3,500.  That’s what you’ll save using our maintenance tutorials and doing the work yourself.   $3,500.   The RX3 motorcycle only costs $3,495.

You do the math…


Posted in CSC Motorcycles | Comments Off on A bike that pays for itself…

Chain and Sprocket Maintenance

Easy things first, and that’s lubricating the chain.   Our advice is that you lubricate your chain approximately every 500 miles, or at the end of a long day of riding.   You should lube the chain more often if you ride in the rain or in dusty conditions.

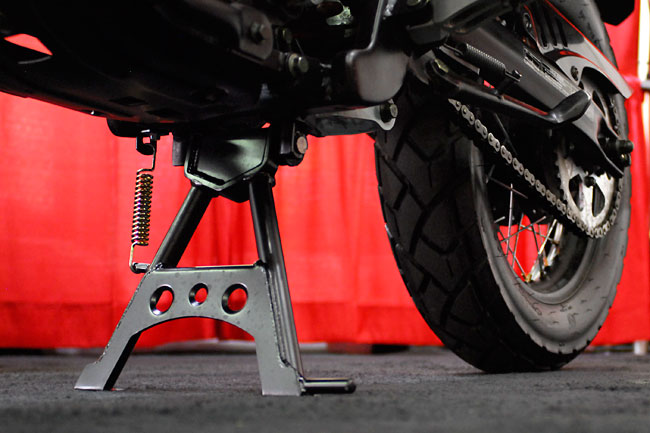
I like to lube my chain when I stop for the day on my adventures.   The idea is to lube the chain as soon as you stop riding while the chain is still warm, as this will allow the lubricant to wick into the chain.    It’s easier to lube the chain if your RX3 has our optional centerstand, but if it doesn’t, it’s still pretty easy.   I hold a rag under the lower chain run and spray the lube directly onto the chain.   Then I’ll push the bike backward a few feet to expose more of the chain, and I’ll lube that.  I keep doing this until I’ve done the entire chain.  It requires pushing the bike backward about 15 feet in total.

ServMan27_0024-650

One word of advice here…don’t get sloppy.   Don’t let the lube get on the tire, and don’t shoot through the spokes and get the lube on the rear brake.

After I lube the chain, I don’t ride the motorcycle for at least 15 minutes.   That will allow the lube to seep in and dry.  It’s also the reason why I do it at the end of the day.

Ask any group of motorcycle riders what the best chain lube is and watch the fireworks begin.   There are wax-based lubes and petroleum based lubes.    Everybody has an opinion on what works best.  We sell both, and if you call us at 909 445 0900, we’d be happy to sell one of our recommended chain lubes to you.   What’s important is that you have a chain lube, especially if you’re leaving for an adventure that lasts more than a day.   You want to lube your chain every night when you get to your destination for that day.   Seriously.    You’ll feel the difference when you get on the motorcycle.

Onward and upward…let’s talk about the chains and sprockets.   Your RX3 has a 520 O-ring type chain, a 14 tooth front sprocket, and a 44 tooth rear sprocket.    The sprockets and chain won’t last forever.   If you keep your chain properly adjusted (see our maintenance tutorial on chain adjustment) and lubed (see above), the chain and sprockets will last a lot longer, but they still won’t last forever.  Typically, motorcycle chains and sprockets last between 10,000 and 20,000 miles.

Next point:  If you change the sprockets without replacing the chain, you’ll just wear out your new sprockets quickly.  If you change the chain without replacing the sprockets, it’s likely you’ll wear out the new chain quickly.   These are things that are best replaced together.   Do the chain and the front and rear sprockets at the same time.

To get a good look at the sprockets (especially the countershaft sprocket) and the chain, it’s best to remove the countershaft sprocket cover and the chain guard.

Removing the countershaft sprocket cover is straightforward; it just comes off when you remove the two bolts that attach it.   You don’t have to remove the shift lever.   I only point this out because one of the RX3 service manuals that’s floating around out there on the Internet says you need to remove the shift lever, but you don’t.

ServMan27_0016-650

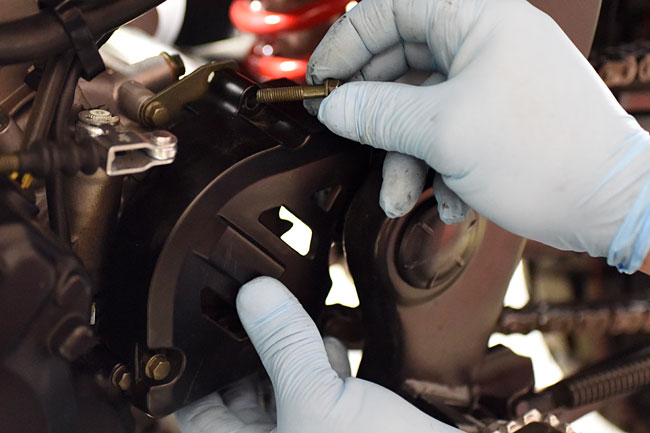
There are three Allen bolts that secure the chainguard.   Two are very visible and accessible; the third is hidden on the forward portion of the chainguard on that part of the chainguard that is behind the chain.  Undo these three bolts and remove the chainguard.

ServMan27_0021-650

ServMan27_0020-650

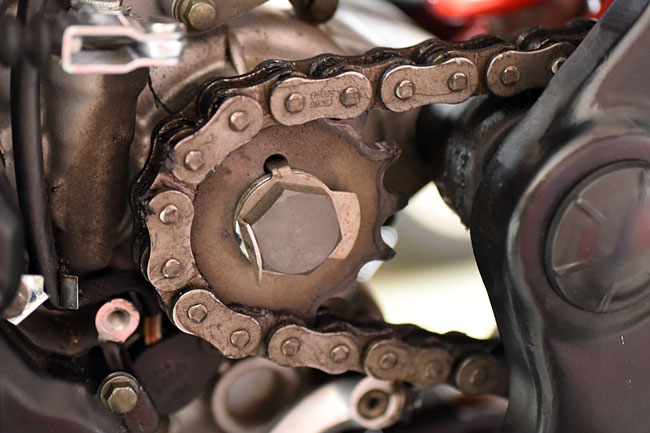
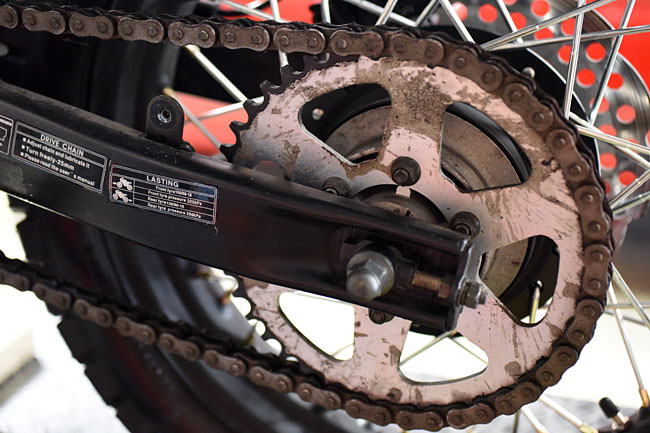
After you have removed these items, you can see the sprockets and the chain.

ServMan27_0014-650

ServMan27_0017-650

If the sprocket teeth are hooked or otherwise excessively worn, it’s time to replace both sprockets.   If the chain has excessive stretch or if it has kinks that you cannot work out by manually rotating the links with respect to each other, it’s time for a new chain.   And like I said above, if you need to replace either item (the chain or the sprockets), you should replace both the chain and the sprockets.

On a new RX3 motorcycle, the chain does not have a master link.   When you need to replace the original equipment chain on your motorcycle, you have to cut it off.   A replacement 520 chain (and yes, we sell them) has a master link that will allow you to install the new chain.   When you install the master link, the closed end should always face the direction the chain rotates.   Another bit of advice:   Carry a spare master link (don’t ask me how I know this is a good idea).

We stock all of the items described above (chain lubes, chains, and sprockets).  Give us a call (909 445 0900) and we’ll be happy to help you.


Posted in Best Of, CSC Motorcycles | Comments Off on Chain and Sprocket Maintenance

Cooling System Maintenance

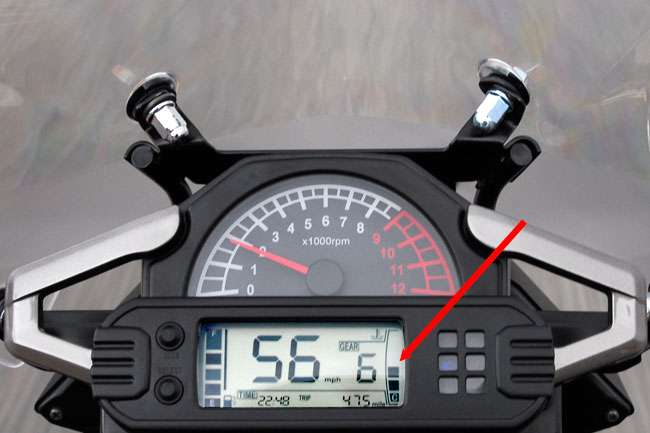
This tutorial addresses the cooling system on your RX3 motorcycle.    The RX3 is water cooled (actually, it’s an ethylene glycol and water mix), and you can see your bike’s operating temperature on the right side of the instrument cluster.

_DSC0059JoshTreeInstCluster

Anything below the max bar is okay.   In the photo above, we were riding through Joshua Tree National Park on a very cold day, and the temperature indicator never got above two bars.  On warm days, when stopped in traffic, or when climbing hills, the temperature indicator will go up to three or four bars.  It’s normal.

Let’s start our cooling system discussion by considering safety issues:

  • Only work on the cooling system when the engine is cold.
  • When opening the radiator cap, always cover the radiator cap with a cloth and open it slowly to prevent being scalded by escaping hot fluid.
  • Always immediately wipe up any spilled cooling fluid.
  • Only use a quality 50/50 ethylene glycol/distilled water cooling fluid with corrosion inhibitors intended for use in aluminum engines.

The RX3 cooling system consists of the following components:

  • Two radiators located under the fuel tank.
  • Two fans (one for each radiator).
  • Hoses connecting the radiators and the engine.
  • A water pump.
  • Cooling fluid.  The system coolant capacity is 1.0 liter.
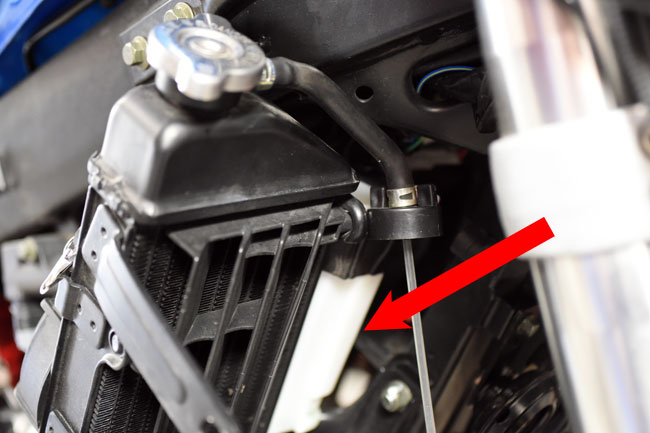
  • A temperature sensor (located on the bottom of the left radiator).
  • An overflow container located to the left of the right radiator.
  • A thermostat located on the top right of the cylinder (it’s where the cooling system hose attaches to the engine).

Don’t buy just any “antifreeze” cooling fluid from an automotive store.  Your RX3 motorcycle has a high performance aluminum engine and it needs a cooling fluid designed to work in this kind of engine.  If you use regular automotive cooling fluid, it will induce engine damage.   We stock cooling fluid for the RX3 motorcycle, and if you would like to order it from us, please give us a call at 909 445 0900.

Okay, that’s enough for the commercial.   Let’s get back to the maintenance activity.

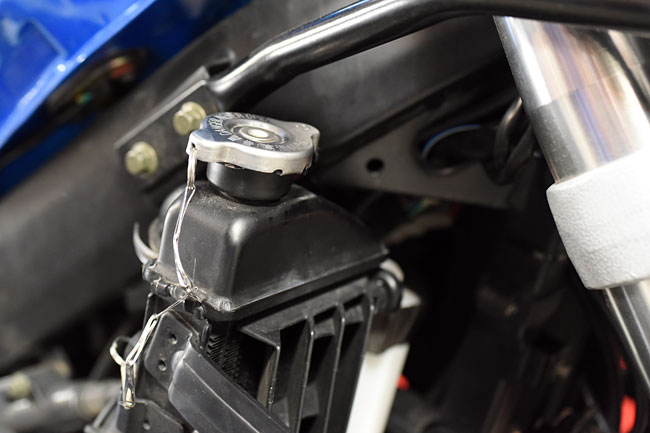
Access to the coolant system is provided via the radiator cap on top of the right side radiator.    As mentioned above, when opening the radiator cap, always place a rag over it and open it slowly.

There are three categories of cooling system maintenance:

  • Checking and adjusting the cooling fluid levels.
  • Flushing and replacing the cooling fluid.
  • Troubleshooting associated with engine overheating or leakage.

This tutorial considers each of these.   We’ll go into detail on the first two categories.   For troubleshooting, we’re going to refer you to the Service Manual provided free with each new CSC RX3 motorcycle.

Checking and Adjusting Cooling Fluid Levels

In our photos in this section of the cooling system maintenance tutorial, we show the bike with all of the right side body panels removed.   We did that just to make the photography easier.   You can get to the radiator cap and the overflow container (just for checking cooling fluid levels) without removing all of the right side body panels, but it will be tight.   Turn the forks to the left to gain more access to the right side radiator and overflow container.  It’s easier to get to the overflow c0ntainer from underneath the bike.

You should check the coolant level in two places:  The overflow container, and the radiator.

The first check is to view the coolant level in the overflow container.   The overflow container should show a fluid level between the top and bottom of the container.   The fluid level is visible from the outside of this container (you do not need to open the container to see the fluid level).   It is normal for this level to vary as the motorcycle is operated and when the motorcycle is turned off as the engine cools.  If you need to add fluid to the overflow container, unscrew the overflow container’s twist top.   Use a funnel to avoid spilling fluid on the motorcycle if you need to add cooling fluid.   If any cooling fluid spills, wipe it up immediately.

ServMan26Feb_0015-650

SuppCooling_0010-650

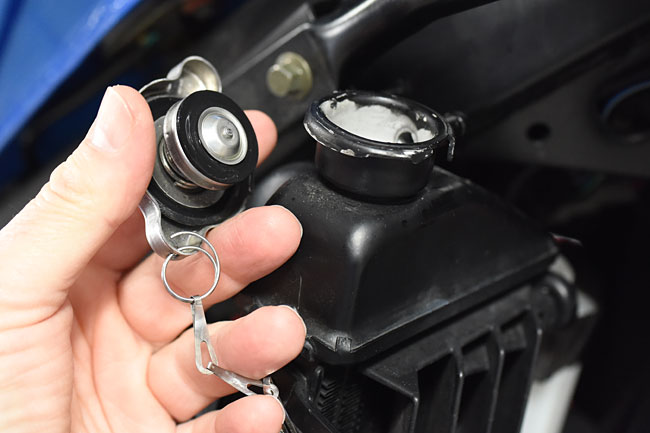
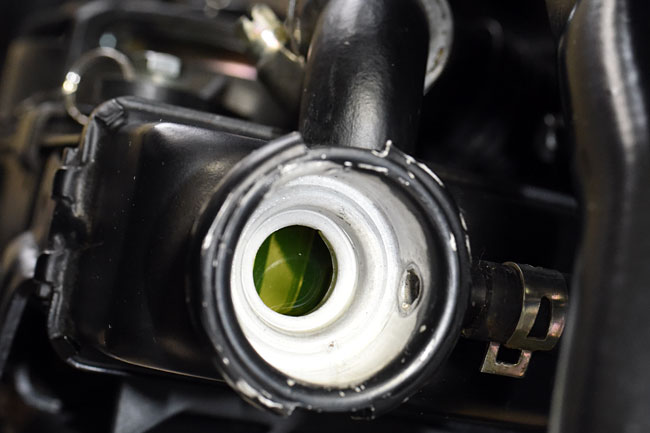
The second place to check the cooling fluid level is the radiator cap.  As mentioned above, use caution whenever opening the radiator cap, and only open it when the engine is cold.  The fluid level should be about even with the bottom lip in the radiator when the radiator cap is opened, as shown below.

ServMan26Feb_0017-650

ServMan26Feb_0019-650

SuppCooling_0009-650

Flushing And Replacing The Cooling Fluid

We recommend flushing and replacing the cooling fluid every two years.

Start by opening the radiator cap.  Again, make sure the engine is cold, and you should still put a cloth over the radiator cap and open it slowly.

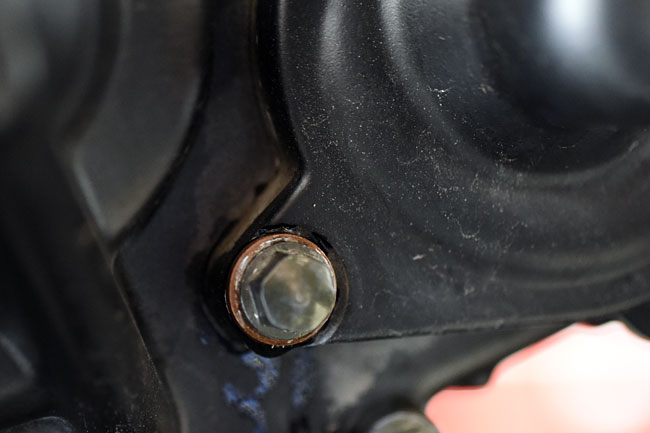
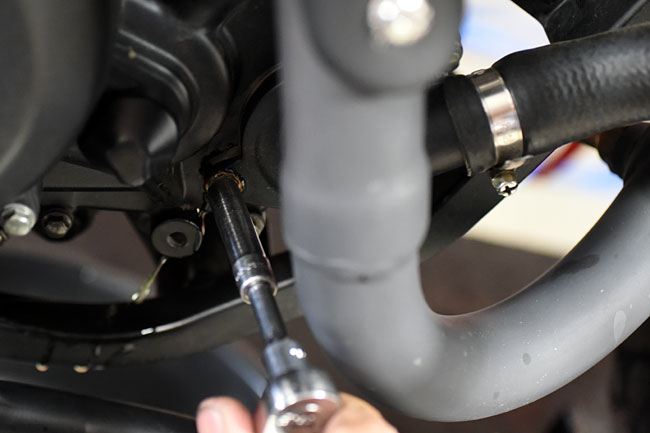
Place a drain pan beneath the motorcycle and then open the cooling system drain plug.  It’s located on the right side of the engine just beneath the water pump.  It looks like one of the bolts securing the water pump to the engine, but you can distinguish the drain plug by its location and the fact that it has a copper gasket beneath the bolt head.

ServMan26Feb_0021-650

ServMan26Feb_0024-650

Allow the cooling fluid to completely drain from the right radiator.   Move the bike to a completely vertical orientation to allow the radiator to drain completely.

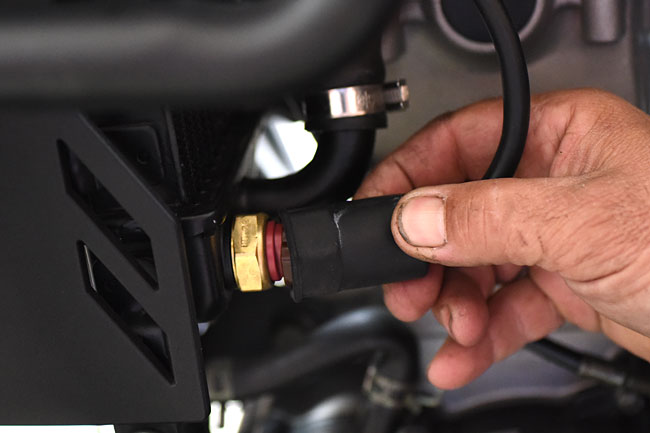
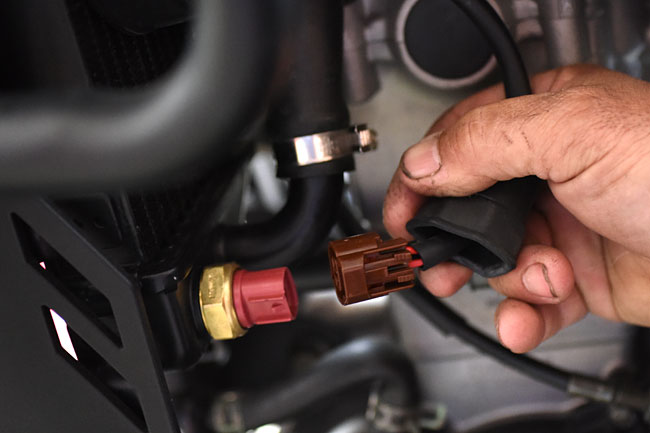
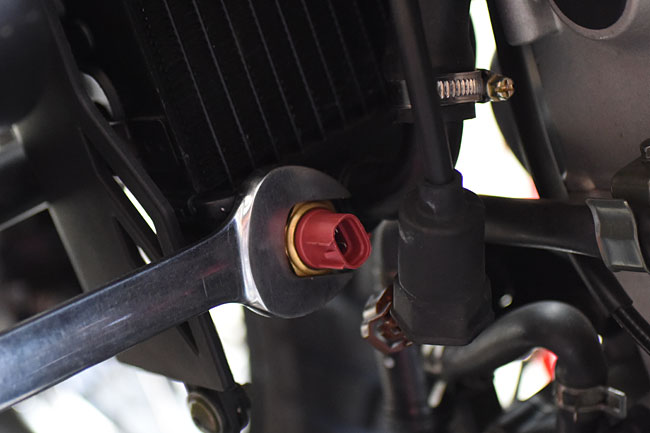
Next, drain the left radiator.   Place a drain pan underneath the left radiator.   Remove the electrical plug from the temperature sensor, unscrew the temperature sensor, and allow the cooling fluid to drain from the radiator.   Immediately wipe any spilled cooling fluid from the motorcycle.

ServMan26Feb_0025-650

ServMan26Feb_0026-650

ServMan26Feb_0028-650

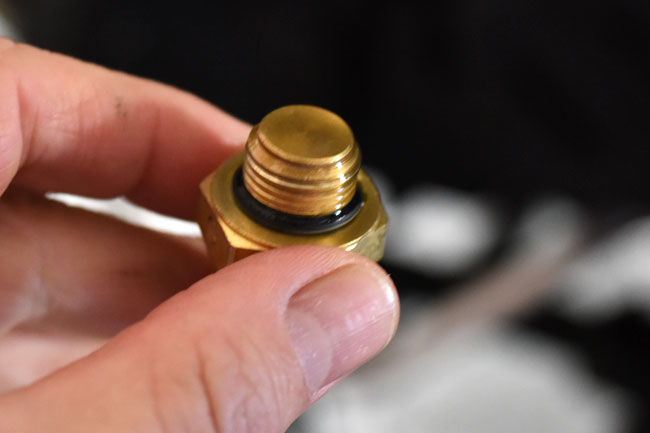
Note that the temperature sensor has a rubber gasket to form a seal between it and the radiator.   Take care not to damage this seal when removing and reinstalling the sensor.

ServMan26Feb_0030-650

At this point, all cooling fluid will have been drained from the motorcycle.

Reinstall the cooling fluid drain plug (just beneath the water pump) and the temperature sensor.

Add one liter of new cooling fluid to the radiator.   Use a funnel to prevent spilling cooling fluid on the engine, and again, immediately wipe up any spilled cooling fluid.   As you are adding cooling fluid, you will notice that the radiator will not take the entire liter of cooling fluid.   That’s because the cooling fluid needs to flow to the other radiator, the hoses, and the engine.

When the right radiator fills to its neck, and with the radiator cap off, start the engine and allow it to run such that cooling fluid is pumped to the engine and the left radiator.   You can burp the system by gently squeezing the cooling system hoses to move fluid through them.    Shut the engine off and add more cooling fluid to the right radiator.   Repeat this process until the cooling system is full.   When you are done, the cooling fluid will be even with the lower lip inside the right radiator opening.

Start and allow the motorcycle to run for several minutes to make sure the cooling system is operating normally.

Next, remove the cap from the overflow container.   Add cooling fluid to the overflow container such that the container is approximately half full.   Remember that this is a reservoir and the cooling system will pull from the overflow container and return cooling fluid to it.   Don’t have a cow about getting it exact.  Half full (or half empty, depending upon your outlook on life) is good enough.

After completing the above activities, reinstall all body work on the right side of the motorcycle.   Start your bike and go for a ride.  You’ll feel better.   Trust me on this.

Troubleshooting

You will know if the cooling system is not operating properly when the engine overheats (discernable via the instrument cluster temperature indication) or if you see cooling fluid leakage from the motorcycle.

If leakage occurs, you need to identify and correct it at the point where the motorcycle is leaking.   There’s no rocket science here; it’s Leak Detection and Fixing 101.

If the motorcycle overheats based on the instrument temperature gage bar indication, we’re going to refer you to the RX3 Service Manual (provided free with each new CSC RX3 motorcycle) for detailed troubleshooting instructions.


Posted in Best Of, CSC Motorcycles | Comments Off on Cooling System Maintenance

The Port of Long Beach

Our good buddy Juddy, who’s on the list for a new RX3, flew over Long Beach today and grabbed this photo for us…

image1-(2)-Off-Long-Beach

The folks at the docks are working the backlog.   The Germany is still a ways out, so we’re expecting most of this backlog to be beaten down by the time she arrives.

As always, we’ll keep you posted.


Posted in CSC Motorcycles | Comments Off on The Port of Long Beach

Fixing flats…

Flat tires.   It’s something we probably all worry about, and it’s something we all have experienced.   The good news is that it doesn’t happen very often.  The bad news is that when it happens, it’s usually out in the middle of nowhere and it’s up to us to fix it.  This maintenance tutorial focuses on fixing a flat on your RX3.   We’ll talk about the tools you’ll need, the approach, and how to do it.

First, a story.   The first time I ever came head-to-head with a flat tire it wasn’t even on my bike; it was on my buddy John’s Virago.  We were on one of our mega-expeditions in Mexico and we were riding through the jungle (no kidding, a real jungle) early on a Sunday morning somewhere way north of Puerto Vallarta.   When I say a real jungle, let me put that in perspective:  We were smack dab in the middle of where Liz Taylor and Richard Burton filmed Night of the Iguana.   Like I said, a real jungle.

John was on his Yamaha riding alongside me on this empty rural road, we were dodging iguanas, and I noticed John’s front tire was nearly flat.   I don’t know why ol’ Juan didn’t notice it.   I motioned for us to stop, we pulled over, and there was no question….that tire looked about as dead as Pancho Villa.   It had just a bit of air, but it was obvious…if we didn’t get it fixed soon, we’d be stranded.   In the middle of the jungle.   Somewhere in Mexico.

John didn’t seem too fazed by all of this.   That guy will probably live to be 900 years old.   Me, I’m a worrier.   I had visions of trying to survive by eating monkey meat (yeah, we could hear them out there in the trees) or lizards.   I remember thinking iguana probably tastes like chicken.   John said maybe he just needed air.   I explained to him how we were in the middle of the jungle on a Sunday morning, we hadn’t seen another car or human being in hours, and things were looking bleak.   John’s only thought was that maybe we’d see something up ahead and we could get the thing fixed there.    We hadn’t seen another structure for the last 60 or 70 miles.   Nothing.   Just trees.   And lizards.

With me feeling deep despair and John being the eternal optimist, we slowly started out again.  We didn’t want to go too fast; there could not have been more than about 8 psi in that front tire.

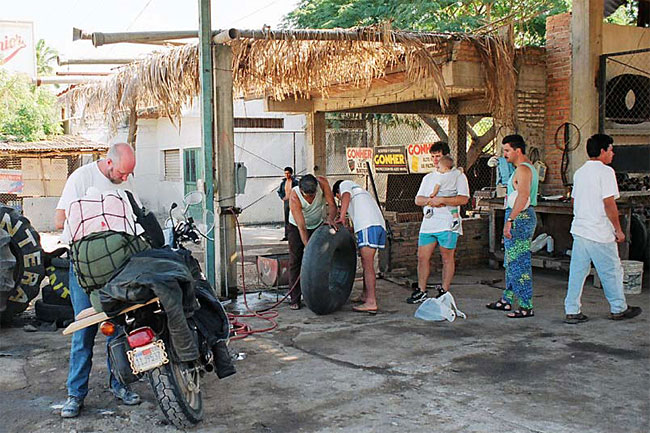
Son of a gun, we hadn’t gone a quarter of a mile when we rounded a bend on that jungle road in the middle of Mexico.   Whaddaya know, there was a llantera (that’s Spanish for “tire shop”) on the right, tucked away in the trees, and it was open!  On a Sunday morning.   There must have been 12 or 15 people out in front, including a bunch of Mexican kids playing with old tires.   It was a hot spot.   I wondered if Richard Burton had ever been there.

JohnGetsLucky

John asked the guy who looked like he was in charge if he had air.

“Que?” was the response.

“Air,” John said again, a little louder.   When someone doesn’t speak English, we Yankees always think if we say the same thing again louder they’ll comprehend.

No dice.   The language barrier.

John made a hissing sound and pointed at his tire.

“Ah, aire,” the llanterian said.   He pronounced it “aye-day.”

So, back to the main attraction.   Most of the places we ride our adventure touring bikes aren’t going to be blessed with a Sunday morning llantera in the middle of nowhere, so we have to know how to fix our tires when they need fixing.

Here we go, boys and girls.  Let’s fix a flat.

The first bit of advice I always give people is to check for any obvious cause of the flat tire on the outside of the tire.  The reason you want to do that is it will make finding the leak in the tube a lot easier.  If you can find it, great.   You’ll know about where to look on the tube for the hole to be repaired.  If you can’t find it, we still have a few tricks we can use, and I’ll get to those shortly.

At this point, let me digress and point a couple of things out.  When you get a flat tire, you’re going to be stopped for a couple of hours.   Don’t sweat it.  It’s all part of the experience, and as a good friend once told me, when you’re on an adventure ride, the real adventure starts when things go wrong.    Don’t get wound up.   We’ll fix it.

Next point…while some folks swear by those “fix-a-flat” kinds of cans that you can just plug into a flat tire and make your cares go away, I’m not one of them.  I’ve tried them a couple of times and I’ve never had good results.   My advice is this:   When you have a flat, you need to fix it.   There are no shortcuts.

Before you prop up the bike so you can remove the wheel with the flat tire, loosen the axle bolts (just loosen them, do not remove them) .   You want to do this before you get the bike in the air because once the bike is in the air, it won’t be as stable as it was when it was on the sidestand.   Do the heavy torqueing (or maybe I should say un-torqueing) before you get the bike in the air.

Back to lifting the affected wheel…if you have our accessory centerstand, this is a lot easier to do.  If you do not (and most of the bikes I’ve ever had are in this category), you need to find a way to prop up the bike so that you can remove the wheel.

Some folks just lay the bike on its side.   I advise against doing that for a lot of reasons.  Another approach is a prop that works with the sidestand to hold one end of the bike in the air.   Yet another approach is to use our accessory maintenance center stand (see the photo below).

All of these things involve carrying more stuff on the bike.   Necessity is the mother of invention, and if I need to prop up a bike, I’m going to find a way to do it…a fallen tree, a log, a box, or something that will get the bike off the ground.   How you do that is up to you.  The bottom line is that you’ve got to get the bike off its feet, so to speak.

Once you’ve got the affected wheel off the ground, you need to remove it.   Our photos here show doing this with the rear wheel because there’s more to removing the rear wheel than there is to removing the front wheel.  Everything that follows in this maintenance tutorial pertains to the rear wheel only, but other than the nuts and bolts of the rear wheel removal process, what we have here is equally applicable to the front wheel.

Remove the rear axle nut (it’s a 17mm; the bolt head on the other side is an 18mm) and pull the rear axle out from the left side of the motorcycle.  You may have to tap it from the right side to get it started.

ServMan24Feb_0014-650

ServMan24Feb_0013-650

ServMan24Feb_0032-650

ServMan24Feb_0035-650

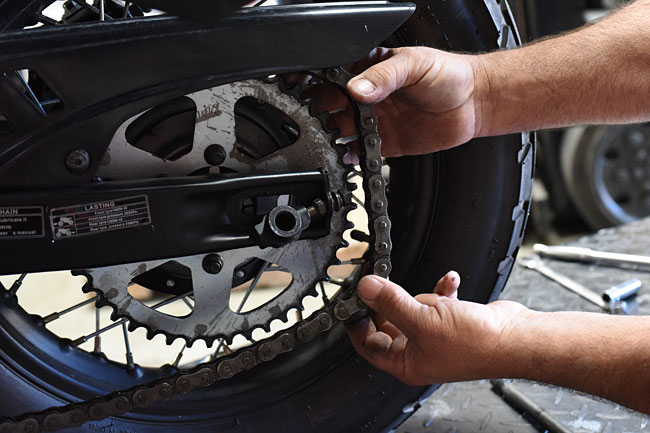
After you have removed the axle, push the rear wheel forward and lift the chain off the sprocket.   Your hands will get dirty (don’t get your shorts in a knot over this; it’s all part of the adventure).   On the RX3, you don’t have to remove the chainguard to get the chain off.   Also, you don’t have to remove the rear brake caliper to get the wheel off the bike.   You’ll want to make sure, though, that after you have removed the wheel, you don’t operate the rear brake (it will make reassembly challenging).

ServMan24Feb_0036-650

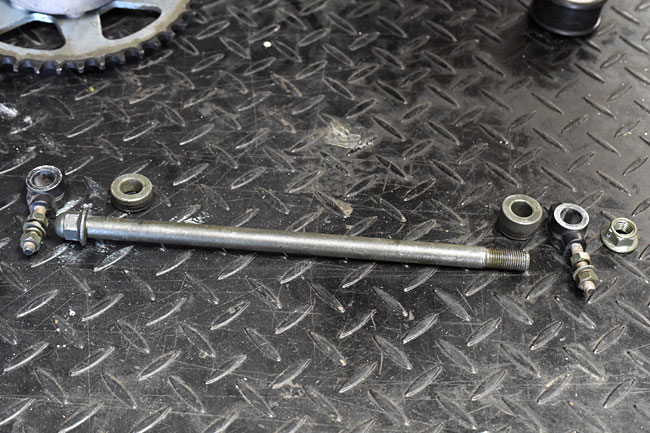
Once the chain is off the sprocket, roll the wheel out from under the motorcycle.   On the rear wheel, there are two bushings (one on either side of the wheel).   The thicker bushing goes on the right side of the motorcycle, and the thinner bushing goes on the left side of the motorcycle.   You’ll want to remember that when you are reinstalling the wheel.  You can see the order of the axle and the bushings in the photo below.

ServMan24Feb_0045-650

Here’s a shot showing Rich rolling the tire away from the motorcycle.

ServMan24Feb_0038-650

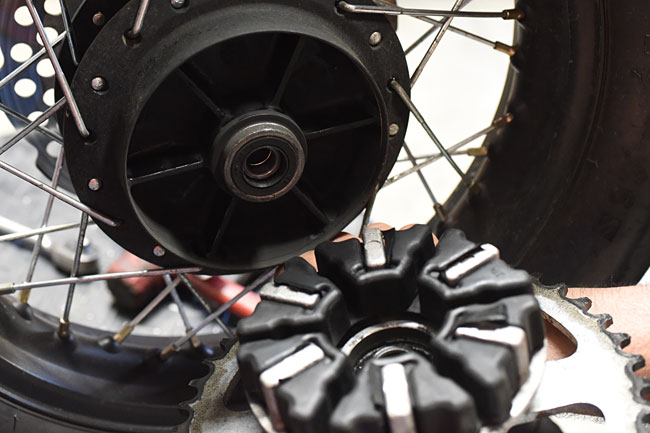
After removing the bushings, remove the sprocket and the cush drive, and set these items aside.

ServMan24Feb_0042-650

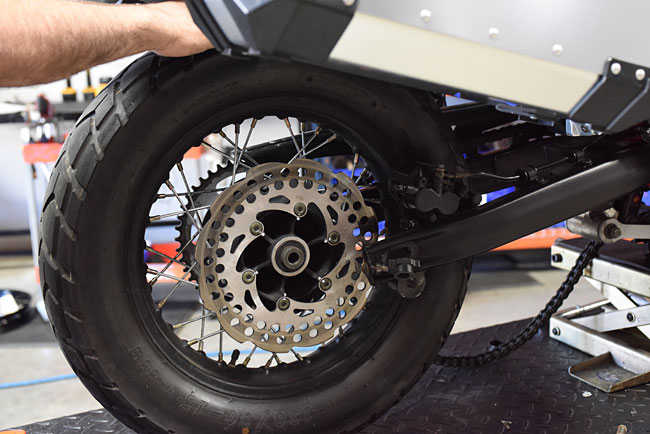
Place the wheel on its side, with the brake disk facing down (as shown in the photo below).

ServMan24Feb_0049-650

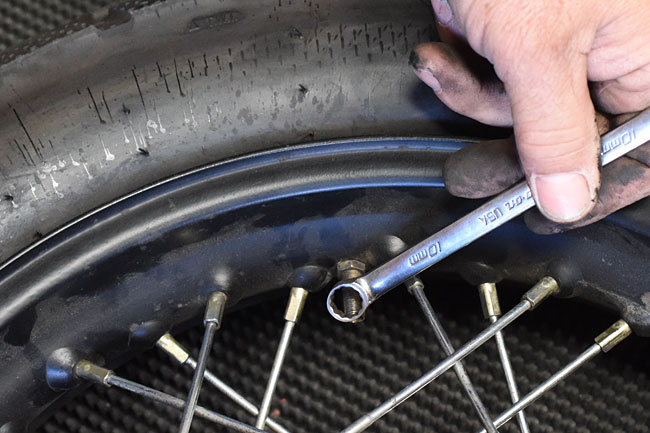
Even though you have a flat tire, there may still be residual air pressure in the tube.   Remove the valve cap and depress the Schrader valve to allow any remaining air to escape.   With a 10mm wrench, loosen the nut around the valve stem, and then unscrew it completely by hand.

ServMan24Feb_0054-650

The next step is to break the bead around the tire.   The good news here is you only need to do this on one side of the tire.   Usually, just stepping on the tire (as shown below) will unseat the tire from the rim.

ServMan24Feb_0050-650

In rare cases where the tire doesn’t want to separate from the rim, you might want to get two people to step on the tire.  Other approaches for breaking the bead can involve using a c-clamp, or using another motorcycles’ sidestand (lean the motorcycle against the sidestand after putting the sidestand on the tire near the bead).   These latter actions are uusally unnecessary, however.   Most of the time, simply stepping the tire will break the bead.

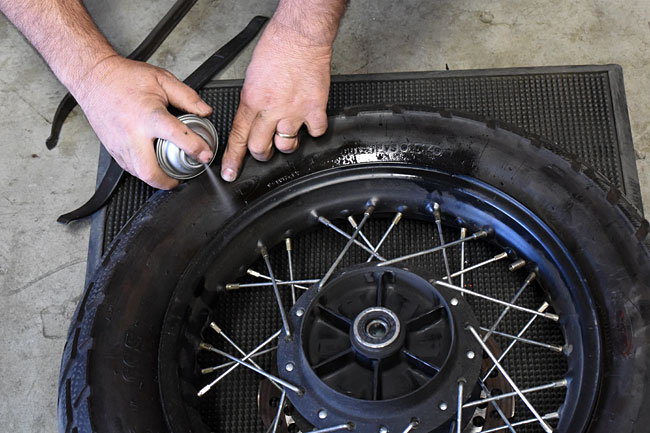
After you’ve broken the bead, spray the area between the bead and the rim with a silicone spray lubricant (I like WD40, and I usually have a can of this in the saddlebag).

ServMan24Feb_0057-650

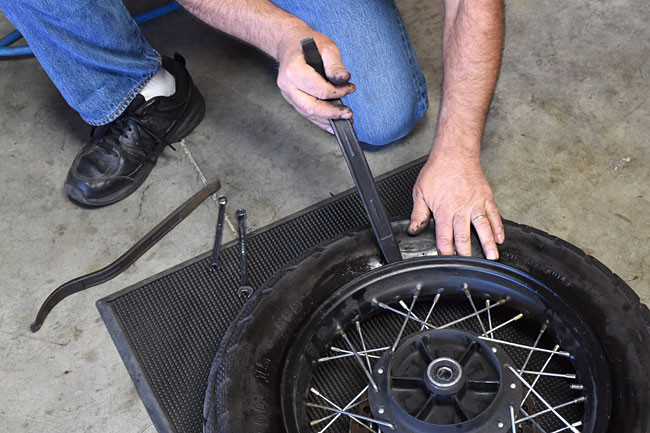
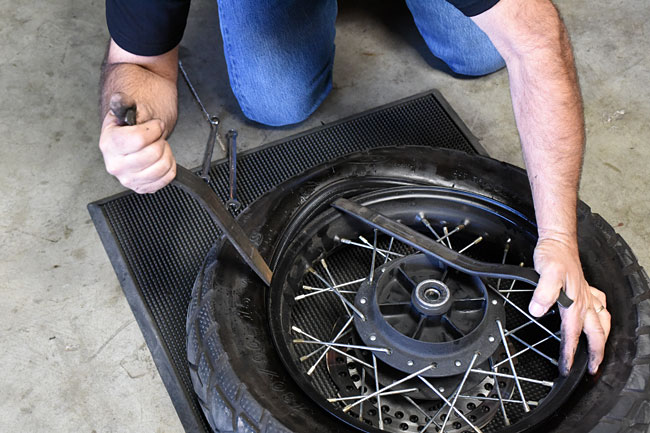
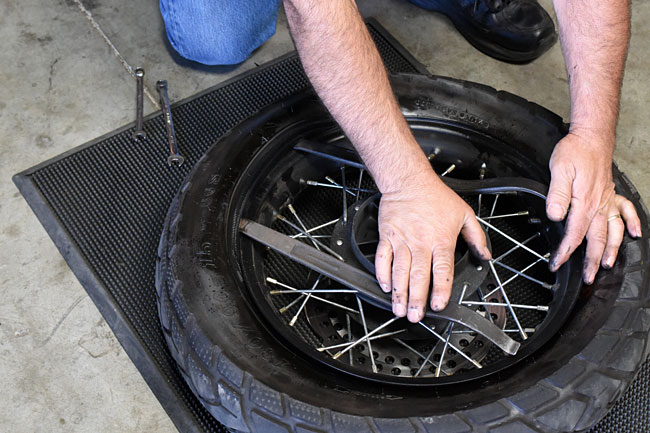
Using one of the tire irons (you’ll need two), insert the tip between the tire and the bead, and pull the bead over the rim.   Using the second tire iron, pick a location about 6 inches away (measured circumferentially on the rim) and do the same thing.     Remove the first tire iron and repeat the process.   You usually only need to do this once and the tire will pop off the rim on the side you’re working.   You do not need to remove the tire from the rim; you only have to get it off the wheel on one side.

ServMan24Feb_0059-650

ServMan24Feb_0063-650

ServMan24Feb_0064-650

At this point, push the valve stem back into the rim so that it is no longer passes through the rim.   Remembering where the puncture occurred on the tire (if you were able to identify the puncture location), pull the tube out of the tire (you’ll be pulling it out between the tire and the rim on the side where you separated the tire from the rim).

Carefully inspect the tube in the area adjacent to the tire puncture location and inspect for the source of the leak.  If you find it and if it is small (they almost always are), you can most likely patch it.  If the tear is more extensive, you will have to replace the tube.

If you can’t find the leak, partially inflate the tube and listen for hissing.  You may have to put the partially inflated tube near your ear and rotate it until you find the leak.  If you are near water, you can immerse the tube and look for bubbles to locate the leak.  If you hear it but can’t see it, you can rub spit around the general area and look for the leak.

People sometimes ask this question:  Is it okay to patch tubes, or should I replace them?   Here’s my advice:  I don’t like to carry complete tubes because they take up a lot of space (and you’ll need two of them; the front and rear tubes are different sizes).   I carry a patch kit, but I view the patch kit as a temporary fix.  It will get me home or to the next town where I can buy a new tube.  I don’t view a patch as a permanent fix.

Regarding a patch kit, we sell a kit for your RX3 that contains what you need to do everything described in this maintenance tutorial.

Tube-Repair-Kit

You can call us at 909 445 0900 to order the kit above or any of the other items we describe in this tutorial.

A bit of advice on patching a tube:  The kit will say how long you should let the glue dry.   Don’t rush it.   Follow the directions.   And one more bit of guidance:  After you’ve patched the tube and allowed it to dry, partially inflate if before putting it back in the wheel and tire.   You don’t want to find out the patch is no good after you’ve reassembled everything.  Pump it up, spit on the patch and rub it around, and look for bubbles.  If it passes our high-tech spit test, you’re good to go.

Before you reinstall the tube (either one you’ve patched or a new one), reach in with your hand and gingerly feel around the inside of the tire.   You are looking for anything that might damage the tube when you reinstall it.   You want to do this delicately because if there is something sticking into the tire, you don’t want to cut yourself on it.  If you find anything, remove it.

After doing the above, deflate the tube and gently reinsert it into the tire.  Position it so that the valve stem is aligned with the hole in the rim.  Push the valve stem through the hole in the rim and then reinstall the 10mm nut on the valve stem to lock the valve stem in place.   Gently tuck the tube completely in to the tire.

Now we need to reinstall the tire on the rim.   You’ll able to get about 50% or so of the inside tire diameter over the rim with your hands.   The remainder will have to be done with your tire irons.   This is not a time to rush.   Take things slowly and be extra careful not to pinch the tube between the tire and the rim (and don’t damage the tube with the tire irons) when you are reseating the tire.   Liberal use of WD40 will help here.

Reinstall the tire and wheel on the motorcycle before you inflate the tube.   This is the reverse of the process I described above.

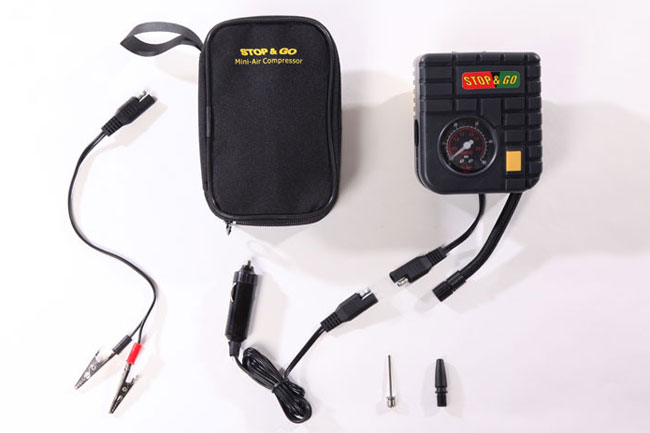
After accomplishing all of the above, it’s time to inflate the tire and get it to seat on the rim.    There are several approaches to this, too.   In a perfect world, you’ll have a source of compressed air nearby (for example, if you can, you might make it to a gas station when you realize you are getting a flat tire).   Most of the time we’re not that lucky.   You can carry a small compressor that runs on the motorcycle’s electrical system.   I’ve used these, they work well, and we sell those, too.   Again, give us a call at 909 445 0900 for a price.

Compressor

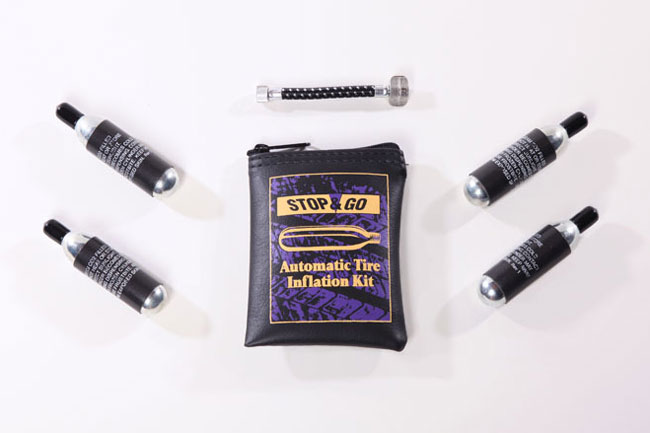
Still another approach is to use CO2 cartridges, and you guessed it, we have those, too.

CO2

There’s yet another approach, and that’s to carry a small bicycle floor pump.   It’s low tech, but it works, and it will get the pressure high enough to seat the tire on the rim.    You’ll get a workout pumping up a motorcycle tire, but then you’d get a workout if you had to walk out of wherever you got a flat tire, too.  The disadvantage is space.   Most inexperienced folks pack too many things on a motorcycle trip.   I like using s small bicycle pump, but I don’t like all the space they take up.

So, you’ve fixed your flat tire, you’re ready to roll, and you have a good war story to share with your friends.   You can even throw in the stuff about Night of the Iguana and being stranded in the jungle if you want (hey, it’s your story)!


Posted in CSC Motorcycles | Comments Off on Fixing flats…

Hard core Peruvian RX3 adventure riding!

Hey, this is interesting! I found a Facebook page that is a Peruvian RX3 owners group. Ever wonder what it might be like to ride the RX3 in Peru?   In the snow?   Way, way up in the mountains?  Well, wonder no more!

Check this out, my friends…especially the second video!

Very cool stuff.   These are definitely hard-care adventure riders!  Thank you, our friends in South America!


Posted in CSC Motorcycles | Comments Off on Hard core Peruvian RX3 adventure riding!

RX3 Chain Adjustment

Our maintenance topic du jour is chain adjustment, which is a bit of a misnomer because adjusting the chain on a motorcycle is actually two jobs:   Adjusting chain tension and aligning the rear wheel.   The challenge here is to both achieve the correct tension in the chain and to align the rear wheel while we are doing so.

You should check the chain adjustment at your motorcycle’s first scheduled maintenance and every maintenance thereafter.   You’ll most likely see the biggest need for adjustment at the first service interval, because chains do most of their stretching in their first several hundred miles of use.

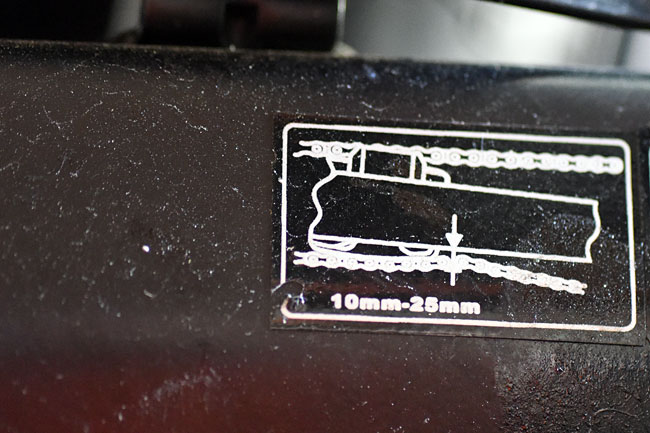
The first step is to check your chain slack.   Zongshen advises 10mm to 25 mm of chain slack, which is indicated by a decal on the left swingarm.

ServMan24Feb_0010-650

The decal is a bit misleading, and I believe 10mm is a bit on the tight side.   On adventure touring bikes with long swingarms such as the RX3, I like to set the chain a bit on the loose side.  I adjust the chain slack to be between 3/4 of an inch and 1 inch (25mm, the high side of the Zongshen recommendation, is just under 1 inch).

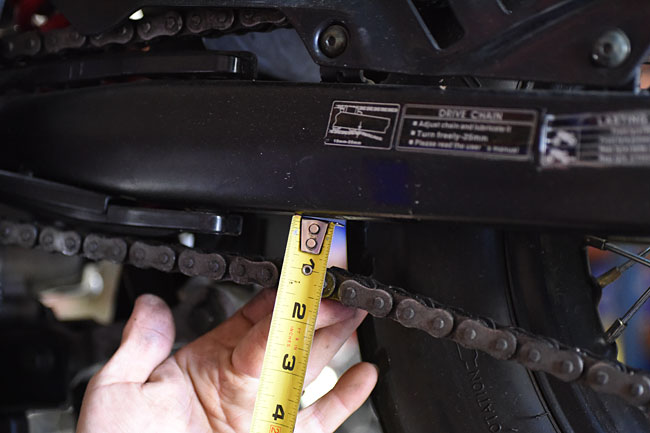
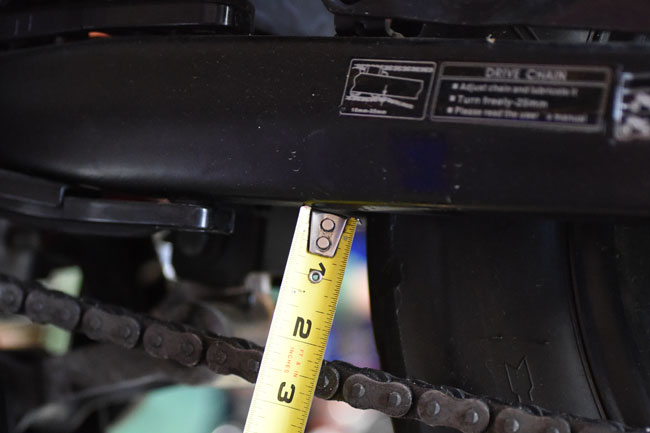
You generally measure chain slack by flexing the lower portion of the chain up and down on the bottom run (between the front and rear sprockets) and measuring the amount of “play” from top to bottom.   You get varying opinions as to whether the rider should be on the bike or not.   I do it with no rider on the bike, but with the motorcycle on the sidestand.   This puts the weight of the motorcycle on the wheels and takes up some of the “sink” from the bike compressing the suspension.  I’ll push the chain all the way up, and then pull it all the way down and compare the readings on a ruler or a tape, as you see in the photos below…and as you can see in these photos, this chain is a bit too loose.

ServMan24Feb_0011-650

ServMan24Feb_0012-650

Let’s assume you’ve done this and you find the chain is either too tight or too loose.  When this occurs, we need to loosen (not remove) the rear axle, and loosen the chain adjustors on both aft ends of the swingarm.

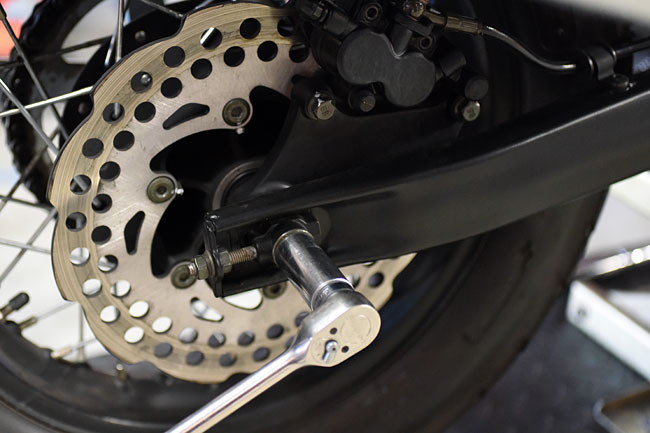
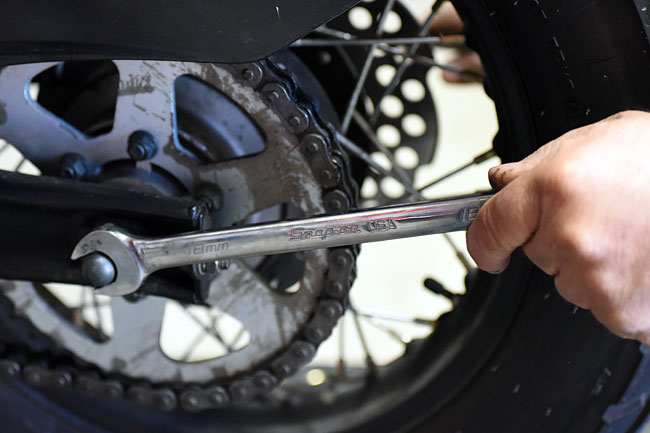
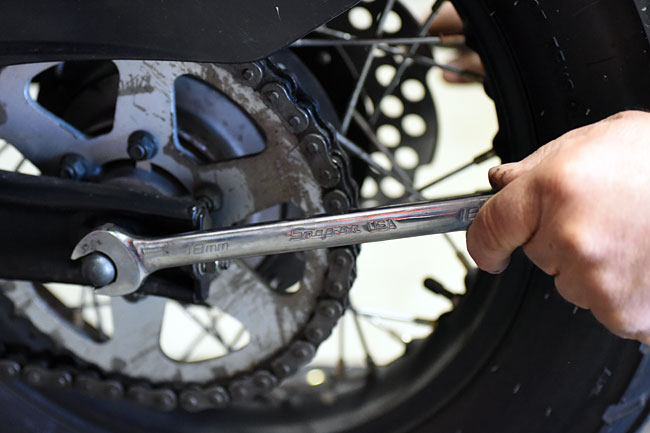
Let’s approach the rear axle bolt first.   The rear axle bolt takes a different wrench/socket size at its two ends.   The bolt head is 18mm on the left side of the bike, and the rear axle nut is 17mm on the right side of the bike.

Loosen the rear axle with either wrenches or sockets.  You don’t need it to be real loose.  Finger tight is good enough.   We just want to be able to move the rear axle back and forth in the swingarm after we loosen it.

ServMan24Feb_0014-650

ServMan24Feb_0013-650

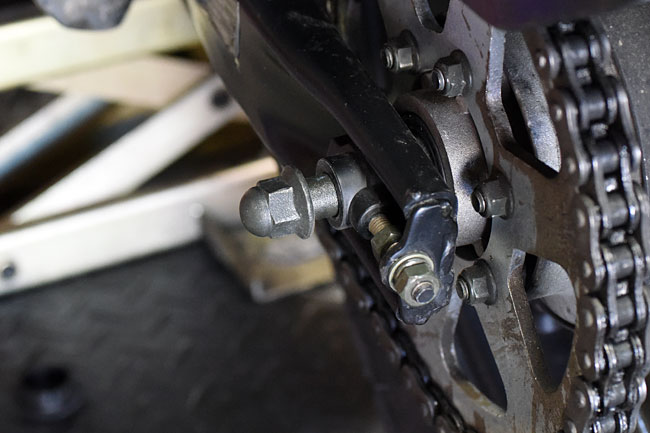
Next, loosen the chain adjustors on both sides of the swingarm.   These adjustors have two nuts, one on each side of the adjustment plate, as shown below.  Note that in the photo below, the rear axle adjustor nuts have already been loosened.

ServMan24Feb_0024-650

This is where it gets interesting.   Our challenge at this point is to drive the rear axle either forward or rearward using the rear axle adjustor nuts while simultaneously positioning the rear axle such that we achieve the desired chain tension (as described above) and we maintain rear wheel alignment.

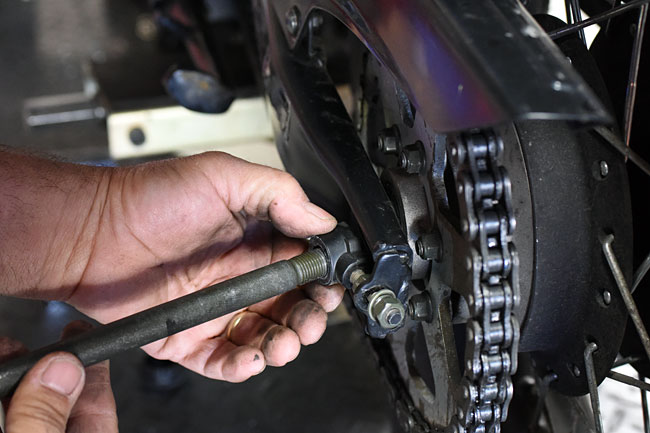
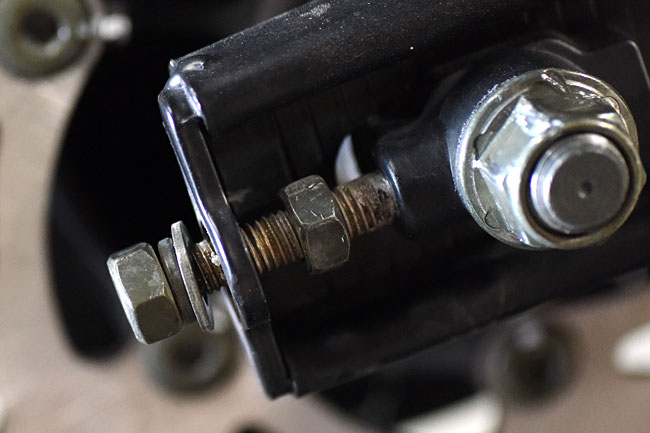
Use the rear axle adjustor nuts to move the wheel either forward or backward.  The inside nut moves the wheel forward, and the outside nut moves the wheel backward.   Note that there are no washers between the inside nut and where it bottoms against the end of the swingarm, and that there is both a flat washer and a lockwasher between the outside nut and the end of the swingarm.   Both axle adjustor nuts are 13mm.

The trick is to get the wheel aligned and the chain properly tensioned.   You need to check both rear axle alignment and chain tension as you make these adjustments.

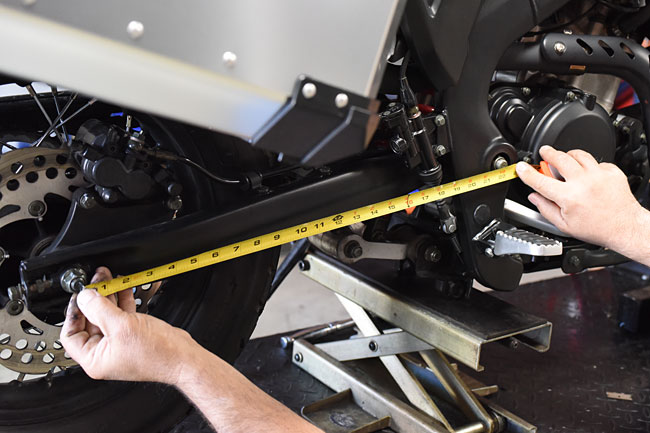
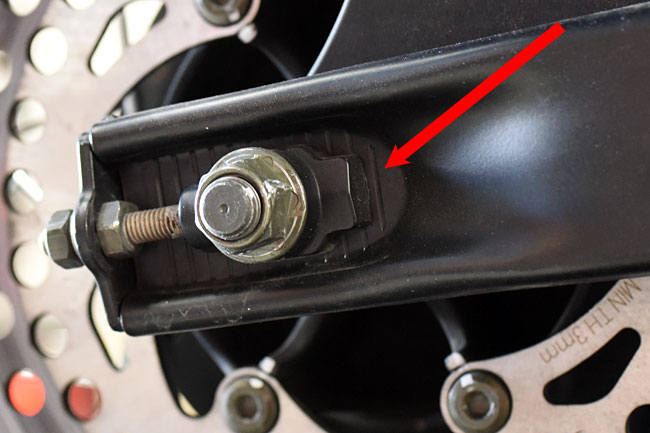
To attain correct alignment, there are two approaches.   You can actually measure the distance between the center of the swingarm pivot point and the center of the rear axle (as shown in the photo below), or you can observe the location of the adjustor on the swingarm scribe marks.  The photos below show both approaches.   I prefer actually measuring the distance (the first approach) because on many motorcycles the scribe marks are not always accurate.   When we do this, you can pop the plastic swingarm pivot point covers off with a small screwdriver.  On the RX3 used for the chain adjustment in these photos, we found that when the rear axle was perfectly aligned, the rear axle adjustors were perfectly placed with respect to the swingarm scribe lines on both sides of the motorcycle.

ServMan24Feb_0025-650

ServMan24Feb_0026-650

ServMan24Feb_0030-650

The above photos showed us checking rear wheel alignment by measuring the distance between the swingarm pivot point and the rear axle.  The other approach (as mentioned above) is to check the scribe marks on the swingarm, and use these to compare the relative position of the adjustors on both sides of the motorcycle.

ServMan24Feb_0004a-650

Once the axle is aligned and the chain tension is where it needs to be, you can tighten the rear axle nut.   I always check the chain tension again after tightening the rear axle nut just to make sure it hasn’t moved.   After doing that, tighten all four of the axle adjustor nuts, and you are good to go!


Posted in CSC Motorcycles | Comments Off on RX3 Chain Adjustment