Dashing around…

Here’s a quick look at the RX3’s trip meter and odometer, the kilometers vs miles features, and how to set the time on your onboard clock.

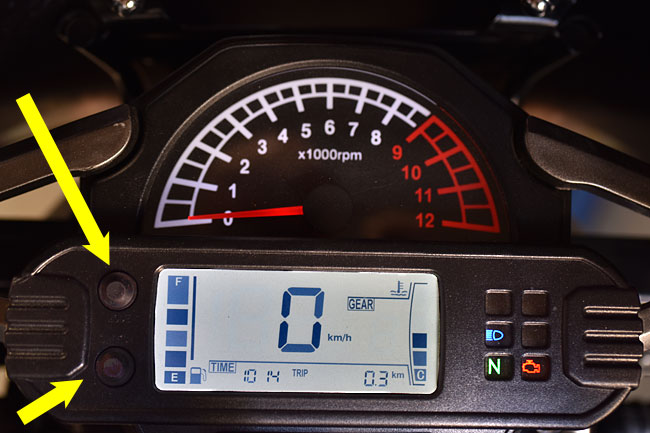
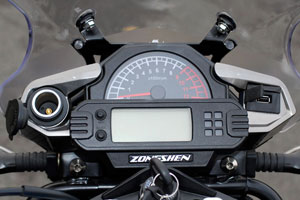
The instrument cluster has two pushbuttons on the left side of the instrument cluster…

Instruments_0014-650

The lower pushbutton toggles the readout between miles and kilometers.   Each time you push it, the display switches between the two.  This effects the trip meter, the odometer, and the speed readouts.

The upper pushbutton toggles between the trip meter and the odometer.   You’ll also see a digital readout that shows if the miles (or kilometers) are for the odometer (the total mileage on the bike) or the trip.   If you want to reset the trip meter to zero, push the bottom pushbutton down and hold it for two seconds.

The RX3 instrument cluster has a clock, which is a nice feature.   To set it, push the top pushbutton and hold it down for two seconds, and the hours display will start flashing.   Push the lower pushbutton down and the hour will advance with each push (or, you can hold it down and the hours will scroll ahead).   After you’ve set the hours, push the top pushbutton again and the minutes display will start flashing.   It’s the same drill here…each time you push the lower pushbutton, the minutes display will advance by one minute (or you can hold it down and it will scroll through the minutes).   When you’ve set the time, you can just leave the display flashing and it will accept the new time after a couple of seconds, or you can push the top pushbutton again and it will set the new time.

The hours display is on a 24-hour clock, so 1:00 p.m. is 13:00, etc.


Posted in CSC Motorcycles | Comments Off on Dashing around…

Not an RX3 color option…

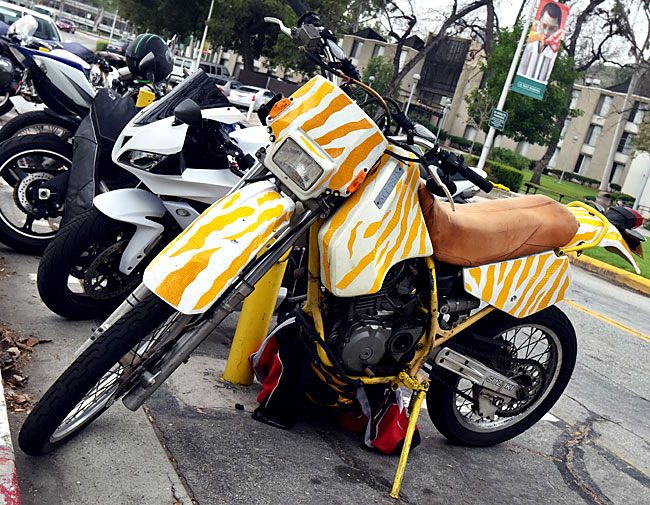
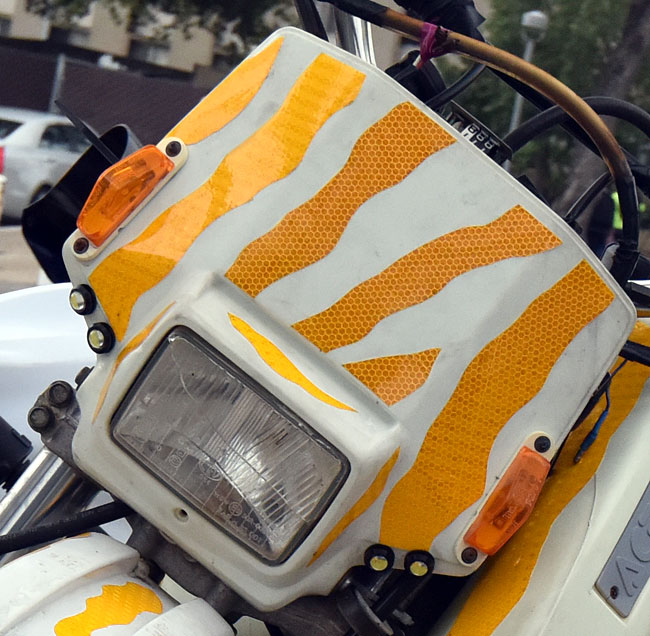
I wanted to get that title out first, just in case any of you thought we might be considering this.   I spotted this bike yesterday, I had the Nikon with me, and here you go…

Instruments_0019-650

So, like I said, we’re not thinking of this as one of our color options (we’re sticking with our RX3 metallic red, metallic blue, orange, and white), but when I saw this parked outside the Engineering building, I had to grab a shot.  It’s a Suzuki something-or-other with a KLR front fender, but what obviously got my attention was the yellow zebra paint treatment.   On closer inspection, it turned out that the bodywork was not painted at all.   What this young fellow did was apply adhesive reflective material cut into zebra-patterned stripes…

Instruments_0019-2-650

Pretty clever, highly visible, and an interesting photo for the blog.

Ryan and I are getting out on the RX3s in a bit, so watch for more photos later today or tomorrow.


Posted in CSC Motorcycles | Comments Off on Not an RX3 color option…

Lupe says hi!

Good things going on with the CSC Mustangs, too, folks…those bikes are still awesome and Steve has some killer deals on them…

DSC_0631_0025-Lupe-650

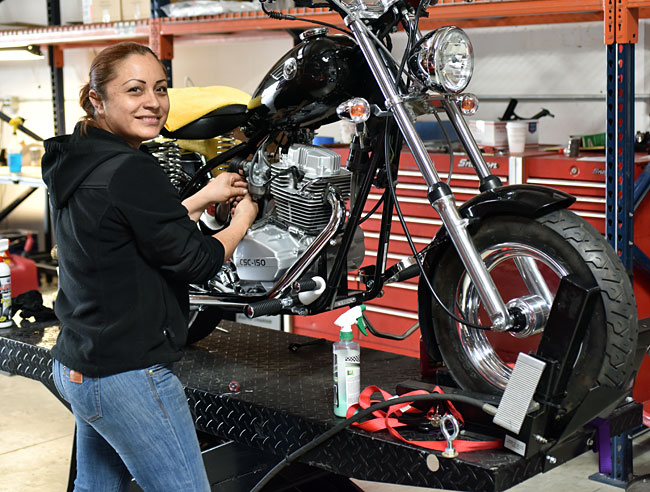
Lupe is putting the finishing touches on a customer’s bike above, and every time I see one of the Military Series bikes I start reaching for my check book…

DSC_0632_0027-650

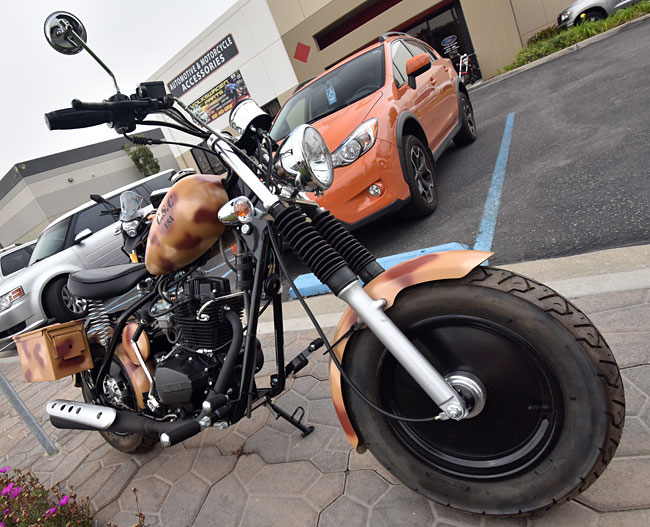
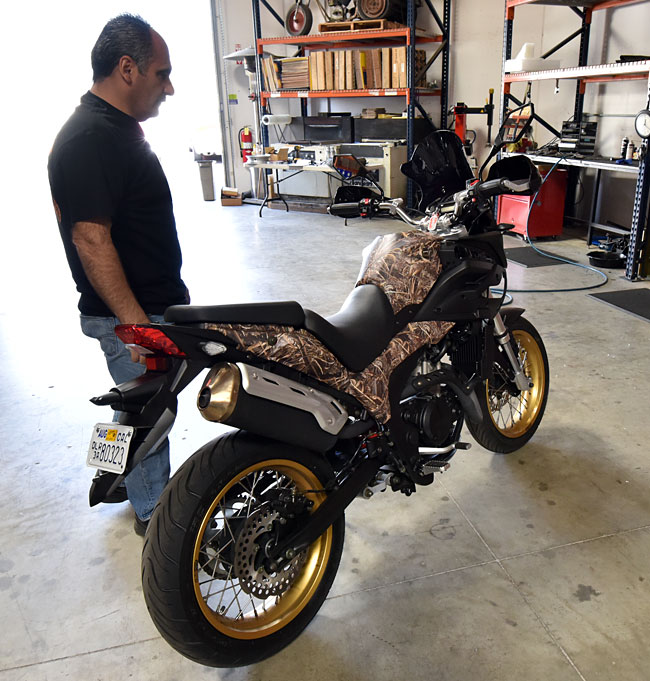
That desert camo bike is calling to me.   Or maybe it’s calling to you…


Posted in CSC Motorcycles | Comments Off on Lupe says hi!

CSC RX3 Electrical System Tutorial

The RX3 electrical system is both advanced and straightforward.   This tutorial explains the system’s main components, their locations, their functions, and some suggestions in the unlikely event you’ll ever need to troubleshoot the system.   I’ll throw in just a bit about some of the cool features we’ve included on the CSC RX3, too.

The CSC RX3 has an 18-pole, 300-watt stator that puts out plenty of power, which we specified when we defined our bike’s configuration with Zongshen.   To put the 300-watts in perspective, the mighty KLR (a motorcycle I own and love, and a benchmark motorcycle in the adventure touring niche) only has a 187-watt stator.   The reason this is important is that adventure riders frequently hang a lot of accessories on their bikes (heated vests, driving lights, heated grips, etc.), and on bikes with smaller electrical outputs, you can run the battery down while riding with all the accessories powered up.   The RX3 needs 160 watts for normal operation, which means that you have another 140 watts for your accessories.

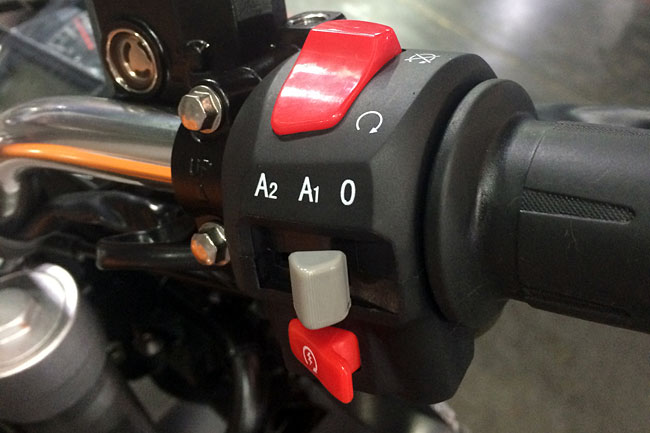
Two other cool features on the RX3 are the built-in accessory outlets already wired into the main harness, and the accessories switch located on the right handlebar.   On the non-US bikes, that switch was used for the headlights and parking lights.   In the US, the headlights have to be on all the time, so the switch isn’t necessary.  Steve had a great idea, though, and Zongshen made it happen…we’re using that switch to control the accessories outlets.

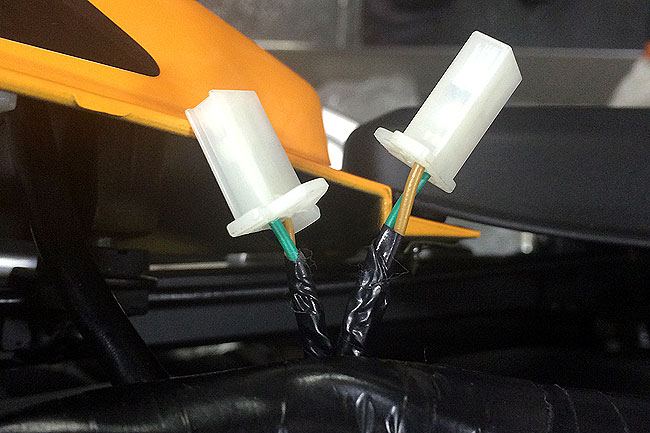
A1A2Switchgear-650 A1A2Connector-650

_DSC0055-AccOutletsIf the built-in accessories outlets are not enough for you, you can buy our dash-mounted accessories outlet kit, which provides USB and cigarette-lighter-type 12V ports.

We specified an RX3 main harness already wired to accept the dash-mounted accessories kit for the CSC RX3 (we thought you might not appreciate having to pull  out your old harness, and then buy and install a new harness).  We ate the cost increase for the dash-outlet-compatible harness (you’re getting that for free).

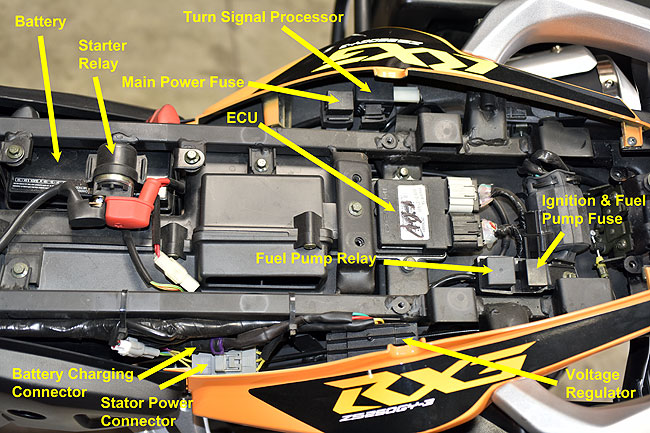
Alright, enough for the commercial.   Let’s get on to the main attraction, and that’s the CSC RX3 electrical system and its components.  Most of the electrical doo-dads on this bike are located under the seats.  The horn, the lights, and the turn signals are pretty obvious, so we’re not going into any detail on those items.  We’ll focus instead on the other items.

To get to the electrical components, remove the seats (the rear seat pops off with the ignition key when you insert and turn it in the key receptacle on the left side of the bike).  The front seat requires removing two bolts on the back of the seat.   You can also remove the body panels under the seat to get to the battery and some of the plugs a little better.

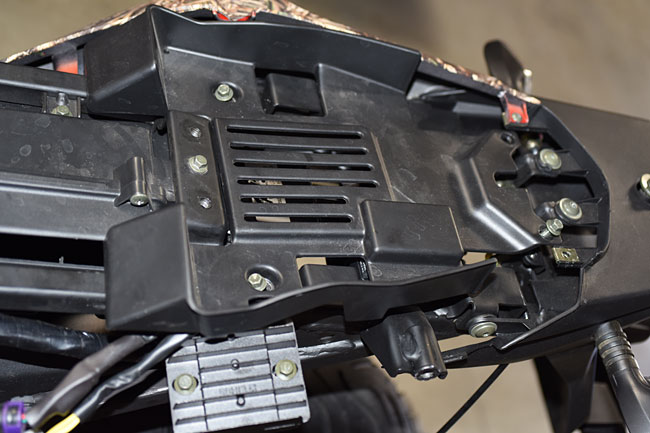
Once you have the seats off, you’ll notice that there’s a plastic cover under the rear seat secured by four bolts.   Remove those and you’ll have access to most of the electrical system components.

Electrical_0023-650

Here’s what it looks like…

DSC_0628_0019-650

So, let’s talk about some of the system’s main components…

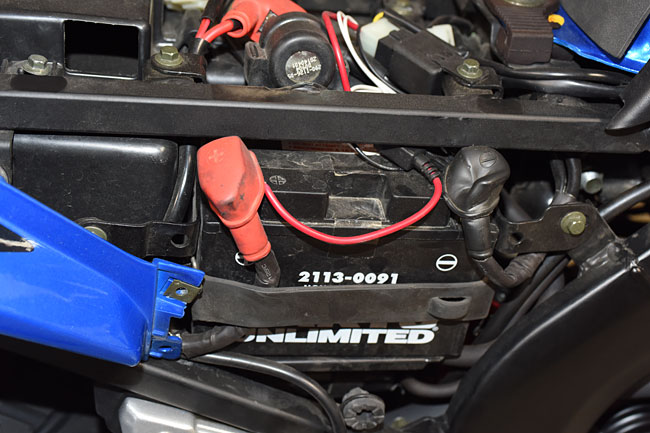
The battery is located under the seat on the right side of the motorcycle.   It is accessible by removing the right body panel underneath the seat.  It is not necessary to remove the seat to gain access to the battery.  It will be easier to work around the battery, however, if you remove both seats.

brakes_0001-650

The red harness is the positive side of the motorcycle electrical circuit; the black terminal is the negative side of the motorcycle electrical circuit.

When installing a new battery, add acid to the cells.   Prior to installing the caps, charge the battery with a battery charging device with a charging rate that does not exceed 2 amps.   We recommend using a Battery Tender charging device for this initial charge, which is well below 2 amps.  (We further recommend using the Battery Tender charging device to keep the motorcycle battery charged when the motorcycle is not in use for an extended period of time, as this will extend battery life.  If you wish to purchase a Battery Tender, give us a call at 909 445 0900.  I keep my bikes on a Battery Tender all the time.)

After the battery is fully charged, install it in the motorcycle.   The battery should be oriented so that the positive terminal faces the rear of the motorcycle, and the negative terminal faces the front of the motorcycle.    Connect the red cable to the positive terminal, and the black cable to the negative terminal.   Secure the rubber retention strap around the battery, and you’re good to go.

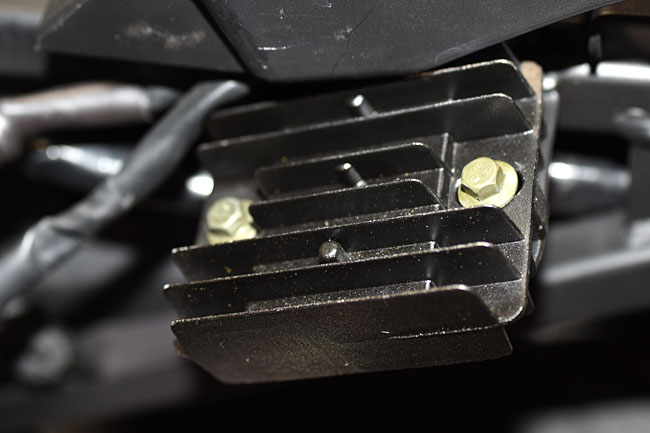
The voltage regulator is the key component for the motorcycle’s power supply.   It is located under the rear motorcycle seat on the left outboard side of the frame…

Electrical_0009-650

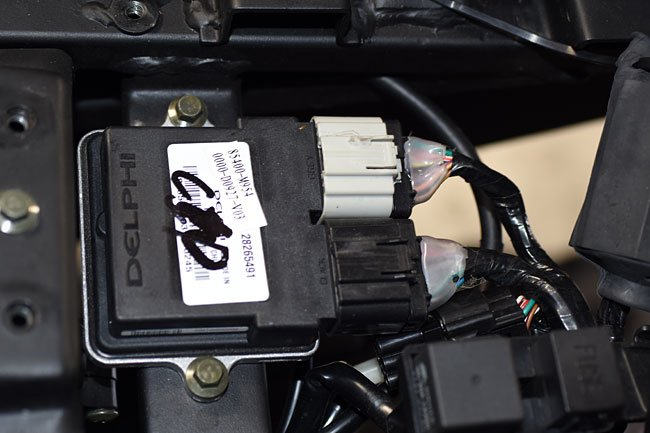
The ECU controls the fuel injection system and the engine’s electrical management.  The ECU is located directly beneath the cover under the rear seat.

Electrical_0011-650

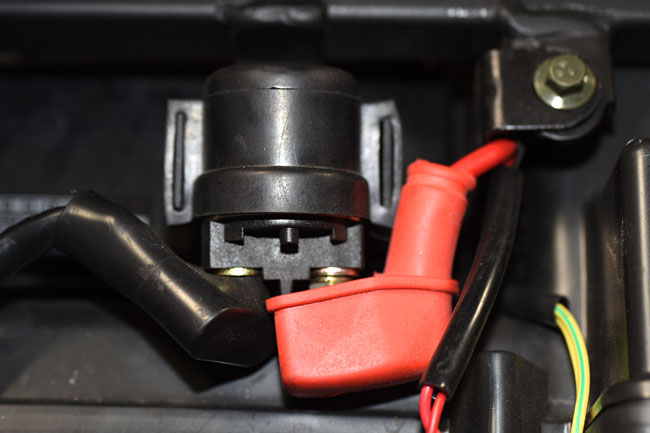
The starter relay is located under the rider’s seat to the left of the battery.   If the motorcycle doesn’t start at all, I’d check here and I’d check the battery.  If it cranks but has difficulty cranking, look for corrosion on either the battery terminals or the starter relay terminals.

Electrical_0004-650

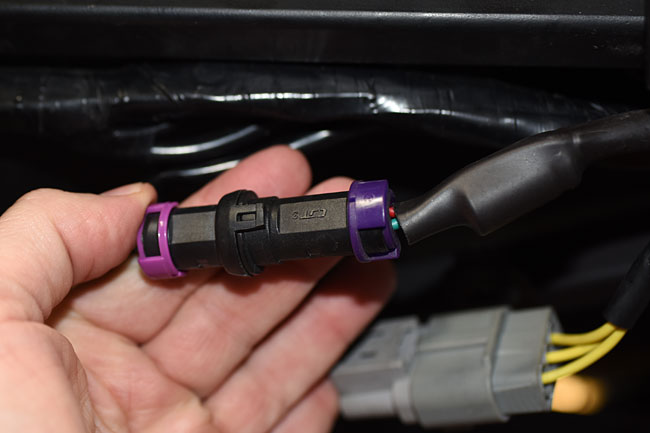
This next electrical connector (the one with purple edges) is located under the rider’s seat outboard of the left side of the frame.   This circuit provides energy from the voltage regulator to the battery.  If this connector is not mated properly, the motorcycle will not charge the battery (don’t ask me how I know this).   When you’re working on the air cleaner, you’ll most likely have to hold this connector out of the way to get the air filter out of the motorcycle.   You need to be careful that you don’t pull too hard on the wires going into this connector such that the connector contacts separate inside the connector.   If I ever found myself in a situation where the battery is good but it’s not charging, this would be the first place I’d look.

Electrical_0006-650

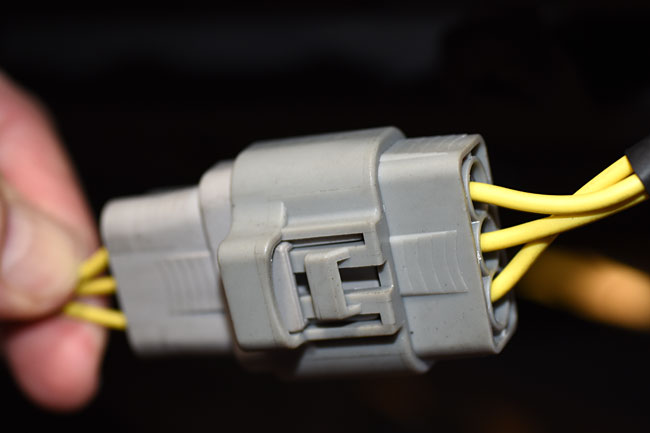
This electrical connector is the main electrical connector from the stator to the voltage regulator.  It is located under the rider’s seat outboard of the left side of the frame.   If this connector is not mated properly, the motorcycle will not charge the battery.

Electrical_0008-650

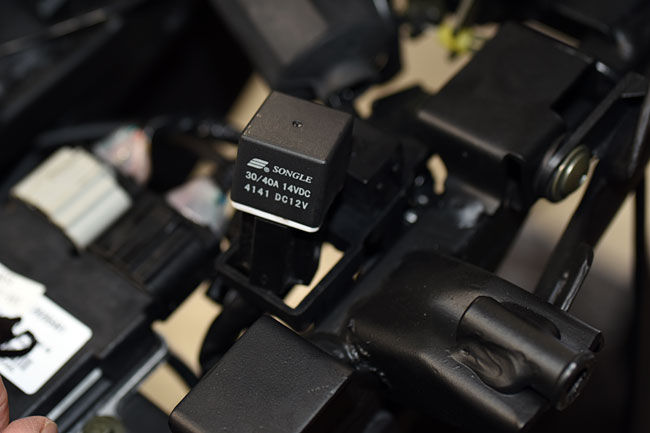
Here’s the relay that controls power to the fuel pump.   It is located under the plastic cover under the passenger seat, inboard of the frame, in front of the 15A fuse box on the left side of the motorcycle.  You can get a better feel for its location by examining the photo above that shows all of the components under the seats.

Electrical_0012-650

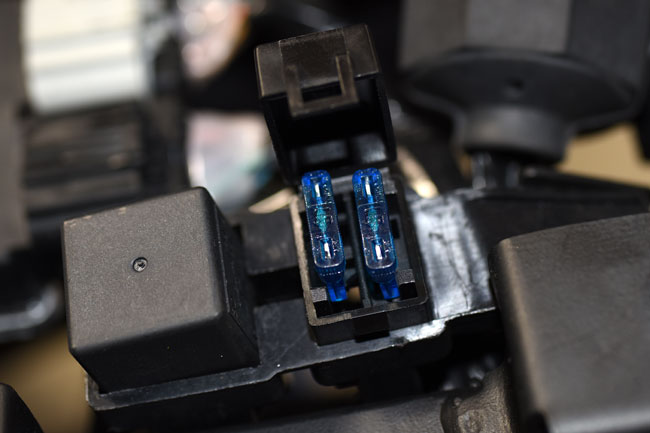
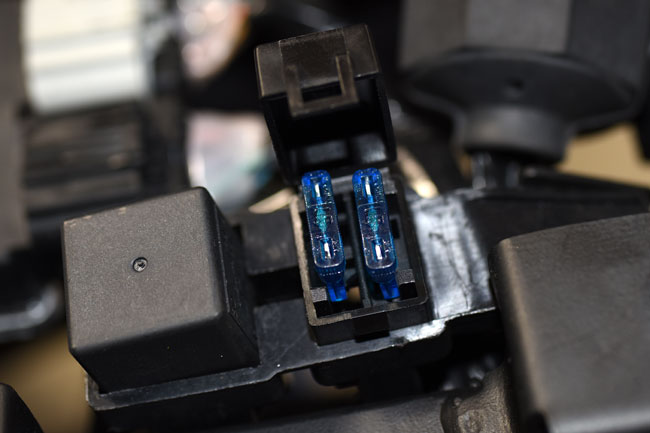
The motorcycle’s two 15A fuses are in a fuse box located under the plastic cover under the passenger seat, inboard of the frame, on the left side of the motorcycle.   One fuse is a spare; the other is the fuse for the ignition and the fuel pump.  This is pretty cool feature (having a spare fuse).  I’ve had other bikes that did not have a spare fuse, and I’ve had instances where the fuse opened and left me high and dry.  If you turn the bike on and don’t hear the fuel pump pressurizing the system, this is a good place to start looking.  If the fuse is blown, find the source of whatever caused it to open before you plug in the spare fuse, or you’ll probably just blow the spare, too.

Electrical_0015-650

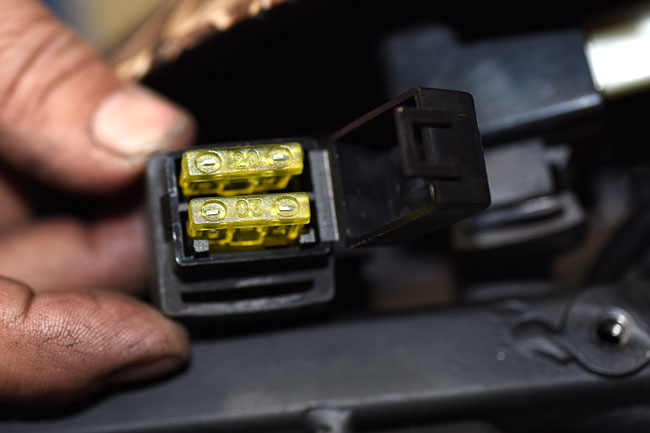
The motorcycle’s two 20A fuses are in a fuse box located under the plastic cover under the passenger seat, inboard of the frame, on the right side of the motorcycle.   Same deal here, boys and girls:  One fuse is a spare; the other is the fuse between the battery and the rest of the motorcycle.   If this fuse is open, no power is provided to anything on the motorcycle.   If your motorcycle is just flat dead, first check the kill switch on right handlebar first to make sure it’s in the run position (you have no idea how many phone calls we get from people telling us their bikes are dead, we ask them to check the kill switch, they disappear for a minute, and then they come back with an embarrassed “never mind…”).   If the kill switch is in the run position and the battery is good, this fuse would be the next place I’d go.

Electrical_0019-650

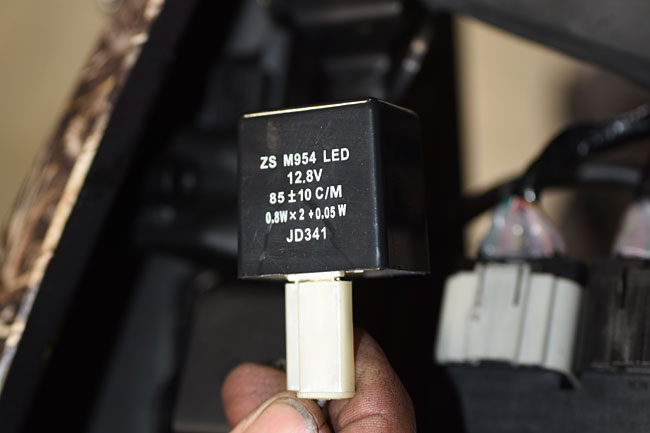
This small processor controls the motorcycle’s turn signals.    It is located under the plastic cover under the passenger seat, inboard of the frame, on the right side of the motorcycle behind the main fuse.  If your flashers conk out, this would be a good place to start looking.

Electrical_0022-650

That’s it for now, folks.  It’s a nice day out, I haven’t ridden our styling exercise SuperMoto yet, and Richard has it ready to go for me…

DSC_0618_0021-650

Time to do some shredding….


Posted in CSC Motorcycles | Comments Off on CSC RX3 Electrical System Tutorial

Newbies!

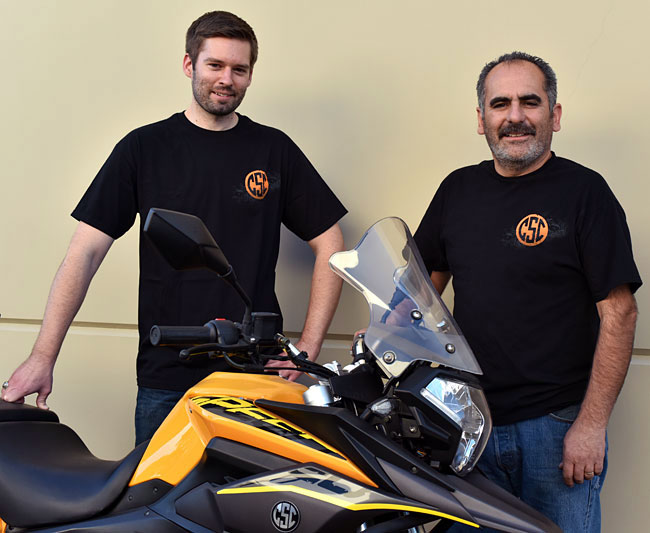
Folks, meet the latest editions to our CSC family!  Allow me to introduce you to Ryan Sarancha (on the left) and Richard Cota (on the right)…

Misc_0022-650

Let me tell you a bit about Richard first.   Richard is a good guy and I’m here to tell you, he’s a mechanical and electrical genius.   I met Richard when he recently joined the CSC team, and I am already mightily impressed.

rc_0008-650

We’ve had a lot of positive comments all over the Internet about our online maintenance tutorials, and some folks have even gone as far as to thank Steve and me.   Guys (and I use the term “guys” in a non-gender-specific sense), I’m just the scribe and the button-pusher.  All of what you’ve seen in the maintenance tutorials comes from Richard…he’s the guy who walked me through what he was doing and explained everything along the way.

Richard is a California native who has been around high performance motorcycles and cars his entire life.   Like many of us, he started wrenching and riding as a youngster.   He’s a Honda, Ford, and Chrysler certified technician, and he holds similar credentials from Bosch for European vehicles.  Richard has been a chief mechanic for Baja race teams, he’s the crew chief for an NHRA top fuel dragster, he ran his own shop (R&R Cycles) for 18 years, and he worked with Trinity Racing developing off-road performance products.  Folks, Richard knows his stuff and he knows it well.   We’re lucky to have him on the CSC team.

Ryan Sarancha is a guy I’ve known for a while…about 10 years, actually.   He’s the newest addition to the CSC sales team with an encyclopedic knowledge of motorcycles.

372-650

I first met Ryan at a cycle shop when I needed tires, and he impressed me immediately.  Ryan is low key, articulate, he knows his stuff, he’s not pushy, and he always took the time I needed to clearly explain to me different products’ advantages and disadvantages.  Over the next 10 years, I bought jackets, batteries, tires, air filters, and a bunch of other things from Ryan, and I picked up a lot of free advice in the process.   I’ll take a minute to brag here:  When Steve said he needed more people, Ryan was the very first person I thought of, and I was the guy who introduced him to the boss.

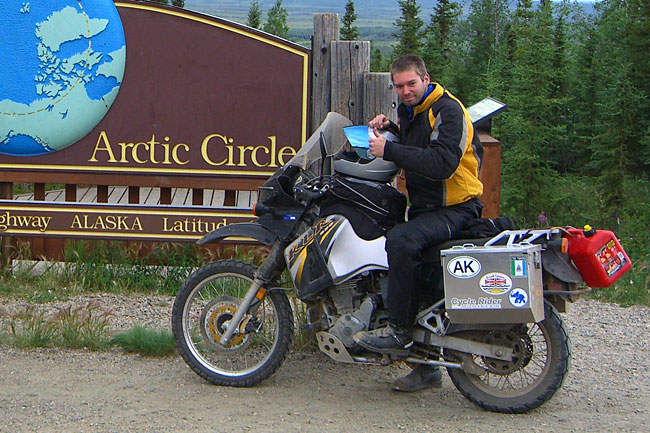
Ryan is one of us; he’s been a motorcycle enthusiast for most of his life.  What I especially like about Ryan is that he’s the real deal.   A few years ago, he bought a KLR and proceeded to fully set it up for a ride up to (get this) the Arctic Circle in Alaska.   Wow, a real bucket list trip and a real adventure rider!   Ryan explained to me that the capstone of that trip was a 23-hour Iron Butt ride from Seattle to Los Angeles.   I don’t know about that being the capstone…Ryan told me about a close encounter with a bear that sounded pretty exciting!  Whether racing motocross, adventure touring, cutting laps at Willow Springs, or commuting to work, Ryan takes every opportunity to get on a motorcycle.   Like all of us, he’s looking forward to his next adventure on a CSC RX3.


Posted in CSC Motorcycles | Comments Off on Newbies!

16-35, the Germany, Baja, and more

The Germany (the container ship with our bikes) is parked a few hundred miles out to sea off the coast of Long Beach.   She’s here, but she’s waiting her turn for a berth in the harbor (there’s still a backup from the dockworker strike).   As soon we have more info on when the bikes will be unloaded we’ll post it.

We’ve had lots of questions about the Supermoto RX3…I haven’t ridden it yet but that may change this morning if I can get some relief from this hayfever.   It doesn’t usually bother me out here in California.   The operative word, I guess, is “usually.”   We had a sudden shift in temperature (it went from the 40s last week to being in the high 80s this week) and that has put a lot of pollen in the air.  I’m up typing this blog at 2:00 a.m. because it was bothering me enough that I couldn’t sleep.  Our favorite ride, Glendora Ridge Road, runs right through one of the premier wildflower nature preserves in the US.  It’s beautiful right now, but the pollen it generates is not.

As soon as we get a confirmed date for getting the bikes off the boat, I’ll nail down a Baja date and post it here.   There’s lots of interest.  I have some time during the next couple of weeks, and if things work out, I may just take one of the test mules on a pre-run down there to check the route, the hotels, etc.  It would be a good opportunity to grab a few photos, too.

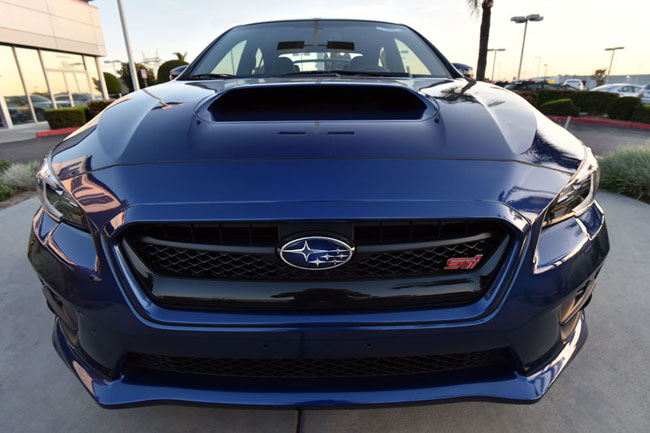
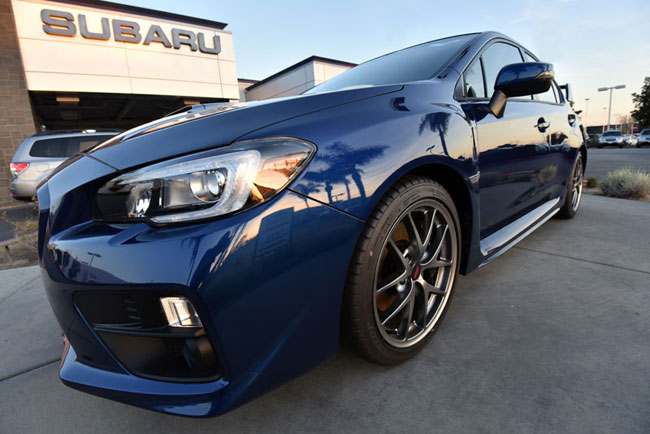
Speaking of which, I picked up a new wide angle lens…it’s 16-35 zoom, and that 16mm at the low end is pretty darn cool.   UPS just delivered it yesterday, so when I stopped by the Subie dealer on the way home I grabbed a couple of shots of the new WRX STI…

NewSubies_0023-800-650

NewSubies_0026-800-650

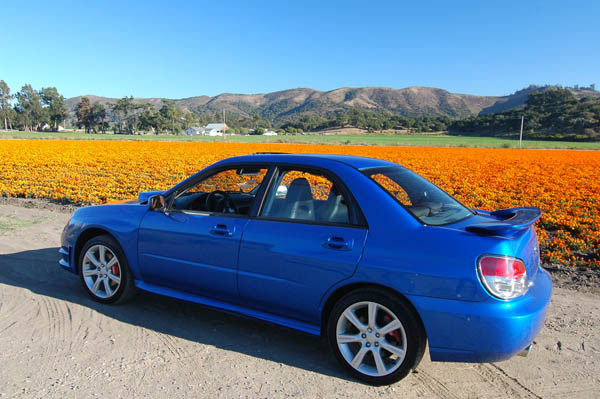
I’m selling my ’06 WRX.   It’s been a good car but I have too many toys and with another motorcycle about to find a spot in my garage (my very own RX3), it’s got to go.   Here’s cool shot of the ’06 that I grabbed 8 years ago near a California marigold farm…

WRXSubyMarigolds1

The Subie served us well, but it’s time to make room and lessen the motor vehicle and insurance fees.   The WRX is out and the Cyclone is in.  I’m as excited as you are about getting my new motorcycle, and believe me, I want to see these bikes off the Germany and into our plant as quickly as possible.

We’re finalizing the RX3 Service Manual (you know you get a free copy when you buy a new Cyclone from us), and it’s looking good.   We’ll be putting the finishing touches on that this week.

Electrical_0015-650

We’ve got some exciting stuff coming up on the blog for you in the next few days…a couple of key staff additions (really great guys we want you to know about), a tutorial on setting the clock on your new RX3, a tutorial on the RX3’s electrical components, a few guidelines for the Baja trip, another motorcycle magazine coming over to test ride the RX3, and more.

Ride safe and stay tuned, my friends…Baja beckons!


Posted in CSC Motorcycles | Comments Off on 16-35, the Germany, Baja, and more

A CSC styling study…

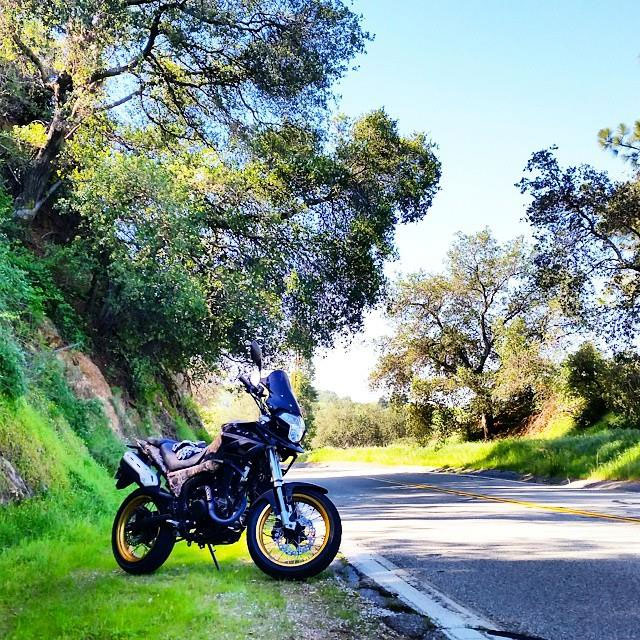
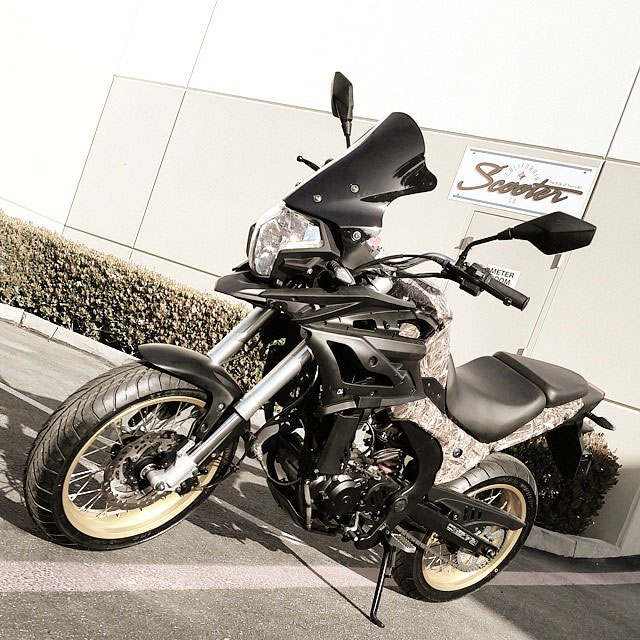
Several of you have asked about the gold anodized wheels that have appeared in a couple of recent maintenance tutorials.   We have styling studies and accessories activities going on literally all the time, and one of the things we’ve been playing with is an accessories package for an RX3-based Motard bike.   So, here’s the deal…we’ll share these photos with you but you have to promise not to deluge us with phone calls about when you can buy the bike, when the accessories will be available, etc.   This particular bike is not for sale, and it will be awhile before the wheels and other bits are available.   But the wheels and accessories are coming, boys and girls, so keep an eye on the blog.

JW1

JW2

JW3

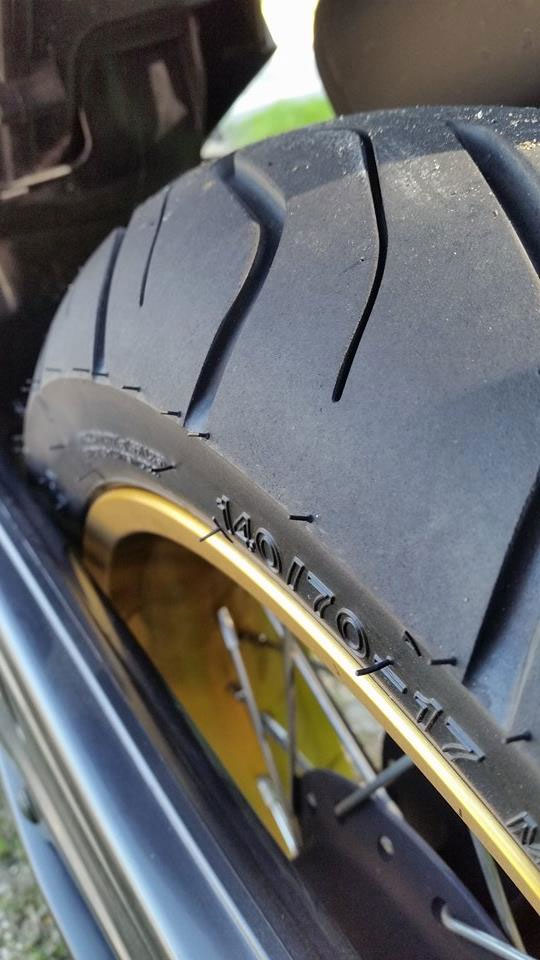
The bike you see above is another one of Steve’s inspirations, and we had Joel, one of our young test riders (whose skills are way better than mine) wring it out in the mountains this morning.    Joel grabbed these photos on his ride earlier today, and based on the quality of his photographs, it looks like he might have me outclassed there, too!  Joel reports that the bike absolutely shreds and drags the pegs with ease, which is obvious based on the complete lack of chicken strips on the 17-inch fore-and-aft street tires.

Stay tuned, because there’s more to come on this, folks!


Posted in CSC Motorcycles | Comments Off on A CSC styling study…

Fork Maintenance

This tutorial, as the name implies, addresses fork maintenance.   We stock all parts for the forks, so whatever you need, feel free to call us at 909 445 0900 and we’ll ship whatever you want immediately.

The most common problem for any motorcycle’s forks would almost certainly be leaking fork seals, and in this tutorial we’ll show you how to get to and replace a fork seal on the RX3.

Some people change their fork oil periodically, but the labor involved is fairly significant and we don’t recommend changing the fork oil if you are satisfied with the front suspension or if you don’t have leaks.

Some people like to raise the forks in the fork yokes to change ride and handling characteristics, but we don’t  recommend that.

Finally, you may wish to use a higher viscosity fork oil to stiffen the front suspension; this maintenance tutorial will show you how to drain the oil and replace it with a higher viscosity oil.

Changing the Fork Oil

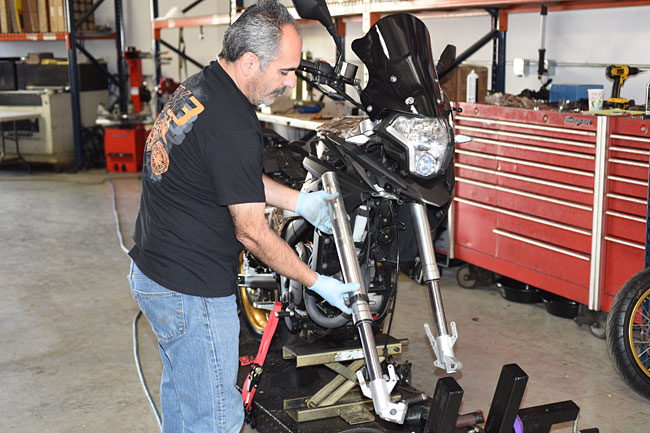
The first step in working on the forks is to remove the front wheel.   You can learn how to do that in our front wheel removal maintenance tutorial.   You will need to get the front wheel off the ground to do this.

After the front wheel has been removed, many people will loosen the fork cap (but just loosen the cap; do not remove it yet).  We advise loosening the upper fork yoke pinch bolts first if you want to do this.  Other folks like to loosen and remove the fork cap after the fork has been removed from the motorcycle (you can do this if you have an impact wrench, but it is difficult to do without an impact wrench once the fork is off the motorcycle).

The next step is to remove the speedometer cable from the right fork leg (if you are removing the right fork leg).   There’s a composite clamp that secures it.   Unscrew the clamp screw and detach the speedometer cable from the fork leg.
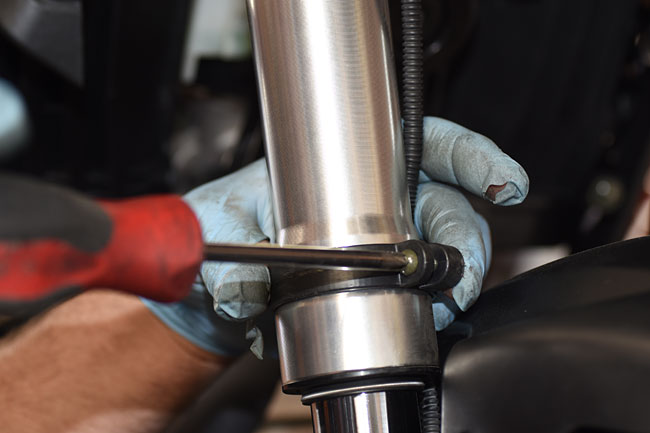
Forks_0009-650

Remove the front fender by removing the four bolts that secure it to the forks.   The front fender can be maneuvered through the forks so that it can be removed after the bolts securing it have been removed.
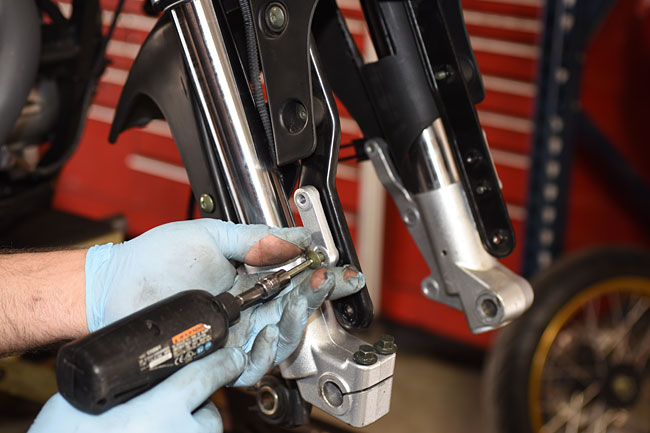
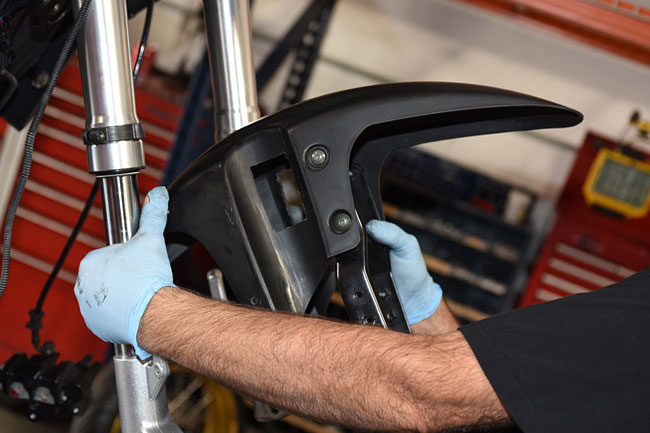
Forks_0019-650

Forks_0021-650

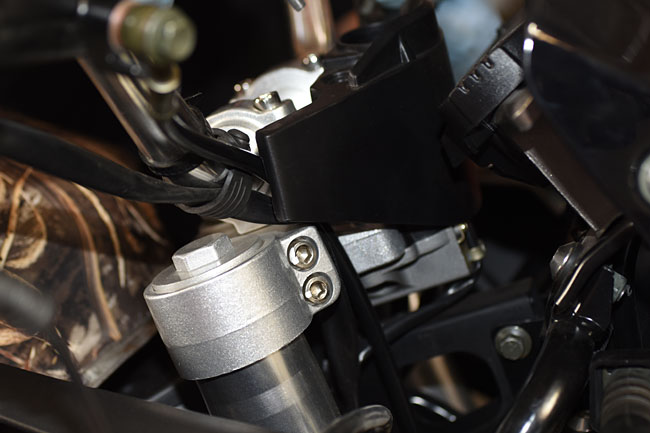
Remove the two bolts that secure the ignition switch shroud.    You need to remove the shroud to gain access to the upper yoke fork pinch bolts.
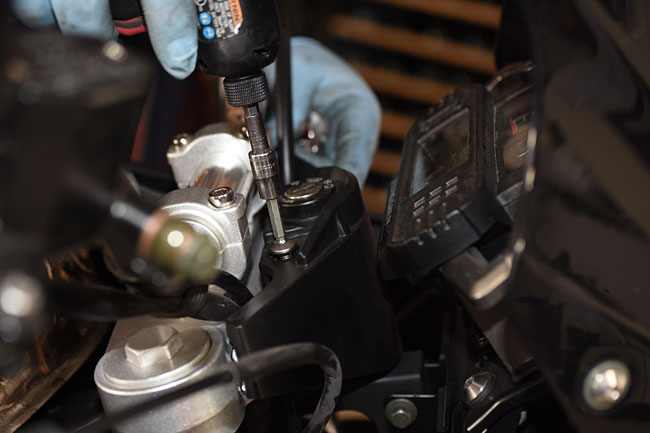
Forks_0002-650

Forks_0003-650

Loosen the two upper yoke pinch bolts if you have not done so already.   You don’t need to remove them; they just need to be loose.
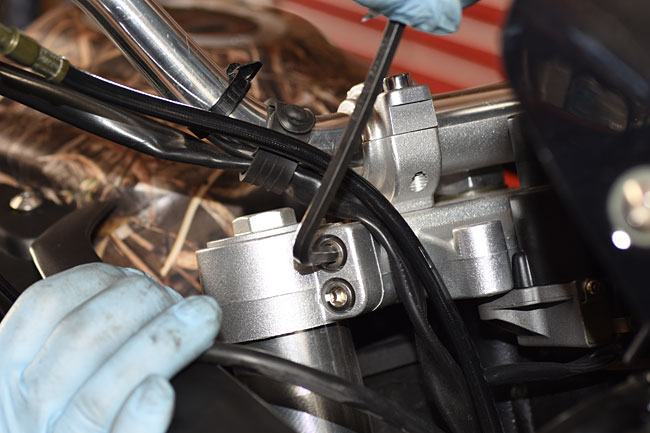
Forks_0025-650

The next step is to loosen the lower yoke pinch bolts, but you need to be prepared for the fork leg to drop as soon you loosen the last pinch bolt.   We recommend holding the fork leg with one hand while you loosen the last pinch bolt.  You can get to the lower yoke pinch bolts from beneath the body panels, and you don’t need to remove the body panels to gain access to the lower yoke pinch bolts.  We took them off for this tutorial only to make the parts more visible.
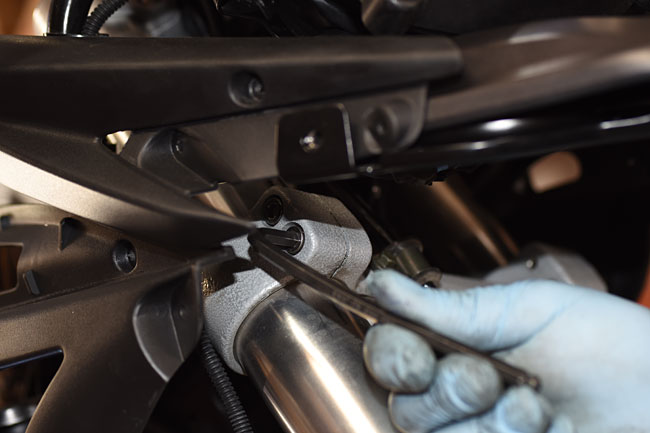
Forks_0024-650

Forks_0026-650

At this point, you’ll have the fork leg off the motorcycle.
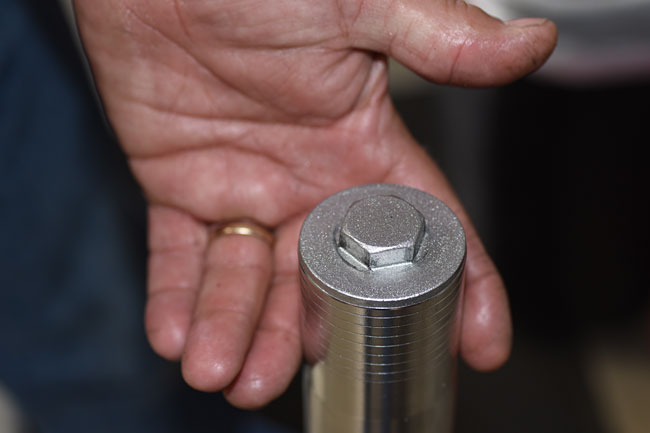
Forks_0027-650

Unscrew the fork cap from the fork.  If you did not loosen it first, as mentioned at the beginning of this tutorial, you will need an impact wrench to loosen it.
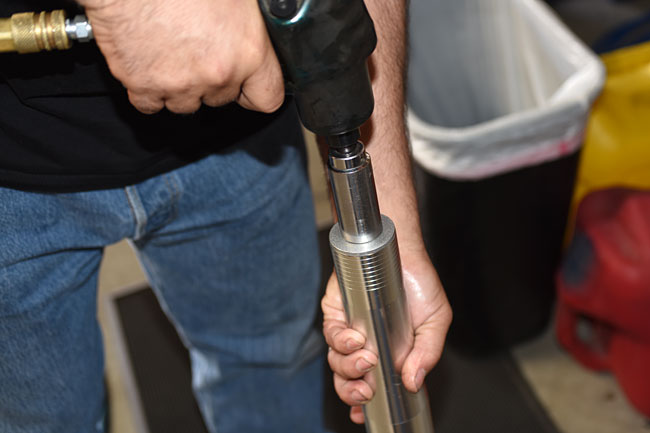
Forks_0028-650

While you are unscrewing the fork cap, and after you have unscrewed the fork cap, keep the fork in a vertical orientation as you see it in the photo below.  That’s because the fork contains oil, and if you tilt it, the oil will spill out.
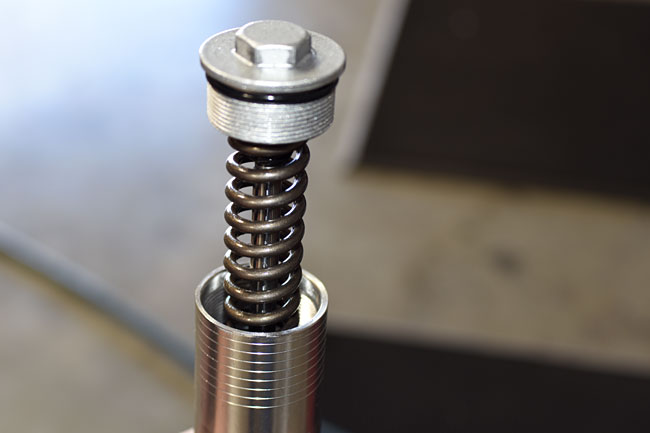
Forks_0030-650

Tilt the fork over a container and empty the oil in it.  Note that in this photo, we’ve already removed the fork cap and spring (that’s why you don’t see it in the photo).   When you do this at this  point in the disassembly process, the fork cap and spring will still be attached to the fork.   The fork cap will be fully unscrewed, but it will be attached the fork rod (as you will see in the two photos down).
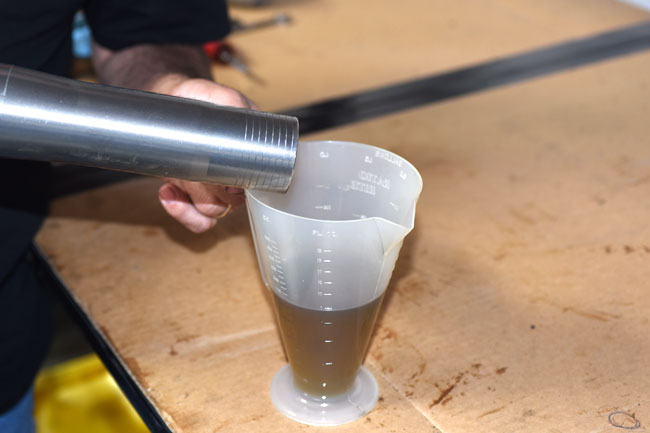
Forks_0035-650

Empty the fork oil into a suitable container for future disposal.

DragSpecForkOilSmall

Each fork leg contains 330 cc (or 11.2 US fluid ounces).   The fork oil that comes from the factory is a fairly light oil, which provides a comfortable ride.   At 210 lbs, I’m what some folks would call a full-figured rider, and I like the ride the RX3 provides as it comes from the factory.   Some people want a stiffer ride if they wish to ride the motorcycle more aggressively in the rough stuff.   You can stiffen the RX3’s front suspension by using a heavier weight fork oil.

At this point, if your fork seals are good (i.e., they were not leaking) and the only reason you took the forks apart was to change the fork oil, repeat the above process for the opposite fork.   Reassemble the forks in the same manner as they were disassembled, leaving the fork caps loose so that you can add new fork oil.  Add 11.2 ounces to each fork.   We advise using a funnel.

CSC stocks fork oils in various weights.  If you wish to stiffen your front suspension with a heavier fork oil, give us a call at 909 445 0900.  Ask to speak with Rich, our suspension specialist, and review your needs with him.   Rich is a real expert in this area and he’ll get you dialed in with the fork oil that will best meet your needs.

Repairing a Leaking Fork Seal

The other common fork maintenance action is repairing a leaking fork seal.   If the fork seal leaks because it was damaged by grit or some other attributable cause, you probably need to only replace the leaking seal.   If the seal started leaking due to age-induced degradation, it’s a good idea to replace the seals on both sides of the forks.  If one leaked due to age-induced degradation, the other is likely to start leaking soon.

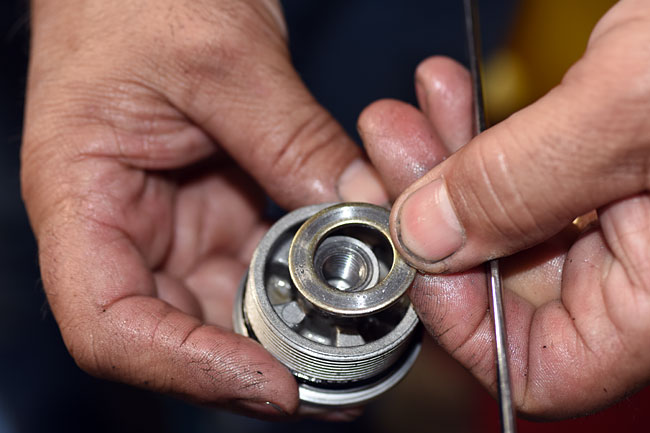
Put a wrench on the bolt head inside the fork spring, and unscrew the fork cap from the fork rod that runs though the center of the fork spring.
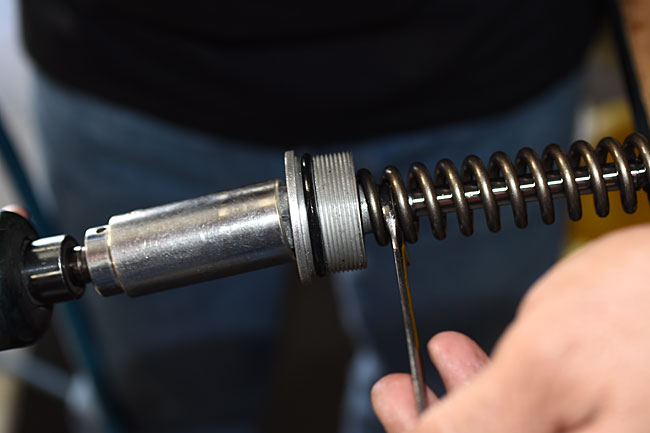
Forks_0031-650

The fork cap and its washer will separate from the fork rod.
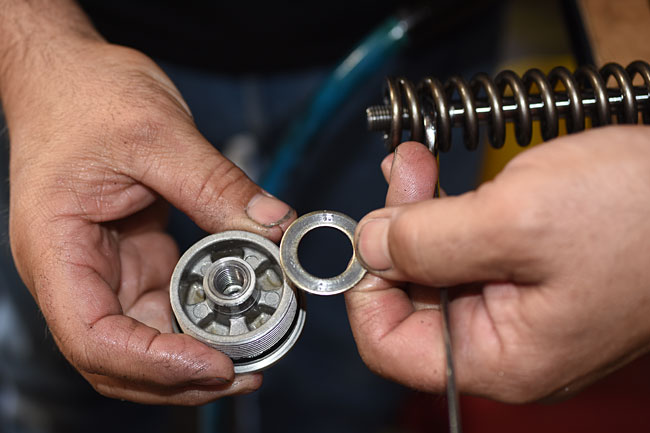
Forks_0032-650

Forks_0033-650

Pull the fork spring completely out of the fork.   Note that the fork spring is a compound spring.  The more tightly wound coils always go toward the lower end of the fork, as you see in the photo below.
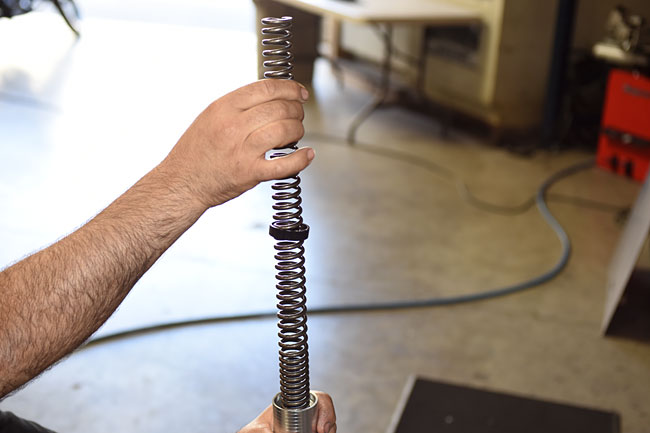
Forks_0034-650

At this point, put a shop rag or a paper towel in the opening at the top of the fork (where the fork cap was).    There will still be residual oil in the fork and this will keep it from making a mess.
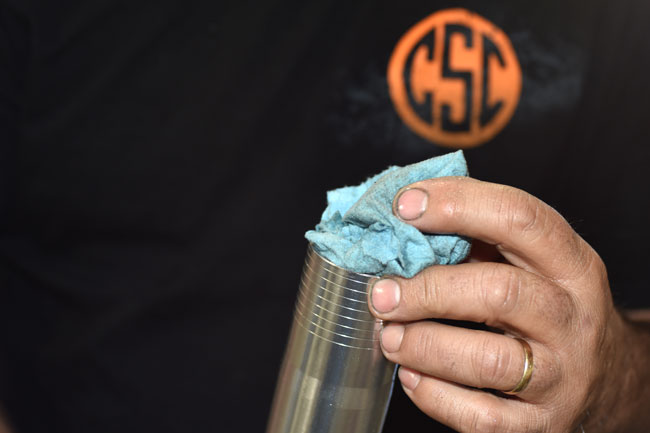
Forks_0036-650

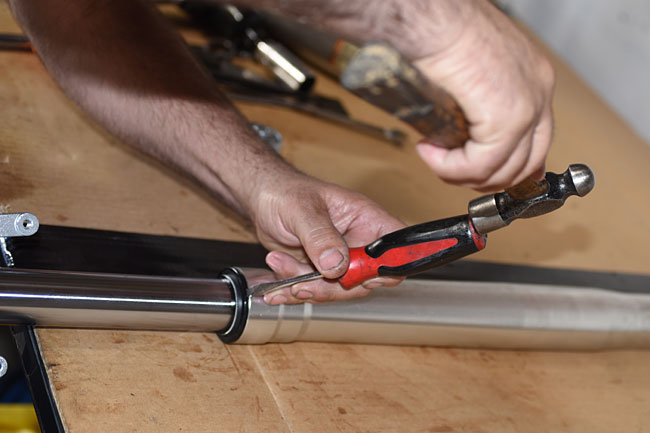
The next step is to remove the dust seal, and this calls for a light touch.  Use a fine bladed screwdriver (or something similar) and gently tap the dust seal away from the fork upper tube.   Work gently around the periphery of the dust seal, as you see Rich doing in the photo below.   If you get careless here and gouge the fork or damage the dust seal, you’ll need to replace those parts.
Forks_0038-650

Forks_0039-650

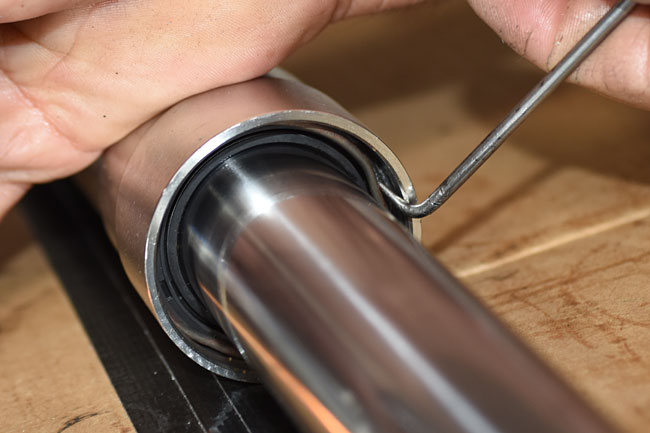
Once the dust seal has been removed, you need to reach inside the fork upper with a pick.  You’ll see a raised area in the clip that secures the fork seal in place.  Gently place the pick inside the raised area of the clip, and push inward and toward the opening.   The clip will release.  Remove the clip from the fork.
Forks_0041-650

Forks_0043-650

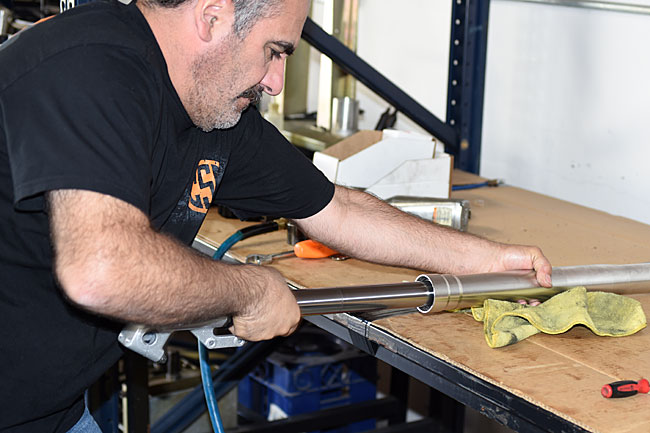
Now we can pull the fork lower out of the fork upper.   This is not easy.   What you see Rich doing in the photo below is using the fork lower as a jack hammer.   Pull it sharply away from the fork upper while holding the fork upper.  You’ll have to repeat this several times to get the fork lower out of the fork upper.
Forks_0047-650

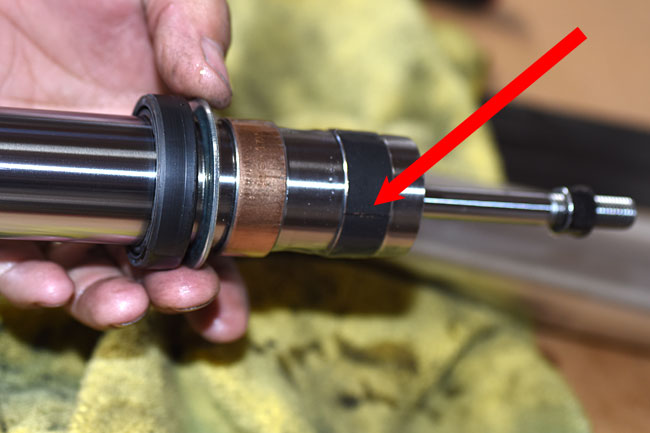
After you have separated the fork lower from the fork upper, it will look like this.  Note that there are two circular flat clips around the diameter of the fork lower.  These are slider bearings; one is black in color; the other is bronze.  These keep the fork centered in the tube.  Each bearing has a slit in it to allow expanding the bearing so that it can be removed from the fork lower.  The red arrow points to the slit in the upper bearing.  It’s barely visible and it is a fine slit.
Forks_0049-650

Here’s another photo showing the slits in both bearings.
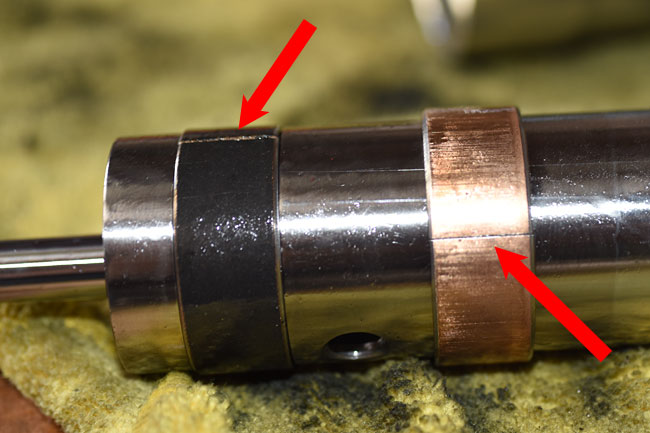
Forks_0053-650

The upper bearing (the black one) rests in an annular groove machined into the fork lower.   We have to expand this bearing diametrically to get it off the fork lower.   Rich did this using a very fine-bladed screwdriver (the one on the right in the photo below) to start the expansion process.  Once he opened the bearing a tiny bit with the fine-bladed screwdriver, he inserted a larger screwdriver.  This allowed expanding the bearing so that it could get out of the fork lower machined annular groove and off the fork lower.   Don’t carried away with this expansion.  The trick is to expand the bearing just enough to get it out of the groove.
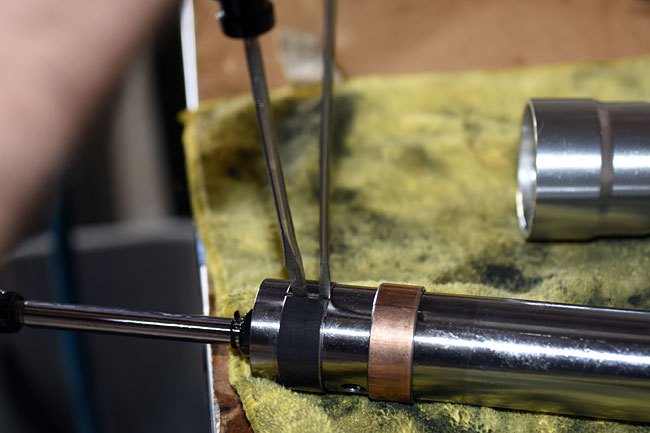
Forks_0055-650

Forks_0057-650

After getting the upper bearing off, slide the lower bearing off.
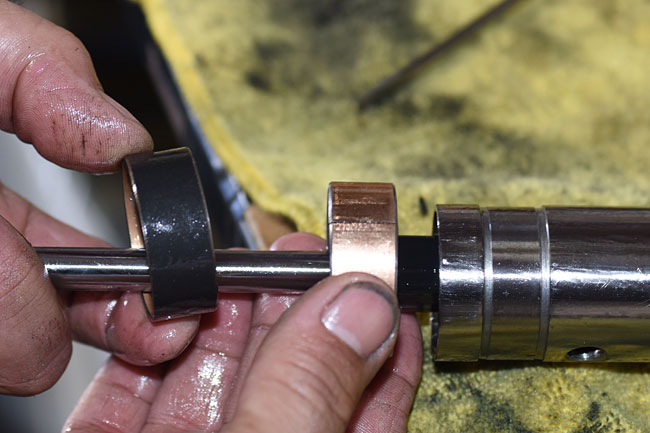
Forks_0059-650

At this point, the fork lower will look like the photo below.
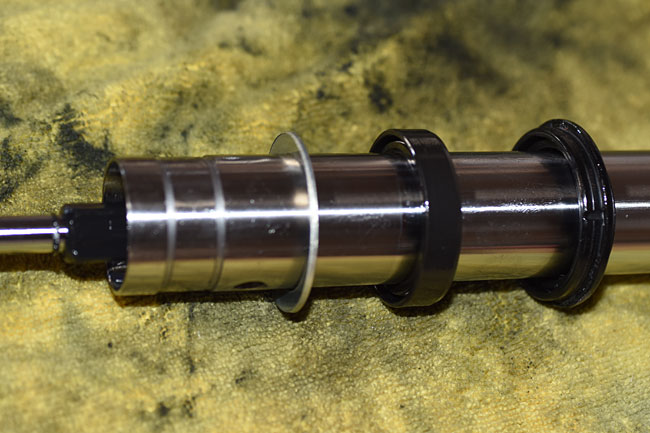
Forks_0062-650

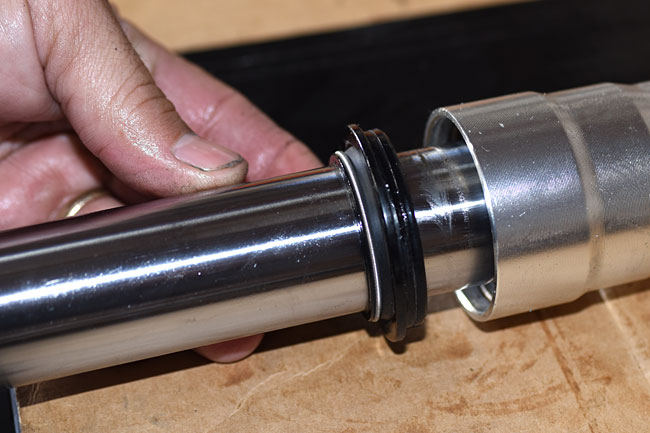
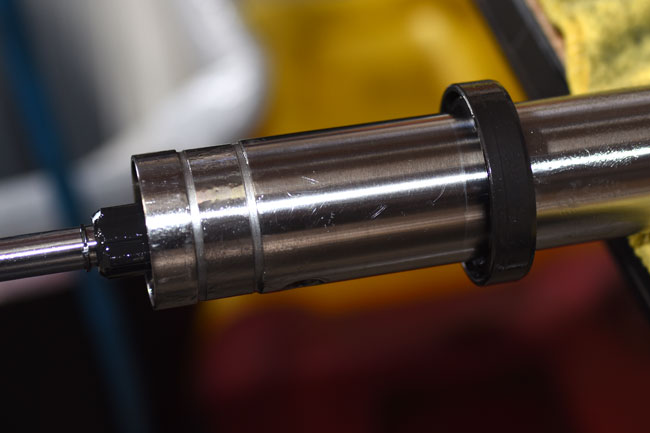
We’re almost done, but not quite.  The challenge now is to get the fork seal over the annular groove without damaging it.  If the seal is leaking and we already know it is defective, we don’t care about getting the fork seal off without damaging it (we’re going to replace it anyway).  But if we are taking the forks apart for any other reason, we need to be careful.   We similarly need to be careful when installing a new seal.   Those edges are sharp, and if we’re not careful, we’ll damage the new seal and have to start all over again.  Some folks use thin plastic (e.g., from a baggy) to cover the annular groove’s edge when removing or installing a new fork seal.  Another suggestion from one our customers is to use electrical tape to cover the annular groove while sliding the seals off of the fork leg.
Forks_0060-650

After removing the fork seal and the dust seal, examine both carefully for any cuts, tears, or degradation.   If there’s even a hint of damage, replace the defective part.   You should also examine the fork lower (which is the part that slides through the dust seal and the fork seal).  If there are any scratches, gouges, or surface imperfections on the portion of the fork lower that slides through the seals, you need to either polish the imperfections out or replace the fork lower.  If you don’t, you’ll just create another leak.

Assembly is the opposite of the disassembly procedure.    After you’ve reassembled the forks, make sure all fasteners are tightened in accordance with the torque table in the CSC RX3 Service Manual torque specification table.

There’s a fair amount of work involved in fork repair (this is one of our longer maintenance tutorials), but it’s a lot less expensive doing it yourself.   And my guess is you’ll reach the same conclusion I have when working on these motorcycles.   We’ve posted 10 or 11 maintenance tutorials now, and one of the things that has impressed me greatly with the RX3 is just how fine a motorcycle it is.   The quality of the internal parts is just awesome.   I used to run factories and machine shops making high performance military aircraft and weapons systems, and the workmanship exhibited in the RX3 is every bit as good as what we built for the US Department of Defense.

Like always, when you finish servicing your motorcycle, go for a ride.   You’ll feel better, secure in the knowledge that your forks were serviced correctly.

 

Posted in CSC Motorcycles | Comments Off on Fork Maintenance

Front Wheel Removal

I’ve received emails asking about more detailed instructions on front wheel removal.   We covered rear wheel removal with our tutorial on fixing flats, but not front wheel removal.   Hey, you speak, we listen, and here we go!

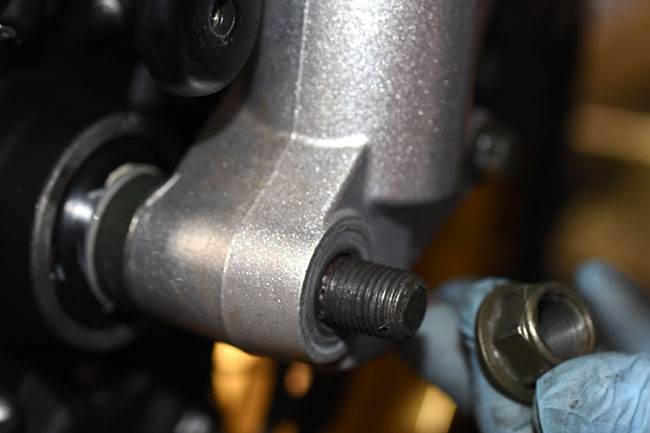
The first step in removing the front wheel is to remove the front axle bolt.  It’s on the left side of the motorcycle.  The axle won’t come out yet (it’s secured by the pinch bolts on the right side of the motorcycle).

Forks_0004-650

Forks_0005-650

The next step is to lift the front end of the bike off the ground.   If you have our accessory centerstand, the front wheel will be off the ground when the bike is on the centerstand.   If you do not have a centerstand, you need a bike lift or some means of safely lifting the front wheel off the ground.

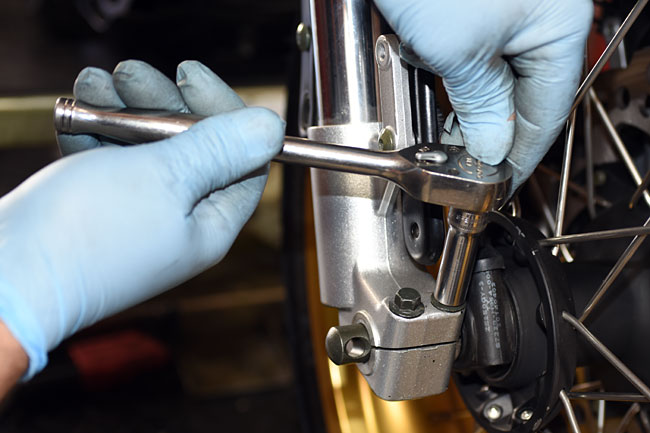
Once the front wheel is off the ground, loosen the two pinch bolts on the right side of the motorcycle.  You don’t need to remove them; just loosen them.

Forks_0006-650

Forks_0007-650

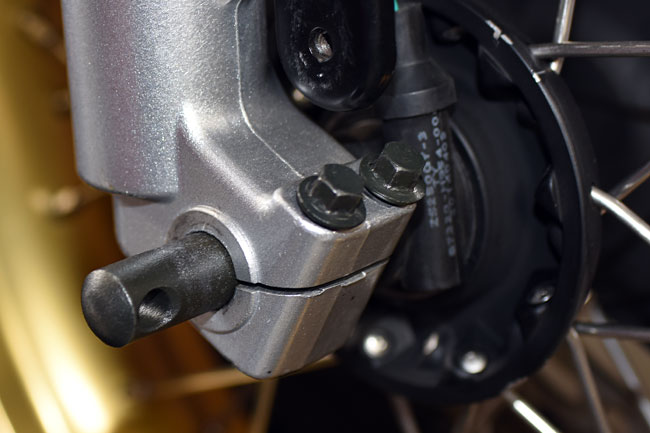
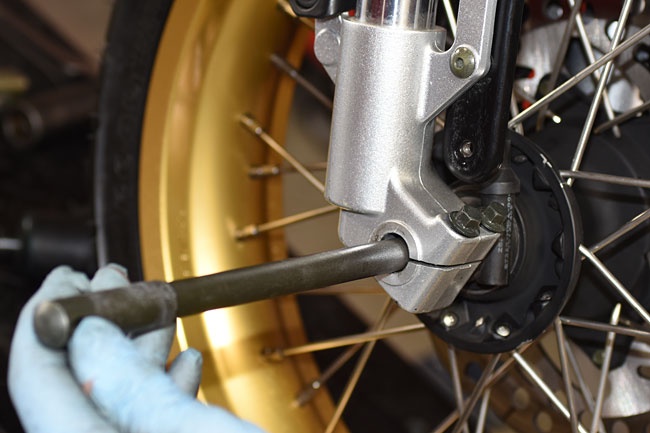
Slide the front axle out on the right side of the motorcycle.

Forks_0008-650

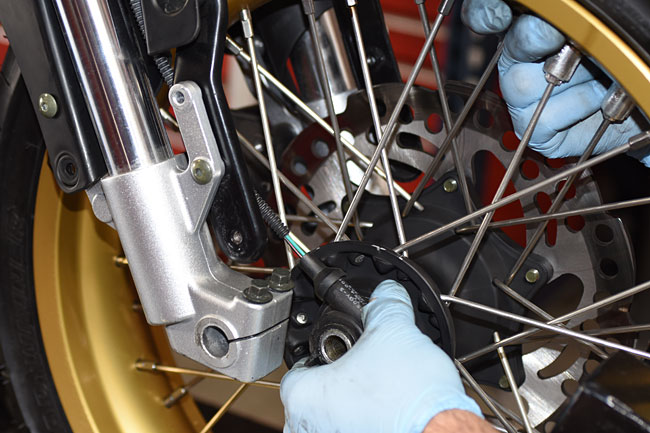
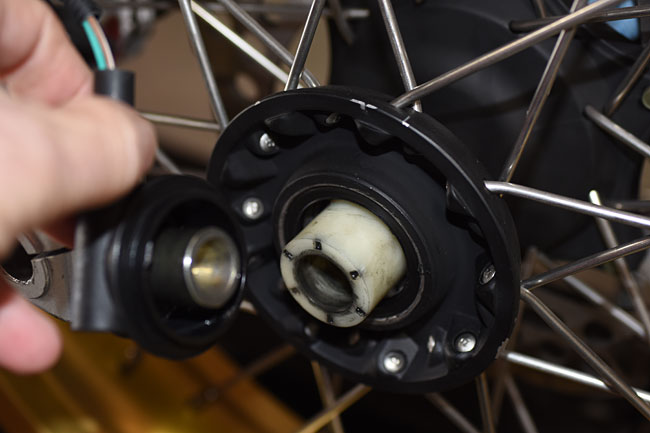
Roll the front wheel forward a short distance and remove the speedometer drive from the right side of the front wheel hub.

Forks_0011-650

Forks_0013-650

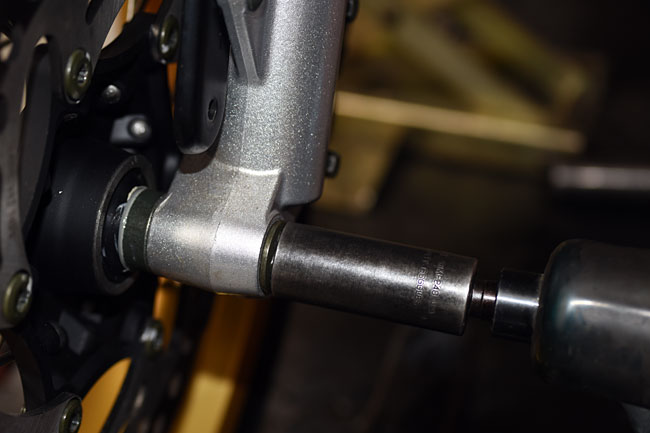
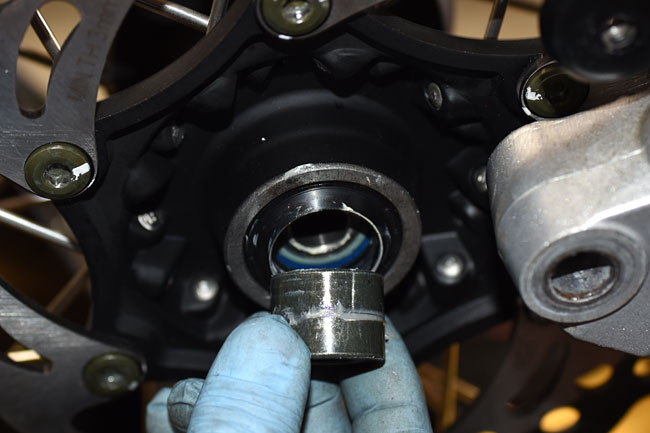
You can now remove the front wheel.   Note that there is only one bushing, and that is installed on the left side of the front wheel hub (it is captured between the left fork and the wheel hub).

Forks_0014-650

Front wheel installation is the reverse of front wheel removal.   A word of caution:  When reinstalling the speedometer drive unit, make sure that the tab in it fits into the slot on the front wheel.

One more note:  I’ve been using one of our test mules for a few of these tutorials, and several of you have written to ask me about the gold anodized wheels.   We’re working the RX3 accessories line, and these are wheels we have in the development process.   They are not yet available, so bear with us.  As soon as they are, we’ll post info right here on the blog.

A few others have suggested we include torque specifications.   We’ll have a torque table in the RX3 Service Manual, and as those of you buying a bike already know, that’s a freebie.   You buy a bike from us and you get the Service Manual for free.

Time to go for a ride, folks!


Posted in CSC Motorcycles | Comments Off on Front Wheel Removal

Air Filter Maintenance

This maintenance tutorial is on getting to and cleaning the RX3 air filter.   You should clean the air filter every 2000 miles, or more often if you ride in dusty environments.

The first step is to remove the seats.   You might be able to get the air filter out with the seats in place, but it’s a lot easier if the seats are off the bike.  The rear seat pops off using the keyed seat release in the left side body panel.  The front seat is secured with two bolts at the rear.

Remove the left side body panel.   The RX3 now has a two-piece left body panel, which makes air filter removal far simpler than it was with the original one-piece left body panel.

_DSC0067

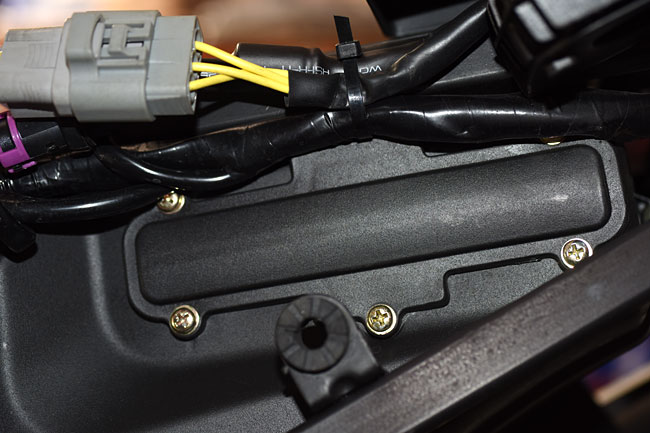
Once the body panel has been removed, you’ll have access to the air filter cover.   You will have to hold the electrical harnesses away from the cover to gain access to the five screws securing it.  Take care not to pull on the harnesses, as this can break the electrical connections.

Airfilter_0002-650

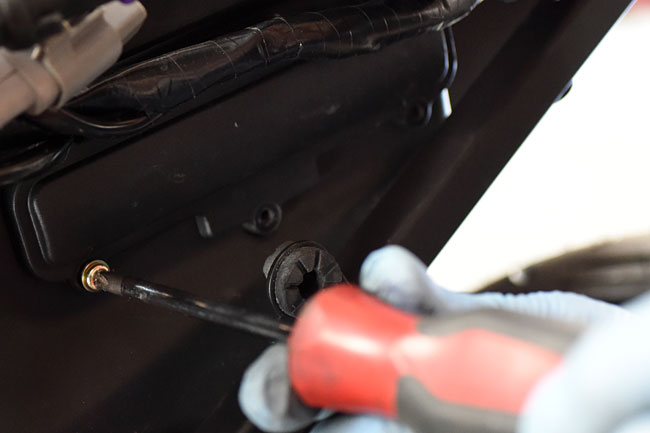
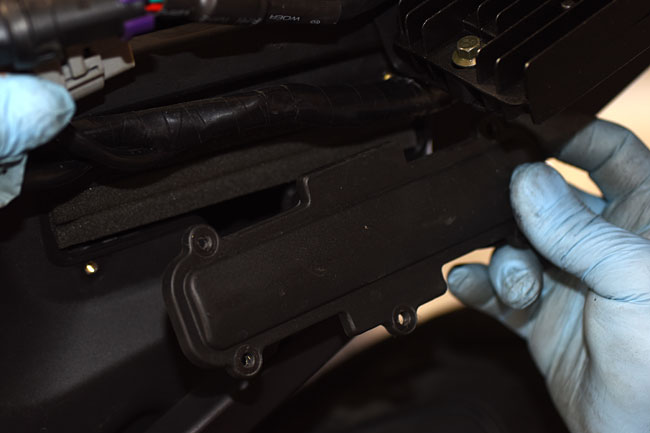
Remove the five screws securing the air filter cover and remove the cover.

Airfilter_0006-650

Airfilter_0007-650

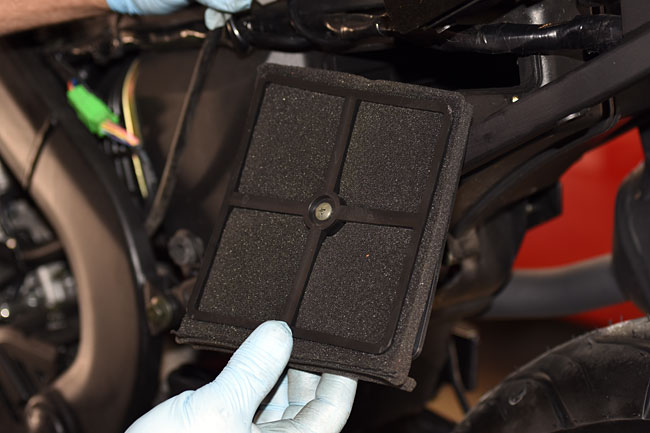
After removing the air filter cover, remove the air filter element subassembly by pulling it out.

Airfilter_0008-650

Airfilter_0012-650

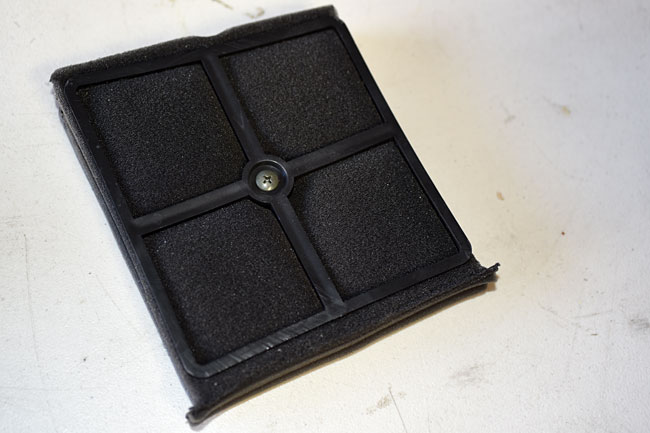
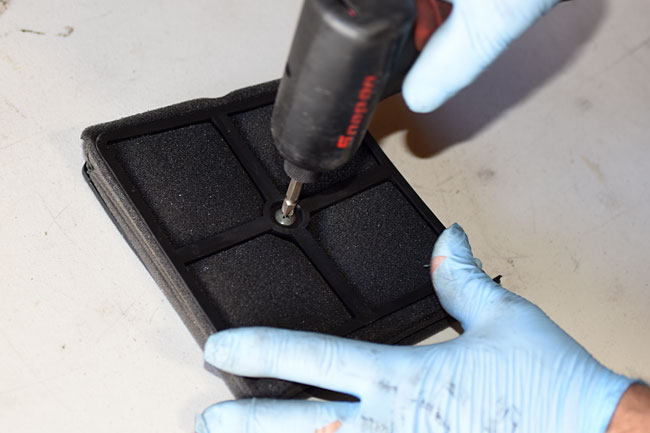
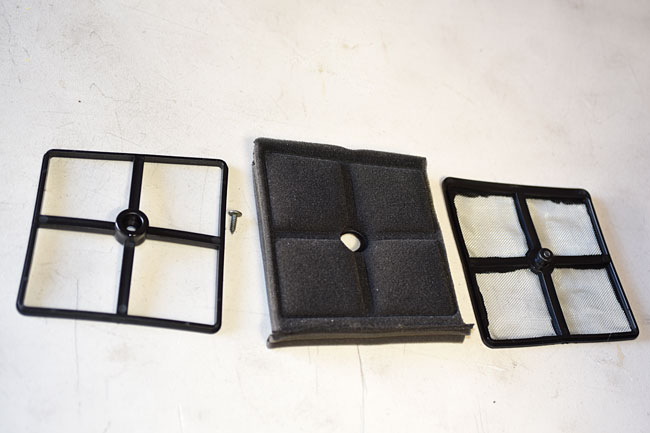
The air filter element subassembly consists of four pieces (the lower screen, the filter element, the upper frame, and the screw that holds these three items together.   Remove the screw to separate the four pieces.

Airfilter_0013-650

Airfilter_0014-650

Airfilter_0015-650

Airfilter_0016-650

Drag-Air-Oil-250The filter element is a serviceable item.   We recommend washing the air filter element in a solution of Simple Green and water.

After washing the air filter element, allow it to dry completely.
After the filter has dried, apply a light coat of air filter oil.   We recommend Drag Specialties oil for this purpose.   You can purchase it from us by calling 909 445 0900.

After repeated washings, or if the air filter element ages, it will ultimately need to be replaced.   If you need replacement air filter elements, again, please give us a call and we’ll be happy to send them to you.

After washing and oiling the air filter element, reassemble the filter element subassembly.  Reinstall the air filter subassembly in the motorcycle, reinstall all components, and you are good to go.
One final word…some folks mistakenly believe their motorcycles will perform better if they take the air filter out.   Maybe that sort of thing made a difference 40 years ago or more, but the RX3 will perform much better with the air filter in place, and the engine will last a lot longer.


Posted in CSC Motorcycles | Comments Off on Air Filter Maintenance